
The avocado (Persea americana) is one of the most beloved fruits worldwide, known for its creamy texture, health benefits, and culinary versatility. While avocados are readily available in markets, many plant enthusiasts and home gardeners enjoy the rewarding experience of growing an avocado tree from a simple seed. It’s an accessible, educational, and satisfying project that turns kitchen scraps into a thriving plant.
Although growing a fruit-bearing avocado tree takes patience — often years before it produces avocados — watching a seed sprout, root, and develop into a tree can be deeply gratifying. This article offers a step-by-step guide to planting an avocado seed, nurturing it through each growth stage, and creating optimal conditions for long-term success.
Understanding the Avocado Seed

At the center of every avocado fruit lies a large, oval-shaped seed. This seed contains all the genetic material needed to grow a new tree. Interestingly, avocado trees grown from seeds typically don’t produce fruit identical to the parent tree and may take 5–13 years to bear fruit. Nevertheless, the process of growing a seed into a tree remains popular for its simplicity and visual appeal.
Materials You’ll Need
To plant an avocado seed at home, gather the following supplies:
- 1 fresh avocado seed
- Toothpicks (3–4)
- A clear glass or jar
- Water
- Potting soil
- A plant pot with drainage holes (for later transplanting)
Step-by-Step Guide to Planting an Avocado Seed

Step 1: Remove and Clean the Seed
After enjoying your avocado, gently remove the seed. Rinse it thoroughly under lukewarm water to remove any fruit residue. Be careful not to remove the brown skin (seed coat), which protects the seed during germination.
Tip: Handle the seed carefully — avoid cutting or damaging it.

Step 2: Identify the Top and Bottom
Avocado seeds have a distinct top and bottom:
- The bottom (flat end) is where the roots will emerge.
- The top (pointed end) is where the sprout will grow.
Correctly positioning the seed is crucial for successful growth.
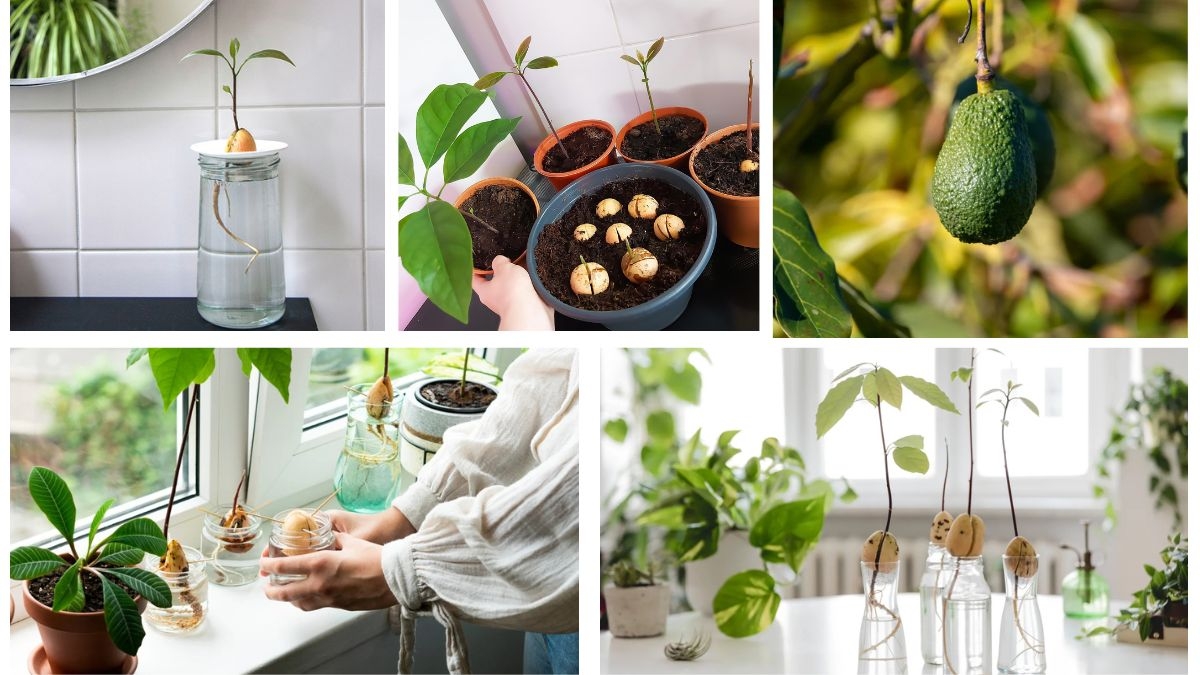
Step 3: Insert Toothpicks and Suspend in Water
Use 3 or 4 toothpicks to create a support system for the seed:
- Insert the toothpicks at a slight downward angle into the seed’s midsection.
- Balance the seed on the rim of a glass or jar with the flat end submerged in water and the pointed end facing upward.
- Ensure about one-third to half of the seed sits in water.
Step 4: Place in a Bright, Warm Spot
Position the glass in a sunny, warm location such as a kitchen windowsill. Avocado seeds thrive in temperatures of 18–25°C (65–77°F).
Tip: Avoid direct harsh sunlight as it can overheat the water and seed.
Step 5: Change Water Regularly
Keep the water clean and fresh by:

- Changing the water every 3–5 days
- Ensuring the bottom of the seed is always submerged
Clean water prevents bacterial or fungal growth and encourages healthy root development.
Step 6: Wait for the Seed to Sprout
Be patient — avocado seeds take 2–8 weeks to sprout, though some may take longer. Here’s what to expect:
- Week 2–4: The outer brown seed coat cracks.
- Week 4–6: Roots emerge from the bottom.
- Week 6–8: A green shoot breaks through the top.
Step 7: Transplant to Soil

Once the roots are about 3–4 inches long and the sprout reaches 6–7 inches tall, it’s time to transfer the young plant to a pot.
How to Transplant
- Choose a pot: Use a container about 8–10 inches in diameter with drainage holes.
- Fill with soil: Use a well-draining potting mix. You can improve drainage by adding sand or perlite.
- Plant the seed: Bury the bottom half of the seed in soil, leaving the top half exposed.
- Water thoroughly: Moisten the soil until water drains from the bottom.
How to Care for Your Avocado Plant
Once in soil, avocado trees need consistent care to flourish.
Light
- Place the pot in a bright, sunny location with at least 6 hours of indirect sunlight daily.
Watering
- Keep the soil consistently moist but not soggy.
- Water when the top 1–2 inches of soil feels dry.
- Avoid overwatering, which can lead to root rot.
Temperature
- Avocado plants prefer temperatures between 18–25°C (65–77°F).
- Bring the plant indoors during cold spells, as it is sensitive to frost.
Pruning
- Once the plant reaches 12 inches in height, trim back the top 3–4 inches to encourage bushier growth.
- Pinch off new tips occasionally to promote branching.
When Will It Bear Fruit?

Growing an avocado plant from seed is more about the journey than the harvest:
- It may take 5–13 years for a seed-grown avocado tree to produce fruit.
- Some may never bear fruit without cross-pollination or ideal conditions.
- Grafted nursery trees usually bear fruit in 3–4 years.
Nevertheless, even without fruit, avocado trees make beautiful ornamental houseplants.

Common Issues and Solutions

| Problem | Cause | Solution |
|---|---|---|
| Brown leaf tips | Overwatering or dry air | Adjust watering; increase humidity |
| Droopy leaves | Too little or too much water | Check soil moisture regularly |
| Slow or no sprouting | Cold temperatures or seed damage | Move to warmer spot; use fresh seed |
Benefits of Growing an Avocado Plant
- Educational project for kids and beginners
- A cost-effective houseplant
- Air-purifying properties
- Adds natural greenery indoors or on patios
- Encourages sustainable practices by reducing kitchen waste
Conclusion
Planting an avocado seed and watching it grow into a thriving tree is an engaging, rewarding, and sustainable hobby. While it requires patience and consistent care, the process itself offers valuable lessons in plant growth, responsibility, and environmental stewardship. By following this step-by-step guide — from cleaning the seed and sprouting it in water to transplanting and nurturing it in soil — you can successfully cultivate your very own avocado plant.
Whether it ultimately bears fruit or simply serves as a lush, ornamental houseplant, growing an avocado tree from seed is a simple pleasure that reconnects us with nature in the most hands-on, satisfying way.
Leave A Comment