How to Plant Pepper Seeds – Start Your Spicy Adventure!

How to Plant Pepper Seeds – Start Your Spicy Adventure!

If you’re a fan of fresh, zesty flavors and a bit of garden excitement, growing your own peppers is the perfect project. Whether you prefer the sweet crunch of bell peppers, the heat of jalapeños, or the fiery bite of habaneros, planting pepper seeds is a fun, rewarding, and surprisingly simple way to start your spicy adventure.

In this detailed guide, we’ll walk you through everything you need to know about planting pepper seeds — from choosing your varieties to caring for your seedlings and transplanting them into the garden. Let’s get those peppers growing!


Why Grow Peppers from Seed?

While it’s easy to find pepper seedlings at garden centers, growing peppers from seed offers a whole new level of control, variety, and satisfaction:

  • Wider variety selection: Access hundreds of unique pepper varieties, from mild to extreme heat.
  • Healthier plants: Control over seed quality, soil, and growing conditions.
  • Longer growing season: Start seeds early indoors and enjoy an extended harvest.
  • Cost-effective: A single seed packet can yield dozens of pepper plants.

Choosing the Right Pepper Seeds

Before you plant, think about your taste preferences and your garden’s climate. Peppers range from sweet and mild to blisteringly hot.

Popular Pepper Types:

  • Sweet Bell Peppers: Great for salads, grilling, and stuffing. Varieties: ‘California Wonder,’ ‘Golden Bell,’ ‘Purple Beauty.’
  • Mild Peppers: Mild heat and great flavor. Varieties: ‘Banana Pepper,’ ‘Poblano,’ ‘Cubanelle.’
  • Medium-Heat Peppers: Add zesty flavor without overpowering spice. Varieties: ‘Jalapeño,’ ‘Cayenne,’ ‘Serrano.’
  • Hot to Super-Hot Peppers: For those who like it fiery. Varieties: ‘Habanero,’ ‘Ghost Pepper,’ ‘Carolina Reaper.’

Tip: Pay attention to the Scoville Heat Unit (SHU) rating on seed packets, which measures pepper spiciness.


When to Plant Pepper Seeds

Peppers are warm-weather crops that need a long growing season. Most gardeners start pepper seeds indoors 8-10 weeks before the last expected frost date.

For example:

  • If your last frost is around April 20, start your seeds indoors by late January to early February.

How to Plant Pepper Seeds – Step-by-Step

What You’ll Need:

  • Pepper seeds
  • Seed-starting trays or small pots
  • Seed-starting mix (light, well-draining soil)
  • Clear plastic dome or plastic wrap
  • Grow lights or sunny windowsill
  • Spray bottle for misting
  • Labels (to track your varieties)

1. Prepare the Containers

Use seed-starting trays, small pots, or recycled containers with drainage holes. Fill with a lightweight, sterile seed-starting mix.

2. Soak Seeds (Optional)

Soaking pepper seeds in warm water for 6–8 hours before planting can help speed up germination, especially for thick-skinned hot pepper varieties.

3. Plant the Seeds

  • Sow seeds 1/4 inch deep.
  • Place 1–2 seeds per cell or pot.
  • Cover lightly with soil and gently mist with water.

4. Create a Warm, Humid Environment

Peppers love warmth to germinate. Cover your tray or pots with a clear plastic dome or wrap to retain heat and moisture.

Ideal Germination Temperature:
75°F to 85°F (24°C to 29°C)

Use a seedling heat mat if your indoor environment is cool.


Caring for Pepper Seedlings

Watering

Keep the soil consistently moist but not soggy. Use a spray bottle to mist the surface gently.

Provide Plenty of Light

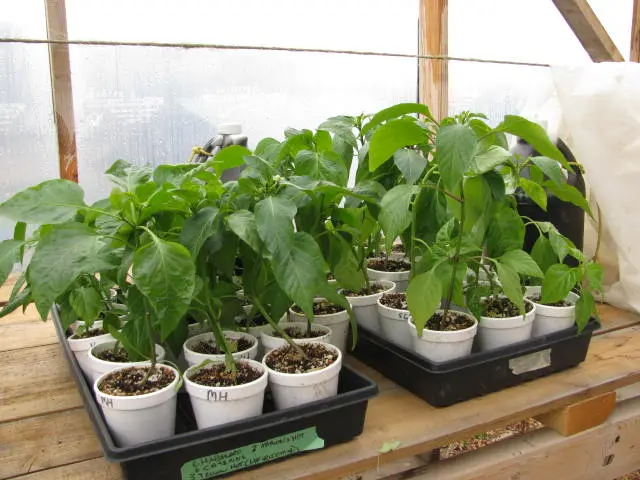
Once seedlings emerge (usually in 7–21 days), move them to a bright south-facing windowsill or under grow lights for 14–16 hours a day. Peppers are sun lovers and need plenty of light to grow strong.

Thin the Seedlings

When seedlings develop two sets of true leaves, thin them to one plant per cell or pot by snipping the weaker one at the soil line.


Transplanting Pepper Seedlings

Once seedlings are 4–6 inches tall and all danger of frost has passed, you can move them outdoors.

Hardening Off

Before transplanting, gradually acclimate seedlings to outdoor conditions:

  • Start by placing them outside in partial shade for a few hours a day.
  • Increase exposure to sunlight and wind over 7–10 days.

Prepare the Garden Bed

  • Choose a sunny location with at least 6–8 hours of direct sunlight daily.
  • Work compost or aged manure into the soil.
  • Space plants 18–24 inches apart in rows 24–36 inches apart.

Caring for Pepper Plants Outdoors

Watering

Keep soil consistently moist but not waterlogged. Peppers prefer even watering — irregular watering can cause blossom end rot or split fruit.

Fertilizing

Use a balanced fertilizer when plants start flowering. Avoid high-nitrogen fertilizers, which promote leafy growth at the expense of fruit.

Staking or Caging

Some larger pepper varieties benefit from staking or small cages to support branches laden with fruit.

Mulching

Apply organic mulch like straw or compost around plants to retain moisture, suppress weeds, and maintain soil warmth.


Common Pepper Growing Problems

  • Blossom End Rot: Caused by calcium deficiency or irregular watering.
  • Aphids: Small sap-sucking insects; spray with water or insecticidal soap.
  • Cutworms: Chew seedlings at the soil line; protect plants with collars.
  • Leaf Drop: Often a sign of too much or too little water.
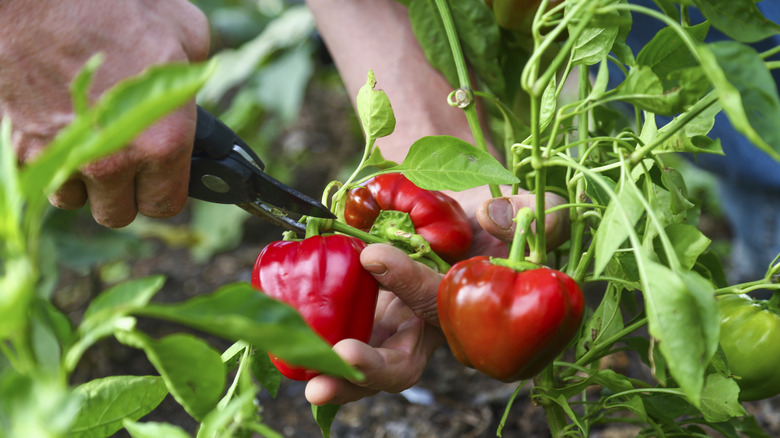
Harvesting Peppers

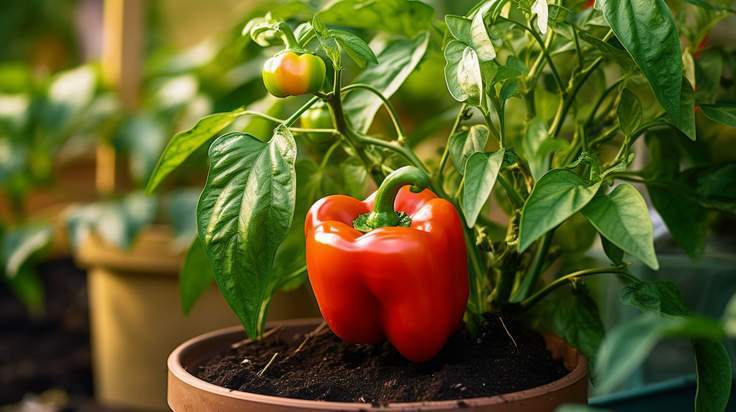
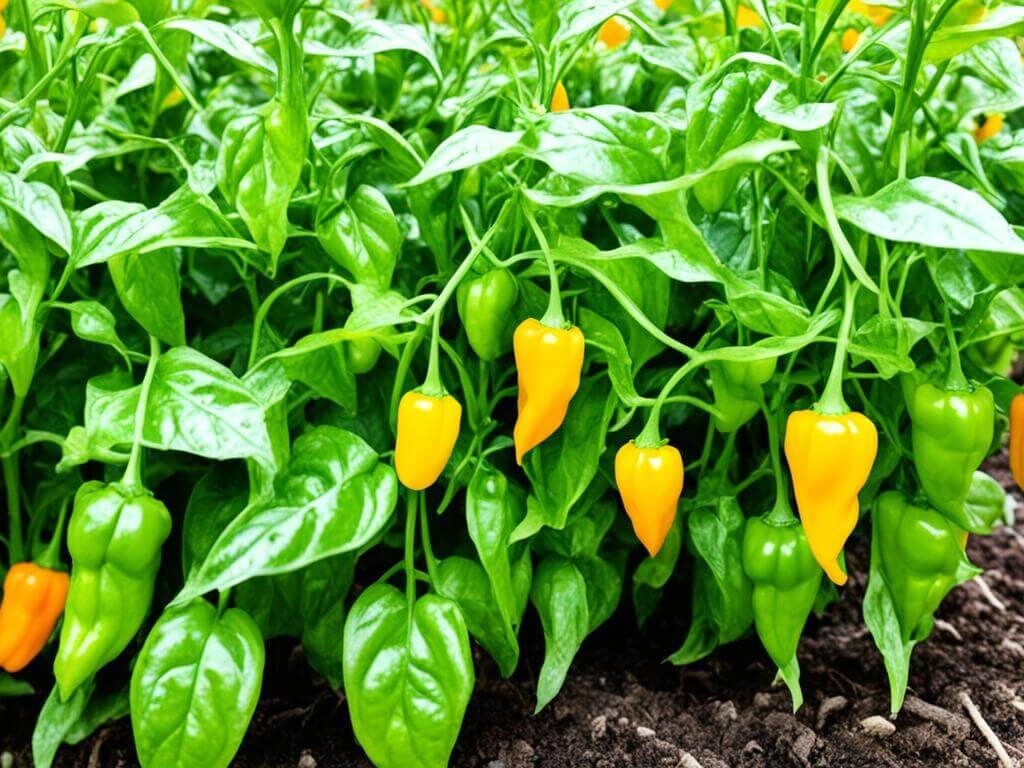
Peppers can be harvested at various stages depending on your preference:

  • Green Peppers: Picked before ripening, with a crisper, slightly bitter taste.
  • Fully Ripe Peppers: Sweet and often turn red, yellow, orange, or purple, depending on variety.

Use sharp scissors or pruners to cut peppers from the plant to avoid damaging branches.


Storing and Using Fresh Peppers

  • Refrigerator: Fresh peppers last 1–2 weeks.
  • Freezing: Chop and freeze raw peppers for use in cooked dishes.
  • Drying: String up hot peppers to air-dry or use a dehydrator.
  • Pickling: Preserve sweet or hot peppers in vinegar brine for snacking and cooking.

Fun Pepper Facts

  • The world’s hottest pepper, the Carolina Reaper, tops 2.2 million SHU!
  • Peppers originated in Central and South America over 6,000 years ago.
  • Green bell peppers are simply unripe versions of red, yellow, or orange ones.

Final Thoughts

Planting pepper seeds is a gratifying way to add some spice and color to your garden and kitchen. With a bit of planning, warmth, and care, you can enjoy an impressive harvest of sweet, mild, or blistering hot peppers — perfect for fresh eating, cooking, or preserving.

Whether you’re a first-time grower or a seasoned gardener expanding your hot pepper collection, there’s always room to start your next spicy adventure.

How to Plant Peas – Enjoy Crisp, Fresh Produce!

How to Plant Peas – Enjoy Crisp, Fresh Produce!

Nothing quite compares to the sweet, crisp snap of freshly harvested peas. Whether you prefer them raw, tossed into a salad, or lightly steamed as a side dish, peas are a spring garden favorite — and for good reason. They’re easy to grow, thrive in cool weather, and can enrich your soil with nitrogen for future crops. If you’ve been curious about how to plant peas and want to enjoy your own homegrown, garden-fresh produce, you’re in the right place.

In this guide, we’ll walk you through everything you need to know about planting peas — from choosing the right variety to harvesting and storage tips. Let’s get growing!


Why You Should Grow Peas

Peas are one of the earliest vegetables you can plant in your garden. They love cooler temperatures, making them ideal for early spring and fall planting in most regions. Not only are peas simple to grow, but they also offer some fantastic benefits:

  • Rich in nutrients: Peas are packed with vitamins A, B, C, and K, fiber, and protein.
  • Soil boosters: Peas fix nitrogen in the soil, improving its fertility for other plants.
  • Space-savers: With climbing varieties, you can grow vertically, making them great for small gardens or raised beds.
  • Versatile harvest: Enjoy them fresh, cooked, or even preserved by freezing.

Choosing the Right Pea Variety

Before planting, decide what type of pea suits your garden and culinary preferences. There are three main types:

1. Garden (Shelling) Peas

These are classic peas, grown for the round seeds inside their pods. The pods aren’t eaten but the peas are sweet and tender. Popular varieties: ‘Green Arrow,’ ‘Little Marvel,’ and ‘Lincoln.’

2. Snow Peas

Snow peas have flat, tender, edible pods and are typically used in stir-fries or salads. They’re harvested before the peas inside fully develop. Popular varieties: ‘Oregon Sugar Pod’ and ‘Snowbird.’

3. Sugar Snap Peas

A cross between snow peas and garden peas, these have plump, edible pods and sweet peas inside. Best enjoyed fresh off the vine or lightly cooked. Popular varieties: ‘Sugar Snap’ and ‘Super Sugar Snap.’


When to Plant Peas

Timing is crucial when it comes to peas. They prefer cool weather and will struggle in the heat.

  • Spring Planting: Sow peas as soon as the soil can be worked, typically 4-6 weeks before your last expected frost.
  • Fall Planting: In areas with mild autumns, sow peas in late summer for a fall harvest.

Ideal soil temperature for germination is between 45°F (7°C) and 75°F (24°C).


Preparing the Soil

Peas thrive in loose, well-draining soil rich in organic matter. Here’s how to get your garden ready:

  1. Choose a Sunny Spot: Peas need at least 6 hours of sunlight daily.
  2. Test and Adjust pH: They prefer a soil pH between 6.0 and 7.5.
  3. Add Organic Matter: Work compost or aged manure into the soil to boost fertility and improve texture.
  4. Avoid Heavy Nitrogen Fertilizers: Since peas fix their own nitrogen, too much can result in lush vines with fewer pods.

How to Plant Peas – Step-by-Step

What You’ll Need:

  • Pea seeds
  • Garden trowel
  • Compost or aged manure
  • Stakes, trellis, or netting for climbing varieties

1. Soak the Seeds (Optional)

For quicker germination, soak pea seeds in water for 8–12 hours before planting.

2. Plant the Seeds

  • Sow seeds 1 inch deep and 2 inches apart.
  • Space rows 18–24 inches apart.
  • For bush varieties, you can plant in wide rows for a denser harvest.

3. Provide Support

Most pea varieties, especially sugar snaps and garden peas, benefit from trellises, netting, or stakes. Set up your supports when planting to avoid disturbing roots later.


Caring for Your Pea Plants

Watering

Peas need consistent moisture, especially when flowering and podding. Water deeply once or twice a week, keeping the soil evenly moist but not waterlogged.

Mulching

Apply a light mulch of straw or compost to retain moisture, regulate soil temperature, and suppress weeds.

Fertilizing

In general, peas require minimal fertilization. A side dressing of compost mid-season can boost yields. Avoid high-nitrogen fertilizers.

Weeding

Keep the area around your peas weed-free to minimize competition for nutrients and water.


Common Pests and Problems

While peas are relatively low-maintenance, watch out for:

  • Aphids: Small green or black insects that cluster on new growth. Use insecticidal soap or a strong water spray.
  • Powdery Mildew: A white, powdery fungus on leaves, common in humid conditions. Provide good air circulation and remove affected plants.
  • Root Rot: Caused by overly wet soil. Ensure good drainage and avoid planting in poorly-drained areas.

Harvesting Peas

Knowing when and how to harvest your peas ensures the best flavor and texture.

  • Garden Peas: Pick when pods are bright green, plump, but before they harden.
  • Snow Peas: Harvest when pods are flat but fully grown, before seeds start to swell.
  • Sugar Snap Peas: Pick when pods are firm, crisp, and peas inside are developed but tender.

Use two hands when harvesting to avoid damaging vines — one to hold the vine and one to gently pull off the pod.


Storing and Using Fresh Peas

  • Garden peas: Shell and use immediately for best flavor. They can be blanched and frozen for later.
  • Snow peas and sugar snap peas: Store in a plastic bag in the refrigerator for up to a week.

Peas are delicious raw, steamed, sautéed, or added to soups, salads, and stir-fries.


Pro Tips for Growing Perfect Peas

  • Rotate crops annually to prevent soil-borne diseases.
  • Add pea inoculant (Rhizobium bacteria) to seeds before planting to enhance nitrogen fixation and yields.
  • Avoid overwatering — peas dislike soggy soil.
  • Harvest frequently to encourage more pod production.

Final Thoughts

Peas are one of the most rewarding crops for gardeners of all experience levels. They’re quick to sprout, delightful to harvest, and their fresh, crisp flavor is unmatched by anything you’ll find in a grocery store. With a little care and timing, you’ll be enjoying sweet, homegrown peas from your garden in no time.

So grab your seeds, prep your soil, and plant some peas this season — your taste buds (and your garden soil) will thank you!

How to Plant Papaya Seeds – Tropical Flavors Made Easy!

How to Plant Papaya Seeds – Tropical Flavors Made Easy!

Few things evoke the taste of the tropics like the sweet, sun-ripened flesh of a papaya. Whether you’ve savored it in a fruit salad, blended it into a smoothie, or enjoyed it fresh from the tree, this exotic fruit brings a burst of sunshine to your plate. The great news is — you don’t have to live in a tropical paradise to grow your own papaya tree. With the right care and a little know-how, you can plant papaya seeds and enjoy this vibrant fruit from your very own garden.

In this comprehensive guide, we’ll walk you through how to plant papaya seeds step-by-step, how to care for your growing tree, and what to expect as you cultivate your tropical flavors at home.


Why Grow Papaya at Home?

Papaya isn’t just a beautiful and delicious fruit — it’s loaded with health benefits too. Rich in vitamins A, C, and E, as well as digestive enzymes like papain, papaya is known for boosting immune health, supporting digestion, and promoting skin wellness. Growing your own ensures you get the freshest, pesticide-free produce right at your fingertips.


Understanding Papaya Plants

Papaya (Carica papaya) is a fast-growing, herbaceous plant that behaves much like a tree but lacks woody growth. It thrives in warm, sunny environments and can grow up to 15-30 feet tall under ideal conditions.

Papaya plants come in three types:

  • Male: Produces only pollen, no fruit.
  • Female: Produces fruit when pollinated.
  • Hermaphrodite: Self-pollinating and produces fruit on its own.

For home gardens, hermaphrodite plants are most convenient because you won’t need multiple trees for pollination.


What You’ll Need

Before getting started, gather these supplies:

  • Fresh, ripe papaya fruit
  • Water
  • Small planting containers or seed trays
  • Well-draining potting mix
  • Compost or organic fertilizer
  • Garden space or large pots (for transplanting)
  • Mulch

Step-by-Step Guide to Plant Papaya Seeds

1. Choose a Ripe Papaya

Start with a fully ripe papaya — preferably one grown organically, as commercial varieties may be hybridized and less reliable for seed saving. The fruit should be slightly soft with orange-yellow skin.

2. Extract and Clean the Seeds

  • Cut the papaya in half lengthwise.
  • Scoop out the black, gel-covered seeds with a spoon.
  • Rinse the seeds thoroughly under cool water to remove the gelatinous coating, which can inhibit germination.
  • Rub the seeds gently in a sieve or between your fingers to clean them.

3. Dry the Seeds

Spread the cleaned seeds out on a paper towel or plate in a warm, shaded area for 1-2 days to dry. Avoid direct sunlight, which can damage them.

4. Prepare Your Planting Containers

Fill seed trays or small containers with a well-draining potting mix. A mixture of garden soil, sand, and compost works well.

Pro tip: Papaya roots are sensitive and don’t like being disturbed, so plant in biodegradable pots if possible, making transplanting easier.

5. Sow the Seeds

  • Plant 2-3 seeds per container about ½ inch deep.
  • Lightly cover with soil and gently water.

6. Provide Warmth and Sunlight

Papaya seeds need warmth to germinate. Keep the containers in a spot with a temperature around 75-85°F (24-29°C).

Place them in a sunny windowsill, greenhouse, or use a heat mat if indoors during cooler months.

7. Keep the Soil Moist

Mist or lightly water the soil daily to keep it consistently moist but not waterlogged. Germination typically occurs within 2-4 weeks.

8. Thin Out Seedlings

Once the seedlings reach 4-6 inches tall, thin them by removing the weakest seedlings, leaving the strongest one in each pot.


Transplanting Papaya Seedlings

When your seedlings are 8-10 inches tall and have developed several leaves, they’re ready for transplanting outdoors or into larger pots.

Best Time to Transplant:

Early spring or when the danger of frost has passed.

Site Selection:

Choose a sunny, sheltered spot protected from strong winds. Papaya plants need full sun for at least 6-8 hours daily.

Soil Requirements:

Well-draining, slightly acidic to neutral soil (pH 6.0-7.0) enriched with compost.

How to Transplant:

  • Dig a hole twice the size of the seedling’s root ball.
  • Gently place the seedling in the hole, keeping it at the same depth it was growing in the pot.
  • Backfill with soil and water thoroughly.
  • Space multiple plants 6-10 feet apart.

Caring for Your Papaya Plants

1. Watering

Papayas love moisture but hate soggy roots. Water deeply 2-3 times a week, adjusting for rainfall. Avoid overwatering, which leads to root rot.

2. Feeding

Feed your papaya plants monthly with a balanced organic fertilizer or compost tea. They’re heavy feeders, especially while fruiting.

3. Mulching

Apply a layer of organic mulch around the base to retain soil moisture, regulate temperature, and suppress weeds.

4. Protecting from Cold

Papayas are frost-sensitive. In colder regions, plant them in large pots that can be moved indoors during chilly weather.


When to Expect Fruits

Papaya trees grow quickly. Under ideal conditions:

  • Seedlings can flower in 5-8 months.
  • Fruits typically ripen 7-11 months after planting.

Each tree can bear 30-150 fruits a year, depending on care and climate.


Common Papaya Growing Problems

1. Root Rot

Caused by poor drainage or overwatering. Ensure soil drains well and never allow the plant to sit in water.

2. Aphids and Whiteflies

These sap-sucking insects can be controlled with insecticidal soap or neem oil spray.

3. Papaya Ringspot Virus

Characterized by yellowing leaves and ring-shaped spots on fruits. Remove infected plants promptly to prevent spread.


Final Thoughts

Growing papaya from seed is a simple, rewarding project that adds a lush, tropical vibe to your garden — and sweet, healthy fruits to your kitchen. By following these steps, you can nurture your own papaya tree from seed to harvest and enjoy the flavors of the tropics right at home.


Ready to start planting? Pick up a ripe papaya, save those seeds, and let the tropical gardening adventure begin!

How to Plant Marigolds – Beautify Your Garden with Vibrant Colors!

How to Plant Marigolds – Beautify Your Garden with Vibrant Colors!

When it comes to adding a burst of cheerful color to your garden, few flowers can rival the marigold. With their fiery hues of gold, orange, and red, marigolds are a gardener’s favorite for brightening borders, containers, and vegetable patches. Not only are they easy to grow, but they also serve a practical purpose — repelling pests and attracting pollinators.

Whether you’re a beginner gardener or an experienced green thumb looking to refresh your space, this guide will show you exactly how to plant marigolds for the healthiest blooms and the most vibrant color displays. Let’s dig in!


Why Plant Marigolds?

Marigolds (genus Tagetes) are hardy annuals known for their dazzling flowers and ease of care. They offer several advantages:

  • Bright, long-lasting blooms from early summer to the first frost.
  • Pest deterrent qualities, particularly against aphids, nematodes, and mosquitoes.
  • Pollinator-friendly, attracting bees, butterflies, and beneficial insects.
  • Excellent for companion planting in vegetable gardens.
  • Ideal for borders, edging, containers, and window boxes.

Types of Marigolds You Can Grow

There are several popular types of marigolds to choose from, each with its own charm:

African Marigolds (Tagetes erecta)

  • Tallest variety, growing up to 3 feet.
  • Large, globe-like blooms in shades of yellow, orange, and gold.
  • Best for garden beds and large containers.

French Marigolds (Tagetes patula)

  • Compact and bushy, typically 6 to 12 inches tall.
  • Frilly, bicolor flowers in warm tones.
  • Perfect for borders, edging, and mixed containers.

Signet Marigolds (Tagetes tenuifolia)

  • Small, dainty flowers with lacy foliage.
  • Edible blooms with a mild, citrusy flavor.
  • Great for herb gardens and window boxes.

When to Plant Marigolds

Marigolds love warmth and sunshine. The ideal planting time is in spring after the last frost date in your region. You can either:

  • Start seeds indoors 6–8 weeks before the last frost.
  • Sow seeds directly outdoors once the soil warms to at least 60°F (16°C).
  • Plant nursery-bought seedlings once nights stay consistently above 50°F (10°C).

Choosing the Right Spot

Marigolds thrive in full sun and prefer well-draining soil. Pick a sunny spot in your garden where plants will receive at least 6–8 hours of direct sunlight daily.

Soil tip: While marigolds tolerate average soil, they flourish in moderately fertile, slightly acidic to neutral soil with a pH of 6.0–7.0.


How to Plant Marigold Seeds

Preparing the Soil

  • Loosen the soil to a depth of 6–8 inches.
  • Mix in compost or well-rotted manure to enrich the soil.
  • Rake smooth and remove debris or stones.

Sowing the Seeds

  • Sow seeds 1/4 inch deep and cover lightly with soil.
  • Space seeds 6–8 inches apart for French marigolds and 10–12 inches for African marigolds.
  • Water gently to settle the soil.

Germination

Seeds typically germinate within 5–7 days in warm soil. Keep the soil slightly moist but not soggy during this period.


Planting Marigold Seedlings

If starting with young plants from a nursery:

  1. Dig holes slightly larger than the root ball.
  2. Space them according to their type:
    • French marigolds: 6–9 inches apart.
    • African marigolds: 12–18 inches apart.
  3. Gently remove the seedling from its container.
  4. Place it in the hole at the same depth it was growing previously.
  5. Backfill with soil, firm gently, and water well.

Caring for Marigolds

Marigolds are wonderfully low-maintenance, but a little care ensures lush, healthy blooms.

Watering

  • Water newly planted seeds and seedlings regularly until established.
  • Once mature, marigolds are drought-tolerant.
  • Water deeply when the top inch of soil feels dry.
  • Avoid overhead watering to prevent fungal diseases.

Fertilizing

Marigolds don’t require much feeding. Over-fertilizing leads to lush foliage with fewer flowers.

  • Before planting, enrich the soil with compost.
  • Optionally, feed with a balanced, diluted fertilizer every 4–6 weeks during the growing season.

Deadheading

Regularly remove spent flowers to encourage continuous blooming. This simple task keeps plants looking tidy and promotes new buds.

Mulching

Apply a layer of organic mulch around marigolds to:

  • Retain soil moisture.
  • Suppress weeds.
  • Keep soil temperatures consistent.

Common Pests and Problems

While marigolds deter many pests, they can occasionally face issues like:

ProblemCauseSolution
Powdery mildewHigh humidity/poor airflowSpace plants properly; water at soil level
AphidsSap-sucking insectsSpray with insecticidal soap or strong water jet
Slugs and snailsDamp environmentsUse organic slug bait or copper tape

Companion Planting with Marigolds

Marigolds are fantastic companions for many garden vegetables. Their strong scent deters harmful insects and attracts pollinators.

Best companions include:

  • Tomatoes
  • Peppers
  • Cucumbers
  • Squash
  • Beans
  • Cabbage family plants

Avoid planting marigolds near legumes like peas, as it can inhibit their growth.


Harvesting Marigold Seeds for Next Season

One of the joys of growing marigolds is collecting your own seeds for future planting.

How to Collect Seeds:

  1. Allow some flowers to fade and dry naturally on the plant.
  2. Once seed heads turn brown and papery, snip them off.
  3. Break open the dried heads and collect the slender black seeds.
  4. Store in a paper envelope or glass jar in a cool, dry place.

This not only saves money but also ensures a continuous display of color year after year.


Fun Facts About Marigolds

  • In Mexican culture, marigolds are known as cempasúchil and play a central role in Día de los Muertos (Day of the Dead) celebrations.
  • The ancient Greeks and Romans valued marigolds for their medicinal properties.
  • Marigold petals are edible and can add color to salads and desserts.
  • Marigolds have been used historically as natural fabric dyes.

Final Thoughts

With their vibrant hues, pest-fighting powers, and cheerful personality, marigolds are a must-have for every garden. Whether you plant them as a decorative border, in a container on your patio, or among your vegetables, they promise to brighten your outdoor space from summer to fall.

Plus, with minimal care and a little attention, marigolds will reward you with an abundance of sunny blooms and the satisfaction of growing one of gardening’s most enduring favorites.

So grab those seeds or seedlings, prepare your garden bed, and get ready to fill your world with radiant color and life!

How to Plant Jade Cuttings – Grow Your Own Lucky Charm!

How to Plant Jade Cuttings – Grow Your Own Lucky Charm!

If you’ve ever admired the fleshy, glossy green leaves of a jade plant (Crassula ovata) and thought, “I wish I had one of my own”, you’re in luck — literally! Jade plants aren’t just beautiful succulents; they’re also considered symbols of good fortune, prosperity, and friendship. Best of all, growing a jade plant from a cutting is surprisingly easy and incredibly rewarding. With the right care, a simple leaf or stem can flourish into a thriving plant that could bring beauty — and a bit of luck — into your home or garden.

In this guide, we’ll cover everything you need to know about planting jade cuttings: from choosing healthy cuttings to rooting them successfully and helping them thrive.


Why Grow Jade Plants from Cuttings?

While jade plants can be grown from seeds, it’s far easier and faster to propagate them from cuttings. Here’s why gardeners and houseplant enthusiasts love this method:

  • Quick and easy: Cuttings root readily with minimal tools.
  • Cost-effective: One plant can produce several new ones.
  • Symbolic gift: A propagated jade plant makes a meaningful housewarming or birthday gift.
  • Therapeutic activity: Propagating plants is a relaxing and rewarding gardening project.

Types of Cuttings You Can Use

There are two main types of jade cuttings you can propagate:

Leaf Cuttings

These are single jade leaves detached from the main plant. While they take longer to establish, they’re perfect for patient gardeners who enjoy watching plants grow from scratch.

Stem Cuttings

These are short segments of a branch or stem with several leaves attached. They root quickly and grow into small plants faster than leaf cuttings.


When is the Best Time to Take Cuttings?

The ideal time to propagate jade plants is during their active growing season — spring and early summer. During this period, plants root and recover faster, reducing the risk of rot and other issues.

Avoid propagating in winter or late fall when the plant’s growth slows down and cuttings may struggle to take root.


What You’ll Need

Before you start, gather these supplies:

  • A healthy, mature jade plant
  • Clean, sharp scissors or pruning shears
  • Small pots or shallow trays
  • Succulent or cactus potting mix (well-draining)
  • Rooting hormone (optional)
  • A sunny windowsill or bright, indirect light source

How to Take and Prepare Jade Cuttings

For Leaf Cuttings:

  1. Choose a healthy, mature leaf without blemishes or signs of disease.
  2. Use clean scissors to snip the leaf from the stem close to the base.
  3. Leave the leaf in a shaded, dry place for 2–3 days to allow the cut end to callous over. This step prevents rot when planted.

For Stem Cuttings:

  1. Select a healthy branch at least 3–4 inches long with several leaves.
  2. Use sharp, sterile scissors to cut the stem cleanly.
  3. Remove the lower leaves, leaving a bare section of stem at the base.
  4. Allow the cutting to dry and callous for 3–5 days.

Tip: To speed up rooting, dip the cut end in a powdered rooting hormone before planting.


Preparing the Pot and Soil

Jade plants need well-draining soil to prevent root rot. Use a commercial succulent or cactus mix, or make your own by combining:

  • 2 parts coarse sand or perlite
  • 1 part potting soil
  • 1 part fine gravel or pumice

Pot selection: Choose a small, shallow pot with drainage holes. Terracotta pots are ideal since they allow excess moisture to evaporate.


Planting the Cuttings

Leaf Cuttings:

  1. Place the calloused end of the leaf flat on the surface of the potting mix.
  2. Press it lightly into the soil so it makes contact.
  3. Water sparingly — just enough to slightly moisten the soil.

Note: Roots will form from the base of the leaf within 2–3 weeks, followed by tiny plantlets.

Stem Cuttings:

  1. Make a small hole in the soil with your finger or a pencil.
  2. Insert the calloused end of the stem cutting about 1–2 inches deep.
  3. Firm the soil around the base to keep it upright.
  4. Water lightly.

Position both cuttings in bright, indirect sunlight. Avoid full, direct sun at this stage to prevent scorching.


Caring for Jade Cuttings After Planting

Watering:

  • Do not overwater. Allow the soil to dry out completely between waterings.
  • Mist the soil lightly every 4–5 days for leaf cuttings until roots appear.
  • For stem cuttings, water lightly when the top inch of soil feels dry.

Lighting:

  • Place cuttings in a bright, warm spot with indirect sunlight.
  • Avoid direct sun, which can dry out or burn tender cuttings.

Temperature:

  • Ideal rooting temperatures are between 65°F and 75°F (18°C–24°C).

Signs Your Cuttings Are Taking Root

You’ll know your cuttings are successfully rooting when you notice:

  • New growth: Small leaves or stems forming at the base of the cutting.
  • Resistance when tugged: Gently tugging the cutting feels firm, indicating roots have formed.

For stem cuttings, this typically happens within 3–4 weeks. Leaf cuttings may take 4–6 weeks before plantlets emerge.


Transplanting and Long-Term Care

Once roots have developed and new growth appears:

  1. Transplant cuttings into individual pots with fresh succulent soil.
  2. Gradually introduce them to more sunlight.
  3. Begin a regular care routine:
    • Water thoroughly but infrequently.
    • Provide at least 4–6 hours of bright, indirect light daily.
    • Fertilize with a balanced, diluted liquid fertilizer once a month during spring and summer.

Common Problems and Solutions

ProblemCauseSolution
Cuttings rotOverwatering or insufficient callousingLet cuttings dry longer before planting; reduce watering
Leaves shrivelToo dry or too much sunIncrease humidity slightly; move to indirect light
No roots after 6 weeksLow light or cold temperaturesRelocate to a warmer, brighter spot

Fun Fact: The Jade Plant’s Symbolism

In many cultures, the jade plant is considered a symbol of wealth, luck, and prosperity. It’s often gifted to new homeowners or business owners to bless them with success and positive energy. Keeping one near your front door or workspace is thought to attract good fortune.


Final Thoughts

Growing jade plants from cuttings is a simple, satisfying way to expand your plant collection or share a meaningful gift with loved ones. With just a few healthy cuttings, a little patience, and the right care, you can cultivate your very own lucky charm. Whether you place them on a sunny windowsill or give them as a thoughtful present, jade plants are beautiful, symbolic, and surprisingly easy to grow.

How to Plant Beets – Root for Healthy Harvests!

How to Plant Beets – Root for Healthy Harvests!

When it comes to nutrient-packed, easy-to-grow vegetables, beets are a garden favorite. With their rich, earthy flavor, vibrant colors, and versatility in the kitchen, beets deserve a spot in every home garden. Whether you love them roasted, pickled, or fresh in salads, growing your own beets is simple and highly rewarding.

In this comprehensive guide, we’ll cover everything you need to know about planting beets — from choosing the right variety to harvesting those plump, juicy roots. Let’s dig in and root for a healthy harvest!


Why Grow Beets?

Beets aren’t just delicious; they’re also packed with health benefits:

  • Rich in antioxidants
  • High in fiber
  • Excellent source of folate, iron, and potassium
  • Support heart and liver health

Better still, you can enjoy both the roots and the leafy tops, making them a dual-purpose crop.


Popular Beet Varieties

Beets come in several colors and sizes. Here’s a quick look at some top picks:

VarietyColor & FlavorBest For
Detroit Dark RedDeep red, sweet, classicRoasting, pickling
Chioggia (Candy Stripe)Pink and white rings, mildSalads, grilling
Golden BeetsBright yellow, less earthyRoasting, fresh eating
CylindraLong, cylindrical shape, tenderSlicing, canning
Bull’s BloodDeep red leaves and rootsDual use — greens & roots

Best Time and Location to Plant Beets

Beets are a cool-season crop that thrive in mild temperatures.

When to Plant:

  • Spring: 2–4 weeks before your area’s last frost date.
  • Fall: 6–8 weeks before your first expected frost.

Beets prefer temperatures between 50°F and 75°F (10°C–24°C) for optimal growth.

Where to Plant:

  • Full sun (at least 6 hours daily)
  • Loose, well-drained, loamy soil
  • Soil pH between 6.0 and 7.5

Pro Tip:
Avoid recently manured beds — excess nitrogen produces lush leaves at the expense of the roots.


Preparing Your Garden Bed

Proper soil preparation is crucial for plump, even-shaped beets.

Steps:

  1. Clear debris, rocks, and weeds.
  2. Loosen the soil to a depth of 10–12 inches.
  3. Work in compost or aged organic matter.
  4. Rake the surface smooth.

Optional Tip:
A raised bed is an excellent choice for beets, providing ideal drainage and loose soil structure.


Supplies You’ll Need

  • Beet seeds (your preferred variety)
  • Garden tools (rake, hoe, trowel)
  • Compost or organic fertilizer
  • Watering can or hose with fine spray
  • Mulch (optional)

How to Plant Beets: Step-by-Step

1️⃣ Soak the Seeds

Beet seeds are clusters containing several seeds. Soaking them in water for 12–24 hours before planting helps improve germination.

2️⃣ Sow the Seeds

  • Create shallow furrows about ½ inch deep and 12–18 inches apart.
  • Space seeds about 1 inch apart.
  • Cover lightly with soil and firm gently.

3️⃣ Water Gently

Water the soil immediately after planting, keeping it evenly moist but not soggy.

4️⃣ Mulch (Optional)

Apply a thin layer of organic mulch to conserve moisture and suppress weeds.


Caring for Your Growing Beets

Watering

Consistent watering is key for even, tender roots.

  • Aim for 1 inch of water per week.
  • Avoid letting the soil dry out or become waterlogged.

Thinning

Since each beet “seed” is a cluster, multiple seedlings may sprout together.

  • Thin seedlings to 3–4 inches apart when they reach 2–3 inches tall.
  • Use snipped seedlings as baby greens in salads.

Fertilizing

Beets aren’t heavy feeders, but a mid-season boost can help.

  • Apply a balanced fertilizer (5-5-5) when plants are about 4 inches tall.
  • Avoid high-nitrogen fertilizers — they encourage leaf growth over root development.

Weeding

Keep the area around your beets free from weeds, which compete for moisture and nutrients.


Common Beet Growing Problems & Solutions

ProblemCauseSolution
Uneven Root GrowthCompacted or stony soilLoosen soil, remove rocks
Leaf Spot DiseasesFungal infectionsWater at soil level, remove infected leaves
AphidsSap-sucking pestsSpray with insecticidal soap or neem oil
Bolting (early flowering)Heat stress or overcrowdingPlant at the right season, thin seedlings

When and How to Harvest Beets

Harvesting the Roots

Beets can be harvested at various stages:

  • Baby Beets: At 1–2 inches in diameter (about 30–40 days after sowing)
  • Mature Beets: At 2–3 inches in diameter (around 50–70 days)

Harvest Tip:
Loosen the soil with a garden fork and gently lift the beets by their stems.

Harvesting the Greens

Beet greens can be harvested as soon as they’re 4–6 inches tall. Pick a few leaves per plant at a time, leaving enough for continued growth.


Storing Your Beet Harvest

Storing Fresh Beets

  • Cut off greens (leave 1 inch of stem).
  • Store roots in a cool, humid place or in the refrigerator crisper for up to 2–3 months.

Storing Beet Greens

Use fresh or refrigerate in a plastic bag for up to 3–5 days.

Preserving Beets

Beets can be canned, pickled, or frozen after blanching for long-term storage.


Cooking and Enjoying Beets

Beets are incredibly versatile in the kitchen:

  • Roast with olive oil and herbs.
  • Pickle with vinegar, spices, and sugar.
  • Grate raw into salads.
  • Blend into smoothies for a nutritional boost.
  • Sauté the greens with garlic and olive oil.

Fun Fact:
Golden and Chioggia beets don’t bleed like red varieties — perfect for colorful dishes without staining.


Final Thoughts

Growing beets is a satisfying and simple way to add color, flavor, and nutrition to your garden and plate. With minimal effort and a little patience, you’ll soon enjoy a bountiful harvest of tender roots and fresh greens.

Whether you’re a first-time gardener or a seasoned grower, beets are a must-have crop that rewards you in more ways than one. So grab some seeds, prepare your soil, and root for your healthiest harvest yet!

How to Plant Basil Seeds – A Beginner’s Guide to Fresh Herbs!

How to Plant Basil Seeds – A Beginner’s Guide to Fresh Herbs!

If you’re dreaming of a lush kitchen garden filled with fresh, aromatic herbs, basil should be at the top of your list. Renowned for its sweet, peppery fragrance and versatility in countless dishes — from Italian pastas to Thai stir-fries — basil is one of the easiest and most rewarding herbs to grow. And the best way to start? By planting it from seed!

In this beginner’s guide, we’ll walk you through everything you need to know to successfully plant basil seeds and nurture them into flourishing, fragrant plants right in your home or garden.


Why Grow Basil from Seeds?

While it’s tempting to buy young plants from a nursery, starting basil from seed has some major perks:

  • More variety choices: From classic Genovese to spicy Thai or lemony basil.
  • Cost-effective: A packet of seeds costs less than a single plant.
  • Stronger plants: Basil grown from seed in your environment often adapts better than store-bought plants.
  • Continuous harvests: Stagger your plantings for fresh basil all season long.

Plus, there’s a special satisfaction in watching your herbs sprout, grow, and end up on your dinner plate.


Popular Basil Varieties to Plant

Before you start sowing, pick a variety that suits your culinary tastes and gardening goals:

VarietyFlavor ProfileBest For
Genovese BasilSweet, rich, classicItalian dishes, pesto
Thai BasilSpicy, anise-likeThai and Vietnamese recipes
Lemon BasilCitrusy, freshTeas, desserts, seafood
Purple BasilMild, slightly clove-likeColorful garnishes, salads
Cinnamon BasilWarm, spicy-sweetFruit dishes, herbal teas

Best Time and Place to Plant Basil Seeds

Basil loves warmth. So, you’ll need to time your planting carefully:

  • Outdoors: After the last frost date in your area when temperatures consistently stay above 50°F (10°C).
  • Indoors: Anytime you can provide warmth and sunlight (perfect for kitchen windowsills or balconies).

Sunlight Requirements:
Basil thrives in 6–8 hours of direct sunlight per day.

Soil Preferences:
Well-draining, nutrient-rich soil with a pH between 6.0 and 7.5. A light, loamy potting mix works great in containers.


Supplies You’ll Need

Starting basil from seed doesn’t require complicated tools. Here’s what you’ll need:

  • Basil seeds (your preferred variety)
  • Seed-starting mix or light potting soil
  • Small pots, seed trays, or containers with drainage
  • A spray bottle for misting
  • Clear plastic wrap or a seed tray cover (optional)
  • Grow lights (optional for indoor growing)

How to Plant Basil Seeds: Step-by-Step Guide

1️⃣ Prepare the Soil

Fill your seed tray, small pots, or containers with moist, well-draining seed-starting mix. Avoid compacting the soil — it should be light and airy to encourage root development.

2️⃣ Sow the Seeds

  • Scatter 2–3 seeds per cell or pot, or lightly sprinkle seeds across a tray surface.
  • Cover seeds with a very thin layer (about ¼ inch) of soil or vermiculite.
  • Gently press down to ensure good seed-to-soil contact.

3️⃣ Water Gently

Use a spray bottle to mist the soil lightly. Keep the surface moist but not soggy. Avoid heavy watering which can wash away tiny seeds.

4️⃣ Provide Warmth and Light

Basil seeds germinate best at 70–75°F (21–24°C).

  • Indoors: Place trays in a warm, sunny window or under grow lights.
  • Outdoors: Wait until temperatures are reliably warm.

Optional Tip:
Cover your tray or pots with clear plastic wrap to create a greenhouse effect and retain moisture until seeds sprout.

5️⃣ Watch for Germination

Seeds typically sprout in 5–10 days. Once you see tiny green shoots, remove the plastic cover and move them to a bright, sunny spot.


Caring for Basil Seedlings

Watering:

  • Keep the soil consistently moist, especially for young seedlings.
  • Water at the base to avoid wetting leaves, reducing the risk of fungal diseases.

Thinning:

Once seedlings have developed two sets of true leaves, thin them by snipping the weaker plants at soil level, leaving one strong seedling per cell or pot.

Light:

Seedlings need 12–16 hours of bright light daily. If indoors, position them by a south-facing window or under grow lights.

Air Circulation:

Good airflow helps prevent mold and damping off (a common seedling disease). Avoid overly humid, stagnant environments.


How to Transplant Basil Seedlings

When seedlings are 4–6 inches tall and the risk of frost is gone:

  1. Harden them off by moving them outdoors for a few hours daily for a week.
  2. Choose a sunny location with well-drained soil.
  3. Dig holes 12–18 inches apart.
  4. Gently remove seedlings from trays, keeping the soil around the roots intact.
  5. Plant them at the same depth they were growing indoors.
  6. Water well and mulch lightly to retain moisture and deter weeds.

Container Planting Tip:
Use 6–8 inch pots per plant, ensuring drainage holes are present.


Common Basil Growing Problems & Solutions

ProblemCauseSolution
Yellowing LeavesOverwatering or poor drainageWater only when top inch is dry
Leggy GrowthInsufficient lightMove to brighter location
Pests (Aphids, Slugs)Insects attracted to leavesUse insecticidal soap, handpick slugs
Downy MildewHigh humidity, poor air flowImprove ventilation, avoid overhead watering

Harvesting Basil for the Best Flavor

Once your plants reach about 6–8 inches tall, you can start harvesting.

How to Harvest:

  • Pinch or snip the top leaves, just above a pair of leaves.
  • Regularly remove flower buds to keep the plant producing fresh leaves.

Pro Tip:
Never harvest more than one-third of the plant at a time.


Storing and Preserving Fresh Basil

Use Fresh: Add to salads, sauces, pizzas, or make classic pesto.

Preserve for Later:

  • Freezing: Chop and freeze in olive oil in ice cube trays.
  • Drying: Hang small bunches in a dark, dry spot. Crumble into jars when crisp.

Final Thoughts

Growing basil from seeds is an easy, rewarding project for gardeners of all levels. With a little warmth, light, and attention, you’ll be harvesting fresh, fragrant basil in just a few weeks — perfect for transforming your meals and brightening up your kitchen.

So grab a seed packet, a sunny windowsill, and start your fresh herb-growing journey today!

How to Plant Basil – Grow Aromatic Flavors at Home!

How to Plant Basil – Grow Aromatic Flavors at Home!

Few herbs are as beloved and versatile as basil. From topping a Margherita pizza to adding depth to a summer salad or enhancing a refreshing cocktail, basil brings a distinctive, aromatic flavor to countless dishes. And the best part? You don’t have to rely on supermarket bunches — you can easily grow this fragrant herb at home, whether in your backyard, balcony, or sunny kitchen windowsill.

In this comprehensive guide, we’ll walk you through everything you need to know about how to plant basil, care for it, harvest it, and use it to infuse your meals with fresh, homegrown flavor.


Why Grow Basil at Home?

Growing your own basil isn’t just practical — it’s rewarding and downright delightful. Here’s why it deserves a spot in your garden or home:

  • Fresh, chemical-free leaves anytime you need them.
  • Cost-effective compared to store-bought herbs.
  • Beautiful, aromatic plants that add charm to any space.
  • Attracts beneficial pollinators like bees to your garden.
  • Versatile for culinary, medicinal, and ornamental use.

Whether you’re a seasoned gardener or a total beginner, basil is one of the easiest and most satisfying herbs you can grow.


Popular Types of Basil to Grow

Did you know there are over 60 varieties of basil? Here are a few favorites you might want to try:

VarietyFlavor NotesBest For
Genovese BasilSweet, rich, classicPesto, Italian dishes
Thai BasilSpicy, anise-likeAsian cuisine, stir-fries
Purple BasilMild, clove-likeSalads, vinegars, garnishing
Lemon BasilCitrusy, freshTeas, desserts, seafood
Cinnamon BasilWarm, spicy-sweetBaked goods, fruit dishes

When and Where to Plant Basil

Best Planting Time:

  • Spring to early summer, after the last frost date.
  • Basil is a warm-weather herb and thrives in temperatures above 50°F (10°C).

Ideal Growing Conditions:

  • Full sun (at least 6 hours a day).
  • Well-draining, nutrient-rich soil.
  • Slightly acidic to neutral soil pH (6.0–7.5).

Good air circulation is important to prevent fungal diseases like mildew.


How to Plant Basil from Seeds

Growing basil from seed is simple, rewarding, and ensures a continuous supply of fresh leaves.

What You’ll Need:

  • Basil seeds (choose your favorite variety)
  • Seed-starting mix or potting soil
  • Seed trays or small pots
  • Water spray bottle

Step-by-Step Instructions:

  1. Fill seed trays or pots with moistened seed-starting mix.
  2. Sow seeds about ¼ inch deep, 1–2 inches apart.
  3. Gently cover with a thin layer of soil and mist with water.
  4. Place containers in a warm, sunny location (or under grow lights).
  5. Keep soil consistently moist, not soggy.
  6. Seeds should germinate in 5–10 days.

Pro Tip:
Covering the trays with a plastic dome or clear wrap can help retain humidity during germination.


How to Plant Basil Seedlings

You can also start with nursery seedlings if you prefer a quicker harvest.

Planting Basil Seedlings:

  1. Choose healthy, green seedlings with no signs of wilting or pests.
  2. Prepare your garden bed or container with loamy, well-drained soil.
  3. Dig a hole deep enough to hold the root ball.
  4. Space seedlings 12–18 inches apart to allow good airflow.
  5. Gently place the seedling in the hole, fill in with soil, and water well.
  6. Add a thin layer of mulch around the base to retain moisture and deter weeds.

Container Gardening: Basil Indoors & On Balconies

Basil is ideal for container gardening. It thrives on sunny windowsills, patios, and balconies.

Container Tips:

  • Use a 6-8 inch pot per plant, with drainage holes.
  • Fill with a light, well-draining potting mix.
  • Water when the top inch of soil feels dry.
  • Rotate the pot every few days for even sun exposure.

Caring for Your Basil Plants

Watering:

  • Keep soil consistently moist but not waterlogged.
  • Water deeply at the base to avoid wetting the leaves, which can lead to fungal problems.

Feeding:

  • Fertilize every 4–6 weeks with a balanced, water-soluble fertilizer.
  • Avoid over-fertilizing, which can reduce the aromatic oils in the leaves.

Pinching and Pruning:

  • Pinch off the top two sets of leaves when the plant reaches 6 inches tall.
  • Regularly remove flower buds to extend leaf production.
  • Harvest leaves from the top down to encourage bushier growth.

Pro Tip:
Never remove more than one-third of the plant at a time to avoid stressing it.


Common Basil Pests and Problems

Although relatively trouble-free, basil can encounter a few issues:

  • Aphids & Whiteflies: Remove with water spray or insecticidal soap.
  • Slugs & Snails: Use copper tape or organic slug pellets around pots.
  • Fungal diseases (Downy Mildew, Powdery Mildew): Ensure good airflow, avoid overhead watering, and remove affected leaves.

How to Harvest Basil

Best time to harvest:
In the morning after the dew dries, when oils are most concentrated.

How to harvest:

  • Snip leaves or stems just above a pair of leaves.
  • Harvest regularly to encourage new growth.
  • Use fresh or store leaves in a glass of water, or dry/freeze for later use.

Creative Ways to Use Fresh Basil

Once your basil plant is thriving, you’ll have a steady supply of aromatic leaves for a variety of uses:

Culinary:

  • Classic pesto sauce.
  • Fresh topping for pizzas and pastas.
  • Infuse into olive oil or vinegar.
  • Garnish for soups and salads.
  • Add to summer cocktails and teas.

Herbal Remedies:

  • Basil tea to aid digestion and reduce stress.
  • Natural mosquito repellents using crushed leaves.

Decorative:

  • Use basil sprigs in floral arrangements for a fragrant touch.
  • Grow purple or cinnamon basil for colorful garden borders.

How to Preserve Basil

Basil’s peak flavor is fresh, but you can preserve it too:

Freezing:

  • Chop leaves and place in ice cube trays with a little water or olive oil.
  • Freeze and use cubes in soups, sauces, or sautés.

Drying:

  • Hang stems in small bunches in a warm, dry spot.
  • Crumble dried leaves and store in an airtight container.

Final Thoughts

Basil is one of those plants that instantly enhances both your garden and your kitchen. Easy to grow, quick to harvest, and endlessly versatile, it’s a must-have herb for gardeners of all skill levels.

Whether you want to whip up a garden-fresh Caprese salad, enjoy an aromatic herbal tea, or simply savor the sight and scent of basil on your windowsill, this delightful herb promises to bring flavor and charm to your home year-round.

So grab some seeds or seedlings, roll up your sleeves, and start growing your own aromatic flavors at home!

How to Plant Bamboo – Bring Elegance to Your Landscape!

How to Plant Bamboo – Bring Elegance to Your Landscape!

Bamboo has long been a symbol of tranquility, strength, and grace in gardens around the world. Whether swaying gently in the breeze of a Zen-inspired courtyard or forming a lush privacy screen in a modern backyard, bamboo adds an unmistakable sense of elegance to any landscape. Fast-growing, hardy, and beautifully versatile, it’s no wonder more homeowners and gardeners are turning to bamboo for both ornamental and practical planting projects.

In this complete guide, we’ll show you how to plant bamboo, select the right varieties, care for your bamboo plants, and use them creatively to transform your outdoor space into a serene, natural haven.


Why Choose Bamboo for Your Garden?

Bamboo isn’t just a pretty face — it comes with a host of benefits:

  • Fast-growing privacy screens and natural windbreaks.
  • Low maintenance and drought-tolerant once established.
  • Adds tropical beauty and texture to landscapes.
  • Excellent for erosion control on slopes and uneven terrain.
  • Can be grown in containers, raised beds, or open ground.

With over 1,000 species to choose from, there’s a bamboo variety for nearly every climate, purpose, and design style.


Types of Bamboo: Clumping vs. Running

Before planting, it’s essential to understand the two primary types of bamboo:

1. Clumping Bamboo

  • Grows in tight, non-invasive clumps.
  • Spreads slowly outward from the base.
  • Easier to control, ideal for smaller gardens and decorative plantings.
  • Popular varieties: Bambusa multiplex, Fargesia rufa.

2. Running Bamboo

  • Spreads aggressively via underground rhizomes.
  • Can cover large areas if not managed.
  • Best for privacy screens or windbreaks but needs root barriers.
  • Popular varieties: Phyllostachys aurea (Golden Bamboo), Phyllostachys nigra (Black Bamboo).

Pro Tip:
If you’re new to bamboo or working in a confined area, start with clumping bamboo for easier management.


Best Bamboo Varieties for Different Uses

PurposeRecommended Bamboo Varieties
Privacy ScreensPhyllostachys aurea, Bambusa oldhamii
Ornamental DisplaysPhyllostachys nigra (Black Bamboo)
Container GardeningFargesia rufa, Bambusa multiplex
Cold-Hardy PlantingsFargesia robusta, Phyllostachys bissetii

When and Where to Plant Bamboo

Best Time to Plant:

  • Spring or early fall, when soil temperatures are mild.
  • Avoid planting in extreme heat or during frosts.

Ideal Location:

  • Full sun to partial shade (depending on variety).
  • Well-draining soil rich in organic matter.
  • Protection from strong winds.
  • Space for growth, especially for running varieties.

Soil pH should be between 6.0–7.0. Bamboo prefers slightly acidic to neutral soil.


How to Prepare the Planting Site

Healthy soil equals healthy bamboo. Follow these steps to prepare your site:

  1. Clear the area of weeds, grass, and debris.
  2. Loosen the soil to a depth of at least 18 inches.
  3. Mix in compost or well-rotted manure to enrich the soil.
  4. Install rhizome barriers (for running bamboo) — heavy-duty plastic or metal sheets sunk 24–30 inches into the ground around the planting area.

Note: Leave the top 2 inches of the barrier exposed to prevent rhizomes from jumping over.


How to Plant Bamboo (Step-by-Step)

1. Dig the Hole

  • Make a hole twice as wide and deep as the root ball.

2. Amend the Soil

  • Mix in organic compost to improve soil texture and nutrient content.

3. Position the Plant

  • Place the bamboo in the hole at the same depth it was growing in the nursery pot.
  • Spread roots gently if compacted.

4. Backfill and Water

  • Fill the hole with soil, gently firming as you go to eliminate air pockets.
  • Water thoroughly after planting.

5. Mulch

  • Apply a 2–4 inch layer of organic mulch (like bark chips or straw) to retain moisture, suppress weeds, and regulate soil temperature.

Watering and Feeding Bamboo

During the first growing season:

  • Water deeply 2–3 times per week.
  • Keep soil consistently moist but not soggy.

After establishment:

  • Water during dry spells.
  • Less frequent watering needed for clumping varieties.

Fertilizer:

  • Use a high-nitrogen fertilizer in early spring to encourage lush growth.
  • Repeat light feedings in summer for best results.

Pruning and Maintenance Tips

  • Remove dead or weak culms (stems) at ground level in late winter.
  • Thin out older growth periodically to improve air circulation.
  • Cut running bamboo’s rhizomes using a sharp spade to control spread.
  • Top-dress with compost in spring for nutrients and moisture retention.

Pro Tip:
To keep running bamboo contained, trench around the planting area and cut back escaping rhizomes annually.


Growing Bamboo in Containers

If space is limited or you prefer a mobile garden, bamboo thrives in pots too!

Container Tips:

  • Use a large, sturdy pot (at least 18 inches deep and wide).
  • Ensure excellent drainage with holes at the base.
  • Use loamy, well-draining potting mix.
  • Water regularly — potted bamboo dries out faster than in-ground plantings.
  • Fertilize monthly during the growing season.
  • Repot every 2–3 years as bamboo outgrows its container.

Creative Uses for Bamboo in the Landscape

Bamboo is one of the most versatile plants you can grow:

  • Privacy screens and hedges for patios or pools.
  • Natural fences or windbreaks.
  • Accent plants in tropical or Asian-style gardens.
  • Erosion control on slopes and banks.
  • Feature plants in modern container gardens.
  • Use mature culms for DIY garden trellises, fences, and décor.

Common Bamboo Pests and Problems

Bamboo is generally tough, but watch out for:

  • Aphids: Spray with water or neem oil.
  • Spider mites: Increase humidity and wash leaves.
  • Mealybugs: Remove by hand or use insecticidal soap.

Fungal issues (like sooty mold) typically result from pest infestations and clear up once pests are managed.


How to Overwinter Bamboo

In colder climates:

  • Mulch heavily around the base of plants.
  • Water well before the first hard frost.
  • For containers, move bamboo to a sheltered, unheated garage or shed.
  • Choose cold-hardy varieties for year-round outdoor growth.

Final Thoughts

Adding bamboo to your landscape is a surefire way to introduce elegance, privacy, and tropical charm to your garden. Whether you opt for a dense privacy hedge, a decorative feature plant, or a container-grown specimen, bamboo’s graceful beauty and fast growth make it a favorite for gardeners everywhere.

With the right site preparation, mindful planting, and regular care, your bamboo will thrive for years — transforming your outdoor space into a lush, serene sanctuary.

So, why wait? Bring home your bamboo today and watch your garden take on a whole new dimension of natural elegance!

How to Plant Asparagus Crowns – A Gourmet Addition to Your Garden!

How to Plant Asparagus Crowns – A Gourmet Addition to Your Garden!

If you’re a fan of fresh, flavorful vegetables straight from the garden, asparagus deserves a prime spot in your backyard. This perennial vegetable is not only a gourmet favorite but also one of the earliest and most rewarding crops to emerge in spring. With its tender green spears and rich, earthy taste, homegrown asparagus far surpasses anything you’ll find in the grocery store.

Even better? Once established, an asparagus bed can produce for 15 to 20 years — making it a long-lasting, low-maintenance addition to your edible garden. In this comprehensive guide, we’ll show you exactly how to plant asparagus crowns and keep them thriving for seasons of delicious harvests.


Why Grow Asparagus in Your Garden?

Asparagus is one of those vegetables that truly shines when grown at home. Here’s why:

  • Superior flavor and tenderness compared to store-bought spears.
  • Perennial growth — plant once and harvest for decades.
  • Nutrient-rich: Loaded with fiber, folate, vitamins A, C, E, and K.
  • Beautiful, fern-like foliage in summer, adding ornamental value.
  • Early spring harvest when little else is ready in the garden.

What Are Asparagus Crowns?

Asparagus can be grown from seed, but most gardeners prefer to start with crowns — which are clusters of 1-year-old roots. These crowns give you a one-year head start and reduce the long waiting period before you can begin harvesting.

When planted in early spring, crowns establish faster and are hardier against pests, diseases, and environmental stress.


Choosing the Right Asparagus Variety

There are several asparagus varieties to consider, depending on your climate and preferences:

Popular Varieties:

  • Jersey Giant: High-yielding, disease-resistant, hardy.
  • Mary Washington: Classic, heirloom variety with excellent flavor.
  • Purple Passion: Beautiful purple spears with a sweet, nutty taste.
  • Millennium: Cold-hardy, adaptable, and great for northern climates.

Pro Tip:
Choose all-male hybrids (like Jersey series) for larger yields, as male plants don’t produce energy-draining berries.


When and Where to Plant Asparagus Crowns

Best Time:

  • Early spring, as soon as the soil is workable and daytime temps reach about 50°F (10°C).

Ideal Site:

  • Full sun — at least 6–8 hours of direct sunlight daily.
  • Well-draining, fertile soil rich in organic matter.
  • Avoid areas where water pools or remains soggy after rain.
  • Pick a permanent location — asparagus doesn’t like to be moved.

Soil pH should be slightly acidic to neutral (6.5–7.0) for optimal growth.


How to Prepare the Planting Site

Asparagus thrives in deeply worked, nutrient-rich soil. Here’s how to prep the bed:

  1. Choose a spacious area, as crowns spread over time.
  2. Clear weeds, grass, and debris thoroughly.
  3. Loosen soil to a depth of 12–18 inches using a garden fork or tiller.
  4. Work in well-rotted compost, aged manure, or organic matter.
  5. Add bone meal or a balanced fertilizer (10-10-10) to promote root development.

Consider building a raised bed if your soil is heavy clay or prone to waterlogging.


How to Plant Asparagus Crowns (Step-by-Step)

1. Dig Trenches

  • Dig a trench 12–18 inches wide and 6–8 inches deep.
  • Space trenches 3–4 feet apart to allow room for spreading.

2. Form a Ridge

  • Create a small ridge or mound of soil down the center of the trench.

3. Position the Crowns

  • Spread the roots of each crown out evenly over the ridge, like an octopus.
  • Space crowns 12–18 inches apart.

4. Cover with Soil

  • Cover crowns with 2–3 inches of soil, leaving the trench partially filled.
  • As shoots grow, gradually fill in the trench with more soil until level with the ground.

Why fill gradually?
It allows spears to emerge more easily and protects delicate new growth.


Watering and Mulching

  • Water thoroughly after planting and keep soil consistently moist (but not soggy).
  • Apply a 2–3 inch layer of organic mulch (like straw or compost) to retain moisture, suppress weeds, and regulate soil temperature.

Fertilizing Asparagus Beds

Feed your asparagus regularly to encourage strong, healthy growth:

  • In early spring, before spears emerge, apply a balanced organic fertilizer around the base of the plants.
  • Add compost or aged manure annually to replenish nutrients.
  • Avoid over-fertilizing, especially with nitrogen, as it encourages excessive fern growth over spear production.

Asparagus Care Tips for Year-Round Success

1. Weeding

Keep the bed weed-free, especially during the first year when crowns are establishing. Mulching helps minimize weeds.

2. Fern Growth

After harvest season, allow remaining spears to grow into tall, feathery ferns. These feed the crowns and prepare them for next season’s harvest.

3. Cut Back in Fall

Once the ferns turn yellow and die back in late fall, cut them down to ground level. Remove and discard the debris to prevent overwintering pests.


When to Harvest Asparagus

Patience pays off when growing asparagus. Here’s the typical harvest timeline:

  • Year 1: Do not harvest. Let plants establish.
  • Year 2: Light harvest for 1–2 weeks once spears reach 6–8 inches tall.
  • Year 3 and beyond: Full harvest for 6–8 weeks each spring.

Pro Tip:
Snap or cut spears at ground level when they’re about 6–8 inches tall and before the tips start to open.


Common Pests and Problems

Asparagus is relatively trouble-free, but be aware of:

  • Asparagus beetles: Hand-pick, use neem oil, or introduce ladybugs.
  • Slugs and snails: Trap or hand-remove.
  • Fungal diseases (like rust): Avoid overhead watering, maintain airflow, and clear dead foliage promptly.

Healthy soil and good cultural practices prevent most issues.


Companion Planting for Asparagus

Good neighbors for asparagus include:

  • Tomatoes: Repel asparagus beetles.
  • Basil and parsley: Help deter pests.
  • Marigolds: Attract beneficial insects.

Avoid planting alliums (onions, garlic) near asparagus, as they can compete for nutrients.


Final Thoughts

Planting asparagus crowns is one of the most rewarding investments you can make in your garden. Though it requires a bit of patience at first, the long-lasting harvests of tender, gourmet-quality spears year after year make it well worth the effort.

With proper site preparation, consistent care, and a little seasonal attention, your asparagus bed will thrive for decades — providing you with early spring harvests, lush summer foliage, and the satisfaction of growing one of nature’s finest perennials right at home.

Ready to start your gourmet garden? Dig those trenches and plant your crowns today — your future self will thank you!