10 Tips to Grow Wildflowers for Beginners (2)

10 Beautiful Flowers That Thrive in Shady Areas

When it comes to gardening, not every part of your yard will be drenched in sunlight. Shady spots, whether under large trees, along north-facing walls, or beneath overhanging eaves, often present a unique challenge for gardeners. But the good news is — many stunning flowers not only tolerate but thrive in these cooler, lower-light areas.

In fact, shade-loving flowers can create lush, tranquil garden spaces, offering delicate textures, graceful foliage, and blooms in a variety of colors. If you’re looking to brighten up your garden’s shady corners, here are 10 beautiful flowers that thrive in shady areas.


1. Astilbe (Astilbe spp.)

Astilbe is a garden favorite for adding color and texture to shady areas. Known for its tall, feathery plumes of flowers, astilbe blooms in shades of pink, white, red, and lavender from late spring to summer.

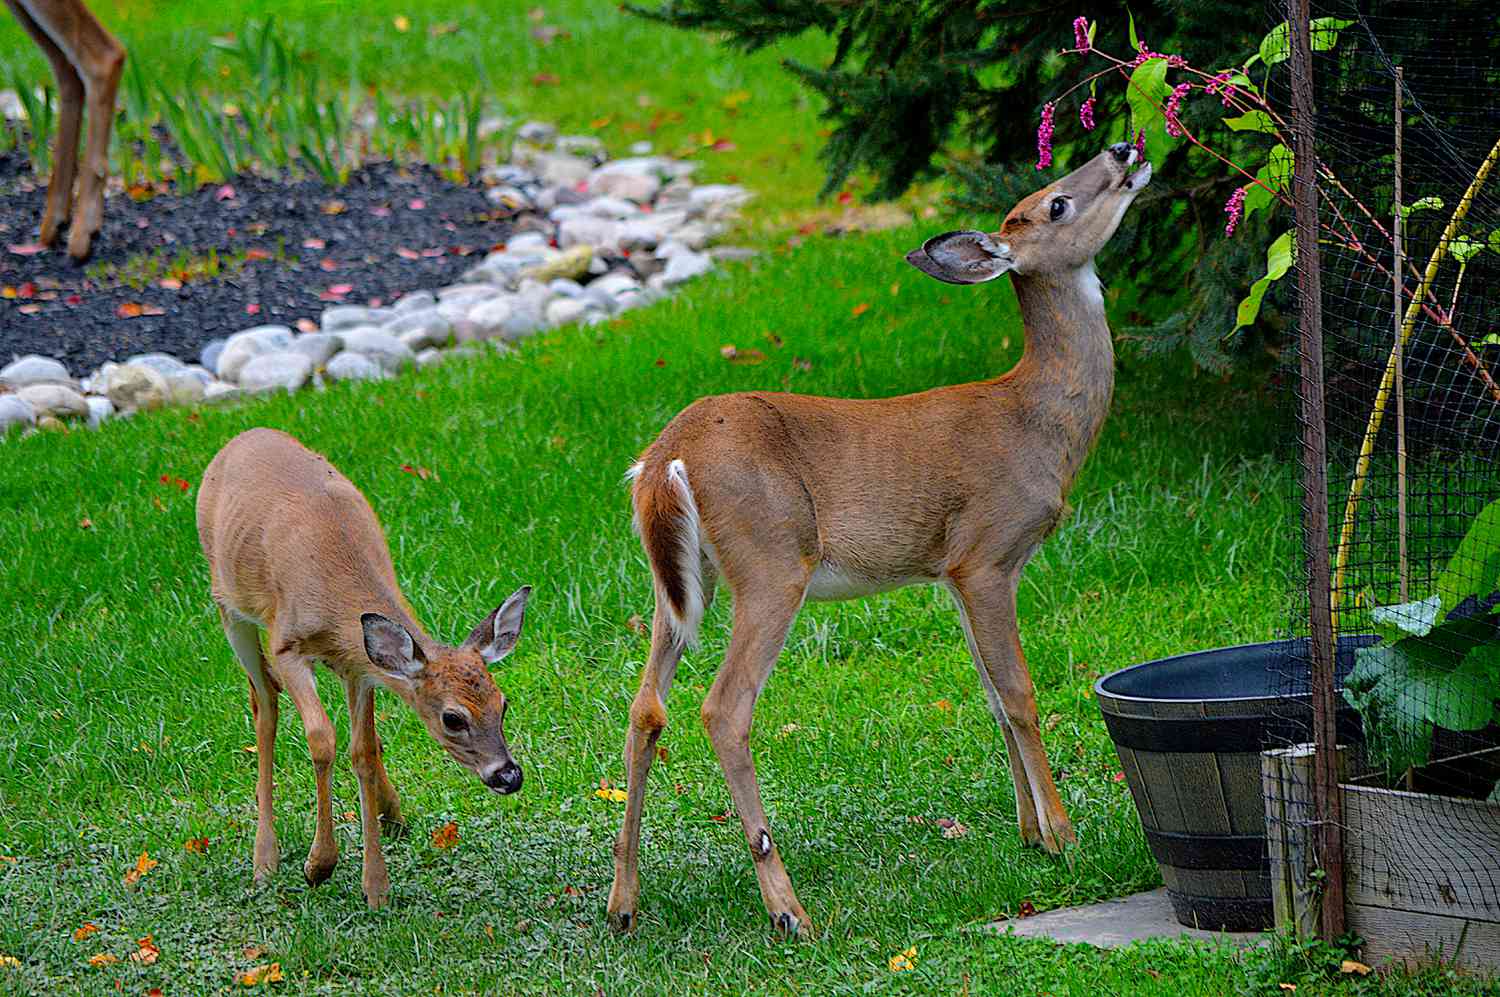
Not only do these flowers thrive in part to full shade, but they also prefer moist, well-drained soil, making them perfect for woodland gardens or shaded borders. Astilbe’s finely divided, fern-like foliage adds visual interest even when the plant is not in bloom. A bonus — they’re deer-resistant and attract pollinators like butterflies.


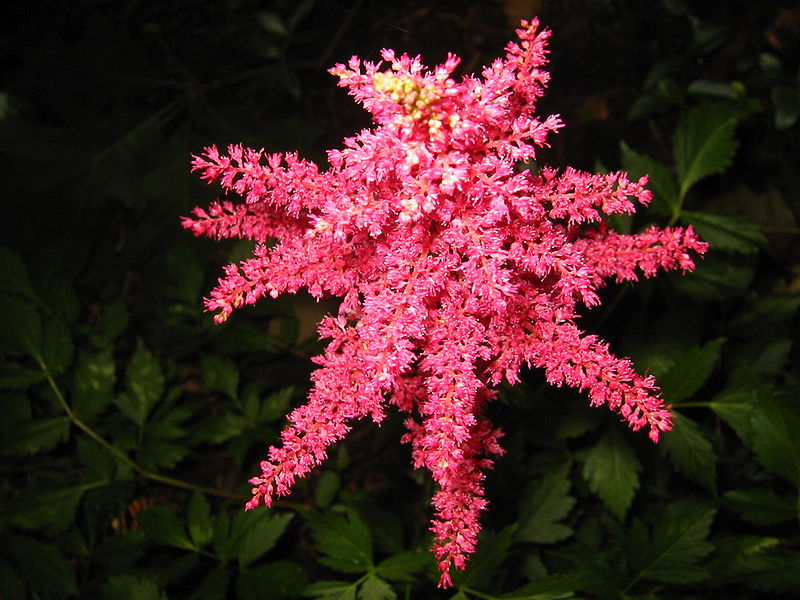
2. Bleeding Heart (Dicentra spectabilis)

With its heart-shaped, pendulous flowers dangling from arching stems, the Bleeding Heart is one of the most romantic and classic shade plants. Native to Asia, this perennial blooms in early spring, displaying delicate pink and white blossoms.

Bleeding Hearts thrive in rich, moist soil in partial to full shade, making them ideal for shaded borders, woodland areas, and under large trees. As temperatures rise in the heat of summer, their foliage naturally fades back, so pair them with summer-blooming shade plants like hostas for continuous interest.


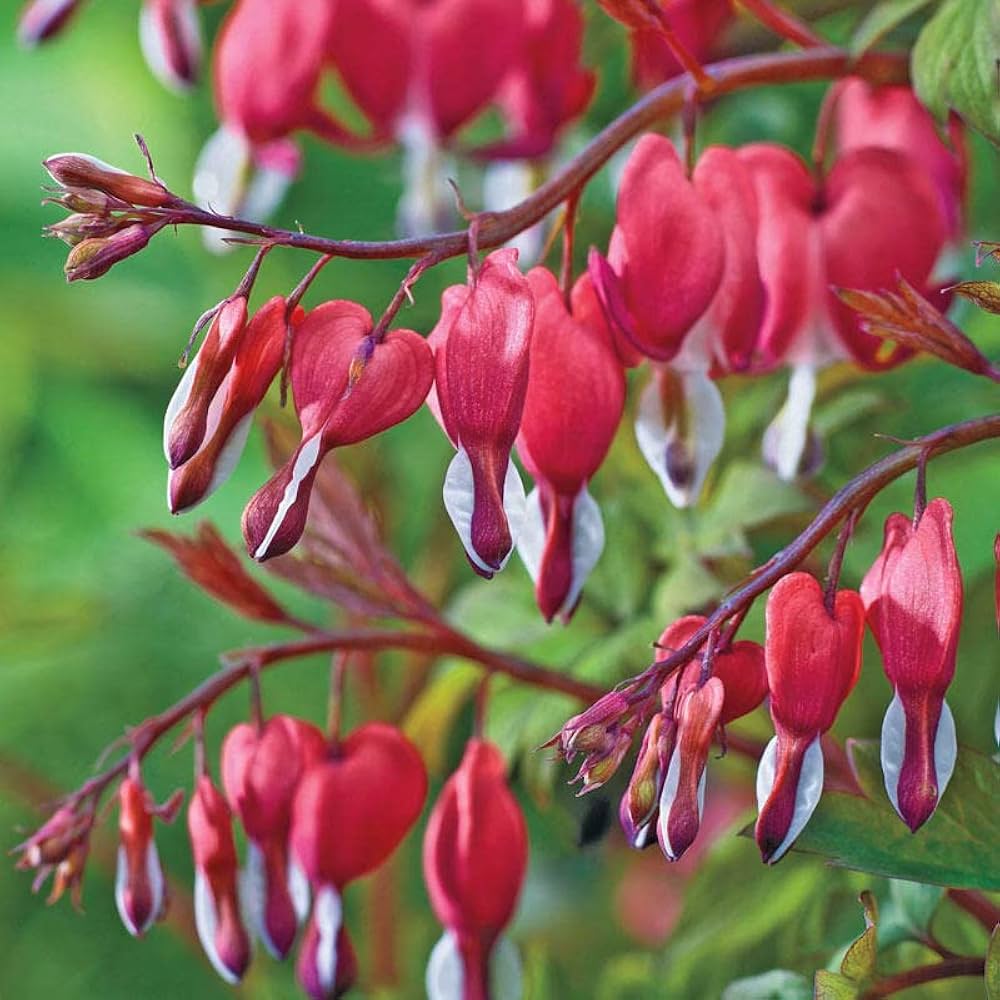
3. Hellebore (Helleborus spp.)

Also known as the Lenten Rose, hellebores are one of the first flowers to bloom in late winter or early spring, often peeking through snow-covered soil. Their nodding, cup-shaped flowers come in an array of colors — from creamy whites and soft pinks to deep purples and greens.

Hellebores thrive in part to full shade, especially in areas with rich, well-draining soil. These tough perennials are also drought-tolerant once established and are known for their evergreen foliage, which remains attractive year-round.


4. Toad Lily (Tricyrtis hirta)

If you’re searching for an exotic-looking flower for shady spots, look no further than the Toad Lily. These late-season bloomers showcase delicate, orchid-like flowers speckled with purple, blue, or pink spots.

Toad lilies prefer partial to full shade and humus-rich, consistently moist soil. They’re perfect for shady borders, along paths, or near water features. Their unusual blooms and upright habit bring a touch of elegance and surprise to shaded gardens, often blooming in late summer to fall when other flowers are winding down.


5. Impatiens (Impatiens walleriana)

One of the most popular and easy-to-grow shade flowers, Impatiens are prized for their long-lasting, vibrant blooms that come in nearly every color of the rainbow. These annuals are a go-to for gardeners looking to brighten up shady patios, containers, or garden beds.

Impatiens thrive in partial to full shade, preferring moist, well-draining soil. Their low, bushy growth habit makes them excellent for mass plantings or mixed container arrangements. With consistent watering, they’ll bloom nonstop from spring to fall.


6. Foxglove (Digitalis purpurea)

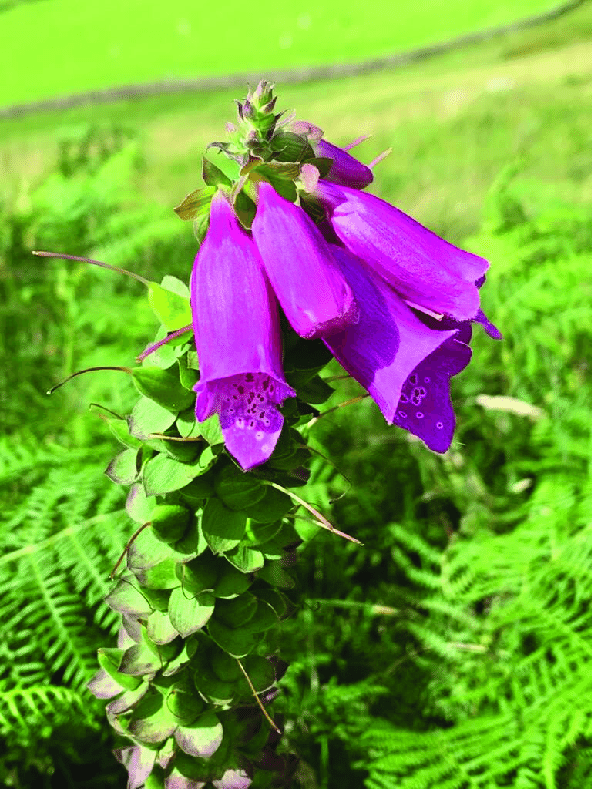
Tall, elegant spires of bell-shaped flowers make the Foxglove a striking addition to shaded gardens. Blooming in shades of pink, purple, white, and yellow, these classic cottage garden plants thrive in partial shade, especially in areas with morning sun and afternoon shade.

Foxgloves prefer rich, well-draining soil and can self-seed, often naturalizing in woodland or shaded garden borders. While stunning, it’s important to note that all parts of the foxglove plant are toxic if ingested, so plant with caution if you have pets or small children.


7. Coral Bells (Heuchera spp.)

Primarily grown for their eye-catching foliage, Coral Bells also produce airy spires of tiny bell-shaped flowers in late spring to early summer. The leaves come in a remarkable range of colors — from lime green and burgundy to deep purple and silver.

Coral Bells thrive in partial shade but can tolerate full shade in hotter climates. They prefer well-drained soil and are drought-tolerant once established. Perfect for adding texture and color variation to shady borders, rock gardens, and container plantings.


8. Lungwort (Pulmonaria spp.)

Pulmonaria or Lungwort with blue flowers in the forest on spring

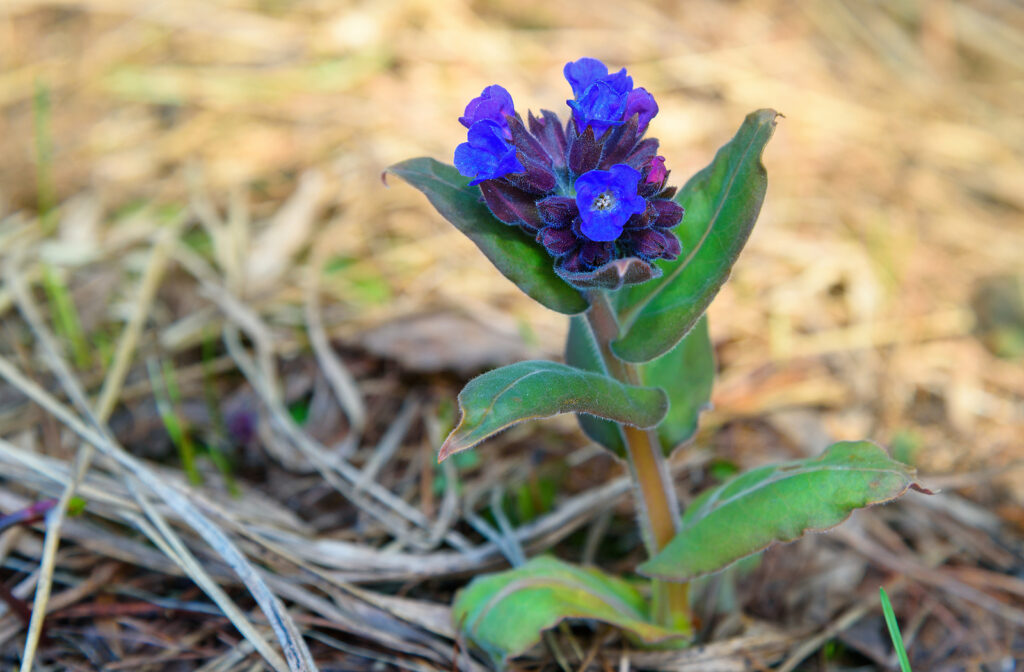
An underrated gem for shady areas, Lungwort is admired for its spotted or silver-speckled foliage and clusters of small, bell-shaped flowers in shades of blue, pink, or white. Often blooming in early spring, Lungwort pairs beautifully with hostas and ferns.

Thriving in partial to full shade, this perennial prefers cool, moist, well-drained soil rich in organic matter. Its attractive foliage remains decorative throughout the growing season, making it a reliable filler plant for shaded areas.


9. Japanese Anemone (Anemone hupehensis)

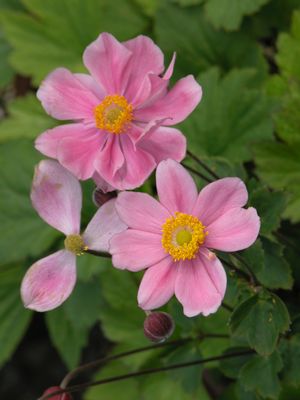
For late-season color in shady garden corners, Japanese Anemones are an excellent choice. These perennials produce graceful, single or semi-double blooms in shades of white, pink, or lavender on tall, wiry stems from late summer into fall.

Japanese Anemones thrive in part shade and prefer rich, evenly moist soil. They’re perfect for naturalizing in woodland gardens, borders, or along shaded walls. Once established, they form large, attractive clumps and are relatively low-maintenance.


10. Begonia (Begonia spp.)

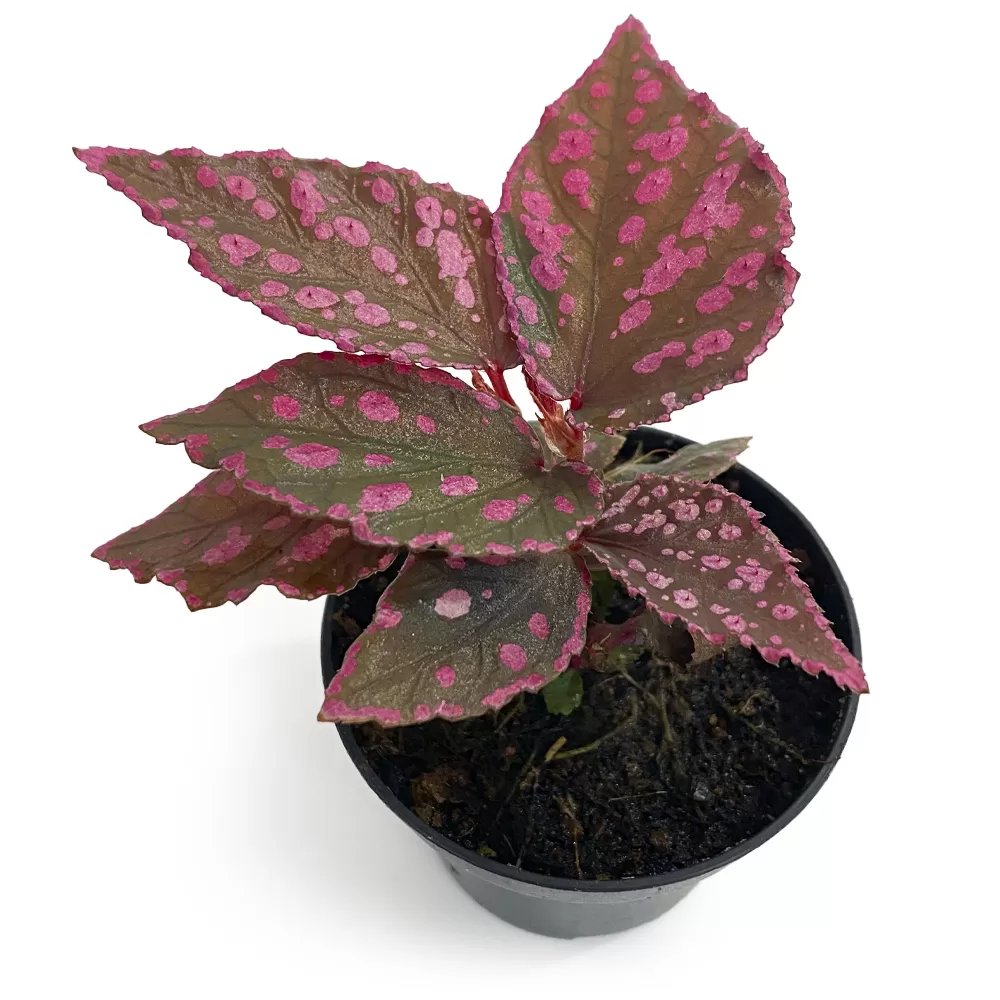
Begonias are versatile shade-loving annuals or perennials (in warm climates) known for their vibrant flowers and often decorative foliage. Popular varieties like Wax Begonias and Tuberous Begonias bloom profusely in shades of red, pink, white, orange, and yellow.

These plants prefer partial to full shade, with moist, well-draining soil. Ideal for hanging baskets, containers, or garden borders, begonias bloom continuously from spring through fall. Their bold, waxy leaves and colorful flowers make them a standout in any shaded garden space.


Final Thoughts

Just because a corner of your garden lacks sunlight doesn’t mean it has to lack color, texture, or life. These 10 beautiful flowers that thrive in shady areas prove that even the dimmest parts of your yard can become a lush, colorful retreat.

By choosing the right shade-tolerant plants — from the romantic Bleeding Heart to the bold foliage of Coral Bells — you can design a visually stunning garden that flourishes without direct sun. Whether you’re aiming for a serene woodland vibe or a pop of vibrant color, there’s a perfect shade-loving flower waiting to transform your outdoor space.

How to Keep Rabbits from Eating Plants – Guard Your Greens!

How to Keep Rabbits from Eating Plants – Guard Your Greens!

If you’re a home gardener, few things are more frustrating than waking up to find your tender greens, blooming flowers, or fresh vegetables gnawed down to stubs. Rabbits may look adorable, but their appetite for garden plants can quickly turn destructive. These cute but crafty critters are notorious for sneaking into yards, feasting on flowers, vegetables, and young shrubs.

The good news? There are plenty of effective, humane ways to guard your greens and keep rabbits at bay without harming them. In this guide, we’ll cover how to spot rabbit damage, why rabbits are so drawn to your garden, and the best natural, physical, and strategic ways to protect your plants.

Let’s hop to it!


Why Do Rabbits Love Your Garden?

Rabbits are herbivores with a preference for soft, succulent, and easily accessible plants. Your garden offers a buffet of exactly what they crave — especially in the early growing season when wild food sources are scarce.

Some of rabbits’ favorite garden treats include:

  • Lettuce
  • Beans
  • Carrots
  • Broccoli
  • Beets
  • Spinach
  • Peas
  • Pansies
  • Petunias
  • Tulips
  • Young tree saplings and bark

Because rabbits are opportunistic feeders, even plants they don’t usually prefer can fall victim when food is limited.


How to Identify Rabbit Damage

Before you implement defenses, it helps to confirm that rabbits are the ones causing trouble. Signs of rabbit damage include:

  • Clean, angled cuts on stems and leaves: Unlike deer who tear, rabbits have sharp incisors that make neat, precise cuts.
  • Plants eaten to ground level: Rabbits often munch from the base upward.
  • Missing leaves or flowers: Especially on tender annuals and vegetables.
  • Small, round droppings: Rabbit pellets are about the size of peas and scattered in feeding areas.
  • Rabbit tracks: Look for small, round footprints and longer hind foot impressions.

If you’re seeing these clues, it’s time to take action.


10 Proven Ways to Keep Rabbits Out of Your Garden

1. Install a Rabbit-Proof Fence

The most reliable way to protect your plants is with a sturdy fence. To effectively deter rabbits:

  • Use 1/4 to 1/2-inch mesh hardware cloth or chicken wire.
  • Bury the bottom of the fence 6–10 inches deep to prevent digging.
  • Make sure the fence stands at least 2–3 feet high, as rabbits can jump surprisingly well.
  • For extra security, angle the top outward to make climbing difficult.

This is especially useful for protecting vegetable gardens, flower beds, and newly planted trees.


2. Use Natural Rabbit Repellents

Commercial rabbit repellents use strong odors or tastes to discourage nibbling. Look for sprays containing ingredients like garlic, putrescent egg solids, or capsaicin.

When using repellents:

  • Apply on dry days and reapply after rain.
  • Spray around the garden perimeter and directly on vulnerable plants.
  • Alternate between different products to prevent rabbits from becoming accustomed.

DIY repellent option:
Mix 2 tablespoons of cayenne pepper, 2 crushed garlic cloves, and a few drops of dish soap into a gallon of water. Let it steep, strain, and spray it generously on your plants.


3. Plant Rabbit-Resistant Plants

While no plant is completely rabbit-proof, some are less appealing due to their scent, texture, or toxicity. Incorporating these can naturally discourage rabbits from settling in.

Rabbit-resistant plants include:

  • Lavender
  • Marigolds
  • Salvia
  • Snapdragons
  • Yarrow
  • Catmint
  • Allium
  • Foxglove
  • Daffodils
  • Peonies

Plant these along garden borders or between rabbit-favorite plants to act as a deterrent.


4. Remove Shelter and Hiding Spots

Rabbits love areas where they can hide and nest. To make your garden less attractive:

  • Clear brush piles and dense ground cover.
  • Trim tall grasses and low shrubs.
  • Keep firewood piles elevated or contained.
  • Seal gaps under decks, sheds, and outbuildings.

By removing their hiding places, you reduce the likelihood of rabbits frequenting your yard.


5. Use Raised Garden Beds

Elevating your vegetable and flower beds can physically put your plants out of easy reach. Raised beds at least 18–24 inches high deter rabbits, especially when combined with fencing or cloches (protective plant covers).

This method not only protects against rabbits but also improves soil control and drainage.


6. Install Motion-Activated Devices

Rabbits are naturally skittish and quick to flee from sudden sounds or movements. Motion-activated devices work well in deterring them.

Effective options:

  • Motion-activated sprinklers
  • Ultrasonic repellers
  • Garden lights triggered by movement

These devices startle rabbits without harming them, especially effective in open yard spaces.


7. Apply Physical Plant Barriers

For individual plants, small garden plots, or young saplings, physical barriers are an excellent choice.

Try using:

  • Chicken wire cages
  • Garden netting
  • Plastic tree guards
  • Floating row covers for vegetables

Be sure to secure barriers firmly at the base to prevent rabbits from squeezing underneath.


8. Use Scent Deterrents

Rabbits have a keen sense of smell and dislike certain strong odors.

Good scent deterrents include:

  • Shredded human or pet hair scattered around plants.
  • Blood meal sprinkled in the garden (also a fertilizer).
  • Crushed garlic cloves or onions.
  • Irish Spring soap shavings placed in mesh bags around your garden.

Refresh scent deterrents regularly for continued effectiveness.


9. Companion Planting

Similar to deer deterrence, companion planting involves mixing plants rabbits dislike alongside their favorites to confuse and repel them.

Ideal companion plants:

  • Basil
  • Oregano
  • Mint (keep it in pots as it can spread aggressively)
  • Rosemary
  • Onions and chives

These herbs and vegetables not only protect their neighbors but also enhance your garden’s productivity.


10. Be Consistent and Vigilant

Rabbits are persistent creatures. Successful rabbit control depends on consistency:

  • Repair fences and barriers promptly.
  • Refresh repellents after rain.
  • Stay vigilant during peak rabbit seasons (spring and summer).
  • Rotate deterrent methods to keep rabbits on their toes (or paws!).

Over time, a combination of these techniques will create an unwelcoming environment for rabbits and preserve your plants.


Final Thoughts

Rabbits may be charming, but their appetite for fresh greens can quickly test any gardener’s patience. Thankfully, with a thoughtful mix of physical barriers, repellents, smart plant choices, and simple landscape adjustments, you can guard your greens without harming these critters.

The key is layering multiple strategies, being consistent, and paying attention to your garden’s vulnerable spots. Whether you opt for a rabbit-proof fence, motion-activated deterrents, or pungent plant companions, you’ll reclaim your garden and keep those hungry hoppers at bay.

Have you had success keeping rabbits out of your garden? Share your tips and tricks in the comments — fellow gardeners will thank you!

How to Keep Deer from Eating Plants – Save Your Garden Easily!

How to Keep Deer from Eating Plants – Save Your Garden Easily!

If you’ve ever walked out to admire your carefully tended garden, only to find your prized roses or tender vegetables munched down to stubs overnight, you’re not alone. Deer are beautiful creatures, but they can quickly turn a thriving garden into their personal buffet. Fortunately, there are plenty of effective, humane ways to keep deer from eating your plants — and many of them are easier than you might think!

In this guide, we’ll explore why deer are so drawn to our gardens, how to spot the signs of deer damage, and the most reliable strategies to protect your plants for good. Let’s dive in.


Why Do Deer Love Gardens?

Deer are natural browsers. Their diet consists of a wide range of foliage, shrubs, fruits, vegetables, and flowers — many of which are conveniently found in our backyards. Especially in areas where natural habitats have diminished or food is scarce, deer see your garden as an irresistible all-you-can-eat buffet.

Some of their favorite garden treats include:

  • Hostas
  • Roses
  • Tulips
  • Daylilies
  • Beans
  • Peas
  • Lettuce
  • Fruit trees (apples, cherries, plums)

Deer are especially active at dawn and dusk, and they’re most likely to cause damage in spring and fall when natural food supplies shift.


How to Identify Deer Damage

Before jumping into solutions, it’s helpful to confirm that deer are the culprits in your garden. Signs of deer activity include:

  • Jagged, torn leaves and stems: Unlike rabbits that neatly snip plants, deer tear foliage with their lower teeth.
  • Trampled plants and pathways: You might notice flattened areas where deer have walked through.
  • Missing flower heads or buds: Deer love tender new growth.
  • Deer tracks: Look for hoof prints, typically about 2–3 inches long.
  • Scat: Deer droppings are pellet-like and scattered.

Once you confirm you have deer visitors, it’s time to protect your plants.


10 Effective Ways to Keep Deer Away from Your Garden

1. Install a Sturdy Fence

Fencing is the most reliable way to keep deer out. However, it needs to be:

  • At least 8 feet tall: Deer are excellent jumpers.
  • Solid or angled outward: A slanted fence can discourage them from leaping.

You can also opt for invisible deer netting or electric fences if a tall structure isn’t suitable for your yard’s aesthetic.

Pro tip: Double fences placed a few feet apart can confuse deer, as they dislike confined spaces.


2. Use Deer-Repellent Sprays

Commercial deer repellents work by creating unpleasant tastes or smells. These typically use ingredients like garlic, rotten eggs, or predator urine.

When using repellents:

  • Reapply after rain.
  • Switch brands periodically so deer don’t become accustomed.
  • Spray both the foliage and perimeter of your garden.

You can also make a homemade mix using:

  • 2 beaten eggs
  • 1 tablespoon dish soap
  • 1 gallon of water
    Spray this mixture on plants you want to protect.

3. Plant Deer-Resistant Species

While no plant is completely deer-proof, some are far less appealing to them. Incorporating these into your garden can help deter deer naturally.

Top deer-resistant plants:

  • Lavender
  • Marigolds
  • Peonies
  • Daffodils
  • Foxglove
  • Bee balm
  • Ferns
  • Salvia

These plants often have strong scents, prickly textures, or toxic properties that deer avoid.


4. Install Motion-Activated Devices

Deer are skittish by nature. Motion-activated lights, sprinklers, or noise makers can startle them away.

Options to consider:

  • Solar-powered garden lights with motion sensors
  • Motion-activated water sprayers
  • Ultrasonic animal repellers

Place these near your most vulnerable plants or at common deer entry points.


5. Use Physical Barriers Around Plants

For individual plants or small beds, you can use netting, chicken wire cages, or floating row covers. This works well for young trees, newly planted vegetables, or valuable ornamentals.

Be sure to secure coverings properly, as deer are persistent and can nudge or trample loose protection.


6. Create a Fragrant Barrier

Deer have sensitive noses and dislike certain strong odors. Placing scent deterrents around your garden can help keep them away.

Try using:

  • Bars of strong-smelling soap (Irish Spring is a favorite)
  • Human or dog hair in mesh bags
  • Blood meal sprinkled around plants
  • Garlic cloves planted near vulnerable areas

Replace these regularly to maintain their effectiveness.


7. Remove Deer Attractants

If you want to discourage deer, make your yard less appealing:

  • Harvest ripe fruits and vegetables promptly.
  • Remove fallen fruit from the ground.
  • Avoid planting large, unprotected patches of deer favorites.
  • Clean up brush piles and dense shrubs that offer cover.

The less inviting your garden is, the less likely deer are to linger.


8. Design a Layered Landscape

Deer prefer open areas where they can see predators approaching. By creating a layered garden with dense shrubs, thorny plants, and hard-to-reach areas, you make your yard less inviting.

Consider planting thorny or deer-resistant shrubs along the outer edges and placing prized plants closer to your home.


9. Use Companion Planting Techniques

Interplanting strong-smelling herbs and flowers among your vegetables and ornamentals can confuse and deter deer.

Good options include:

  • Garlic
  • Chives
  • Mint
  • Oregano
  • Thyme

These not only help keep deer away but also attract pollinators and beneficial insects.


10. Stay Consistent

The key to deer deterrence is consistency. Deer are creatures of habit — if they’ve found a reliable food source, it takes persistence to change their patterns.

Remember to:

  • Rotate deterrents and scents regularly.
  • Repair fences or covers promptly.
  • Keep deterrent sprays fresh.
  • Stay vigilant during peak deer seasons (spring and fall).

Final Thoughts

Deer may be graceful, but they’re no friends to a lush garden. With a combination of physical barriers, deterrents, smart planting, and a bit of strategy, you can reclaim your garden and enjoy your hard work without worrying about overnight raids.

No single solution works for everyone, but layering these tactics will significantly reduce the chances of deer damage. Whether you opt for sturdy fencing, fragrant deterrents, or deer-resistant plants, your garden can thrive beautifully — deer-free.

How to Kill Gnats in Plants – Reclaim Your Plant's Health!

How to Kill Gnats in Plants – Reclaim Your Plant’s Health!

Few things are more frustrating for plant lovers than seeing tiny, pesky gnats buzzing around their beloved indoor plants. These annoying insects, often mistaken for fruit flies, can not only be a nuisance but can also harm your plants if left unchecked. Fortunately, getting rid of gnats in plants isn’t difficult once you understand why they appear and how to effectively manage them.

In this article, we’ll break down everything you need to know about dealing with gnats in houseplants — from identifying them, understanding why they invade, and using natural, chemical, and preventive solutions to reclaim your plant’s health.

Let’s dive in!


What Are Gnats in Plants?

Gnats, specifically fungus gnats, are small, black, mosquito-like insects that often hover around the soil of indoor plants. While adult gnats are mostly harmless to humans and mature plants, their larvae can damage plant roots by feeding on organic matter in the soil — including young root hairs.

Quick facts about fungus gnats:

  • Adults are about 1/8 inch long.
  • They’re attracted to moist soil.
  • Females can lay up to 200–300 eggs in damp soil.
  • Eggs hatch into larvae within 4–6 days.
  • Larvae feed on fungi, decaying organic matter, and plant roots.

If left untreated, a gnat infestation can weaken plants, stunt growth, and even cause plant death in severe cases.


How to Identify Gnat Infestation in Plants

Before taking action, it’s important to confirm you’re dealing with gnats and not other flying pests like fruit flies.

Signs of gnat infestation:

  • Tiny black flies hovering around the soil surface.
  • Larvae (small, translucent worms with black heads) visible in wet soil.
  • Wilting, yellowing, or drooping leaves despite proper watering.
  • Mushy roots or signs of root rot due to soil staying too moist.

Once you’ve identified the problem, it’s time to tackle it head-on.


Why Do Gnats Invade Plant Soil?

The biggest attraction for gnats is consistently moist, organic-rich soil. Overwatering, poor drainage, and the presence of decaying organic material like dead leaves create the perfect breeding environment.

Key causes include:

  • Overwatering plants.
  • Using soil mixes with a high organic content.
  • Leaving decaying plant matter on the soil surface.
  • Lack of proper soil aeration.
  • Warm, humid indoor conditions.

Understanding these factors is crucial because removing them is half the battle in getting rid of gnats for good.


How to Kill Gnats in Plants: 10 Effective Methods

Now that you’ve identified the culprits and their causes, here are the best proven ways to eliminate gnats from your plants:


1. Let the Soil Dry Out

The simplest and most natural method is to let the top 1-2 inches of soil dry out completely between waterings. Fungus gnats need moist conditions to lay eggs and for larvae to survive. Dry soil disrupts their life cycle.

Pro Tip: Stick your finger into the soil; only water when it feels dry an inch below the surface.


2. Use Sticky Traps

Bright yellow sticky traps attract adult gnats and prevent them from laying eggs. Place these traps near the soil surface or hang them just above your plants.

  • Replace traps every few days as they fill up.
  • Position traps close to plant pots for maximum effectiveness.

This helps control the adult population while you target the larvae below.


3. Apply a Natural Soap Spray

A homemade insecticidal soap made from dish soap and water can kill adult gnats on contact.

Recipe:

  • Mix 1 quart of water with 1-2 teaspoons of mild dish soap.
  • Pour into a spray bottle and mist the soil surface and leaves.

Repeat every 3–4 days until gnats disappear.


4. Use Hydrogen Peroxide Solution

Hydrogen peroxide (3%) is safe for plants and effective against gnat larvae.

How to use:

  • Mix one part hydrogen peroxide with four parts water.
  • Water your plants with the solution, soaking the soil.
  • You’ll hear a fizzing sound — that’s the peroxide killing larvae and fungi.

Do this once a week until no gnats remain.


5. Introduce Beneficial Nematodes

For a completely natural, soil-safe solution, release beneficial nematodes into the soil. These microscopic worms prey on gnat larvae without harming your plants.

To use:

  • Purchase nematodes online or from garden centers.
  • Mix them with water and pour into the soil as directed.

They’re highly effective and safe for homes with pets and kids.


6. Top Dress the Soil

Gnats lay eggs on the soil’s surface. Covering it with a dry, inert material creates a barrier.

Materials to use:

  • Sand
  • Fine gravel
  • Decorative pebbles
  • Horticultural charcoal

This method also adds a stylish look to your pots while blocking access to moist soil.


7. Use Neem Oil Solution

Neem oil is a natural insecticide and fungicide, effective against both adult gnats and larvae.

How to use:

  • Mix 2 teaspoons neem oil, 1 teaspoon dish soap, and 1 quart water.
  • Spray the soil surface and plant leaves thoroughly.
  • Repeat every 7–10 days until the infestation is gone.

8. Cinnamon Powder Treatment

Cinnamon acts as a natural fungicide and gnat deterrent.

How to apply:

  • Sprinkle ground cinnamon evenly over the soil surface.
  • Water lightly to activate its antifungal properties.

It kills fungi that larvae feed on and helps control the population naturally.


9. Bottom Watering

Bottom watering involves adding water to the plant tray instead of on top of the soil. This method keeps the surface dry, making it less appealing for gnats.

How to do it:

  • Place water in the plant saucer.
  • Let the plant soak up moisture through drainage holes.
  • Remove excess water after 30 minutes.

10. Repot with Fresh, Sterile Soil

If your infestation is severe, the best option may be to repot the plant entirely.

Steps:

  • Remove the plant and gently shake off old soil.
  • Rinse roots with lukewarm water.
  • Clean the pot thoroughly.
  • Refill with fresh, sterile potting mix.
  • Water sparingly after repotting.

How to Prevent Gnats in Plants

Once you’ve eradicated the gnats, it’s important to prevent them from returning.

Prevention tips:

  • Avoid overwatering — always check soil moisture first.
  • Ensure good drainage in pots.
  • Remove dead leaves and plant debris.
  • Use well-draining, sterile potting soil.
  • Keep indoor humidity in check.
  • Regularly inspect new plants before bringing them inside.

Final Thoughts

Gnats in houseplants can be annoying, but with the right knowledge and a combination of natural and proactive methods, you can quickly reclaim your plant’s health. From sticky traps and hydrogen peroxide treatments to clever prevention tips, tackling these tiny pests is entirely manageable.

A little consistency goes a long way — and soon, your indoor jungle will be gnat-free and thriving once again.

Got a gnat problem story or a tip that worked for you? Share it in the comments — let’s help fellow plant parents win the battle against these pesky intruders!

How to Plant a Plum Seed – Enjoy Juicy Harvests!

How to Plant a Plum Seed – Enjoy Juicy Harvests!

There’s something special about enjoying fruit you’ve grown yourself. Even more satisfying? Growing it from scratch — starting with a humble seed. While many people opt for young fruit tree saplings, planting a plum seed offers a rewarding experience and, with a little patience, can lead to lush trees bearing sweet, juicy plums in your own backyard.

If you’ve ever wondered what to do with the stone at the center of your plum, this guide will walk you through how to plant a plum seed, care for it, and eventually harvest your very own homegrown fruit.


Why Grow a Plum Tree from Seed?

Growing a plum tree from seed isn’t the fastest method to get fruit, but it has its own charm and rewards:

  • Cost-effective: No need to buy a sapling — just use a seed from a fresh plum.
  • Unique results: Seed-grown trees can produce slightly different (and sometimes superior) fruit than their parent.
  • Satisfying process: Watching a seed turn into a thriving tree is deeply fulfilling.
  • Great for nature lovers: Plums attract pollinators like bees and butterflies, adding life to your garden.

Can You Grow a Plum Tree from Any Plum Seed?

Yes — but with a few considerations. Not every plum seed will sprout successfully, and some varieties sold in grocery stores are hybrids or treated to prevent germination. Your best bet is to use a seed from an organic, locally grown plum, or better yet, from a tree known to grow well in your climate.


When and Where to Plant a Plum Seed

Plum trees thrive in USDA zones 4–9, depending on the variety.
They prefer full sun, well-draining soil, and protection from strong winds.

Best time to plant:
Late winter to early spring is ideal for outdoor planting, though you can start the seed indoors any time of year and transplant later.


How to Plant a Plum Seed: Step-by-Step

What You’ll Need:

  • Fresh, ripe plum
  • Nutcracker or hammer (optional)
  • Paper towel
  • Plastic bag or small container
  • Potting soil and small pot
  • Garden space (if planting outdoors)

Step 1: Extract the Seed

Enjoy your plum, then carefully save the stone (pit) from its center. Rinse off any remaining fruit flesh under cool water and let it air dry for a day.

Optional:
To speed up germination, gently crack the outer shell with a nutcracker or hammer to reveal the almond-like seed inside. Be careful not to damage the seed.


Step 2: Cold Stratification (Mimicking Winter)

Plum seeds require a cold, dormant period before they’ll sprout — a process called stratification.

Here’s how:

  1. Wrap the clean seed in a damp paper towel.
  2. Place it in a plastic zip-top bag or airtight container.
  3. Store it in your refrigerator for 6–8 weeks.

Check the paper towel every couple of weeks to ensure it stays moist, and watch for signs of germination.


Step 3: Prepare for Planting

Once your seed has gone through stratification and begins to sprout (you’ll notice a small white root emerging), it’s ready to plant.

Choose a pot:

  • Use a small container with drainage holes.
  • Fill it with a light, well-draining potting mix (a mix of peat, perlite, and organic compost works well).

Step 4: Plant the Seed

Plant the sprouted seed about 2 inches deep in the soil, with the root pointing downward. Cover it lightly with soil and water gently until the soil is moist but not soggy.


Step 5: Provide the Right Conditions

Place the pot in a warm, sunny location.
Ideal growing conditions:

  • Temperature: 65°F–75°F (18°C–24°C)
  • Light: 6–8 hours of direct sunlight daily
  • Moisture: Keep soil slightly moist — avoid waterlogging

Step 6: Transplanting Outdoors

Once your plum seedling reaches 5–10 inches tall and the outdoor temperature stays consistently above 60°F, you can transplant it into your garden.

How to transplant:

  1. Choose a sunny, well-drained location.
  2. Dig a hole twice the size of the seedling’s root ball.
  3. Place the seedling in the hole and backfill with soil.
  4. Water thoroughly and add mulch around the base to retain moisture.

How Long Until a Plum Tree Bears Fruit?

Patience is key! A plum tree grown from seed typically takes 3–6 years to produce fruit. While it’s a longer process than planting a nursery sapling, the journey from seed to harvest is incredibly rewarding.


Caring for Your Plum Tree

Watering:
Keep the soil consistently moist, especially during the first few years. Avoid overwatering.

Fertilizing:
Feed young trees with a balanced fertilizer (10-10-10) in early spring and midsummer.

Pruning:

  • Prune in late winter while the tree is dormant.
  • Remove dead, damaged, or crowded branches.
  • Maintain an open canopy to improve air circulation and sunlight exposure.

Pest and Disease Control:
Watch for aphids, borers, and fungal diseases like brown rot.
Use organic insecticidal soap or neem oil as needed.


Benefits of Growing Plum Trees

Homegrown flavor:
Nothing beats the taste of a freshly picked, sun-ripened plum.

Aesthetic value:
Plum trees add natural beauty to your yard with delicate spring blossoms and lush foliage.

Wildlife attraction:
Pollinators love plum trees, which helps support your local ecosystem.

Versatile fruit:
Use your harvest for jams, desserts, fresh eating, or dehydrating.


Fun Plum Facts

  • The plum belongs to the Prunus genus, which includes cherries, peaches, and apricots.
  • Over 2,000 plum varieties exist worldwide.
  • Plum blossoms are a traditional symbol of perseverance in East Asian cultures.
  • Dried plums are better known as prunes, valued for their digestive benefits.

Common Mistakes to Avoid

1. Skipping stratification:
Without a proper cold period, your seed likely won’t germinate.

2. Overwatering:
Plum seedlings dislike soggy soil — keep it moist, not wet.

3. Planting too soon outdoors:
Wait until your seedling is sturdy enough and outdoor temperatures are consistently warm.

4. Ignoring pruning:
Regular pruning keeps the tree healthy and productive.


Final Thoughts

Planting a plum seed is a delightful, hands-on project that rewards you with both the process and, eventually, a bountiful harvest of sweet, homegrown plums. While it requires a bit of patience and care, the result is a beautiful fruit tree with personal significance.

Whether you’re a seasoned gardener or a curious beginner, growing a plum tree from seed is a wonderful way to connect with nature, nurture something meaningful, and eventually savor the fruits of your labor.

So next time you enjoy a juicy plum, don’t toss the pit — plant it and start your own plum-growing adventure!

How to Plant a Pineapple – Create Your Tropical Haven!

How to Plant a Pineapple – Create Your Tropical Haven!

Imagine stepping outside and plucking a sweet, golden pineapple from your own backyard or patio. With its spiky green crown and juicy flesh, the pineapple isn’t just a tropical delicacy — it’s a striking, low-maintenance plant that can thrive indoors or outdoors. The best part? You don’t need to be a master gardener or live in a tropical climate to grow one. All you need is a fresh pineapple, a bit of patience, and this simple guide.

In this article, you’ll learn everything you need to know about planting a pineapple — from choosing the right fruit to caring for your growing plant — so you can create your very own tropical haven at home.


Why Grow a Pineapple at Home?

Growing a pineapple isn’t just about the fruit; it’s about the experience. Here’s why it’s worth adding this exotic plant to your collection:

  • Unique tropical charm: Adds an instant island vibe to your home or garden.
  • Low-maintenance: Pineapples are drought-tolerant and easy to care for.
  • Fun for all ages: A simple, rewarding project for families and beginners.
  • Homegrown flavor: Nothing beats the sweetness of a pineapple you grew yourself.

Can You Really Grow a Pineapple from a Grocery Store Fruit?

Yes — and it’s surprisingly easy! Unlike some fruits that require seeds or grafting, pineapples grow from the green leafy crown found at the top of the fruit. With a little prep, that crown can sprout roots and become a new plant.


When and Where to Plant a Pineapple

Pineapples thrive in warm, sunny conditions. If you live in a tropical or subtropical climate (USDA zones 9–11), you can grow them outdoors year-round. In cooler areas, pineapples make excellent container plants that can be moved inside during the winter.

Best time to plant:
Spring or early summer is ideal, but you can start a pineapple indoors at any time of year.

Ideal growing conditions:

  • Temperature: 65°F–85°F (18°C–29°C)
  • Sunlight: 6–8 hours of bright, indirect sunlight
  • Soil: Well-draining, sandy or loamy soil with a pH of 4.5–6.5

How to Plant a Pineapple: Step-by-Step

What You’ll Need:

  • A ripe, healthy pineapple
  • Sharp knife
  • Glass of water (optional)
  • Pot with drainage holes (if container planting)
  • Well-draining potting mix
  • Garden spade (if planting outdoors)

Step 1: Choose a Ripe Pineapple

Look for a healthy, ripe pineapple with:

  • Fresh, green, and firm leaves in the crown
  • No mold, soft spots, or shriveled leaves
  • A sweet, fruity fragrance

Avoid overripe fruits with browning leaves or mushy skin.


Step 2: Remove the Crown

  1. Firmly grasp the leafy crown and twist it off the fruit. Alternatively, slice off the crown with about an inch of fruit attached.
  2. Carefully trim away excess fruit flesh at the base of the crown to prevent rot.
  3. Peel away the lower leaves (about 1 inch) to expose small root buds — these look like tiny brown dots around the stem.

Step 3: Dry the Crown

Allow the prepared crown to dry for 1–3 days in a cool, shaded area. This helps prevent rotting when it’s planted in soil or water.


Step 4: Root the Pineapple Crown (Two Methods)

Method 1: In Water (Optional)

  • Place the dried crown in a glass of water, ensuring only the stem is submerged.
  • Set the glass in a bright, warm spot.
  • Change the water every 2–3 days.
  • Wait for roots to grow — usually in 1–2 weeks.

Once roots are about 2 inches long, it’s ready for soil.

Method 2: Directly in Soil

  • Fill a pot or garden hole with well-draining potting mix.
  • Make a small hole and plant the dried crown about 1–2 inches deep.
  • Firm the soil around the base and water lightly.

Step 5: Place in a Sunny Spot

Position your pineapple plant in a sunny location that gets at least 6 hours of light daily. Indoors, place it near a bright, south-facing window.


Step 6: Water Wisely

Pineapples prefer to stay slightly dry rather than overly wet.

  • Water sparingly, allowing the top inch of soil to dry out between waterings.
  • Pour water directly into the center of the rosette of leaves (leaf cup) — it acts as a natural reservoir.
  • Reduce watering in winter when growth slows.

Step 7: Fertilize Occasionally

Feed your pineapple plant with a balanced liquid fertilizer every 2–3 months during the growing season. A slow-release or organic fertilizer also works well.

Tip:
You can use diluted compost tea or fish emulsion for a natural boost.


Step 8: Repot or Transplant as Needed

If your plant outgrows its pot or you’re moving it outdoors:

  • Choose a larger container or sunny garden spot with well-draining soil.
  • Handle the root ball gently when transplanting.
  • Keep the plant upright and water thoroughly after moving.

When Will My Pineapple Bear Fruit?

Pineapples are slow-growing and typically take 18–24 months to produce fruit. While this might seem like a long wait, the plant’s tropical beauty makes it worth it.

Signs your pineapple is ready to fruit:

  • The plant reaches about 3 feet tall.
  • A red or pink flower spike appears from the center, eventually forming a small fruit.

Once it ripens, you can harvest and repeat the process by planting the new crown.


Common Pineapple Plant Care Tips

Pests & Problems:

  • Watch for mealybugs, spider mites, and scale insects.
  • Avoid overwatering to prevent root rot.

Winter Care:

  • In cooler climates, bring container plants indoors before the first frost.
  • Place them in a bright room and reduce watering during dormancy.

Pruning:

  • Remove dead or damaged leaves as needed.
  • Cut off suckers (small shoots) if you prefer one main fruit-bearing plant.

Fun Facts About Pineapples

  • Pineapples are not grown from seeds — they grow from crowns, slips, or suckers.
  • A single pineapple plant produces one fruit per cycle.
  • The plant’s spiky leaves store water, making it drought-resistant.
  • In colonial times, pineapples were a symbol of hospitality and wealth.

Final Thoughts

Growing a pineapple plant is an easy, budget-friendly, and rewarding project that transforms your home or garden into a mini tropical retreat. With its spiky foliage, minimal maintenance needs, and eventual juicy reward, it’s a must-try for plant lovers and foodies alike.

Whether you’re placing it on a sunny patio, bright windowsill, or backyard garden, your pineapple plant will bring a touch of the tropics right to your doorstep.

So the next time you enjoy a sweet, ripe pineapple, save the crown — and start creating your very own tropical haven at home!

How to Plant Bell Peppers – Add Color to Your Garden!

How to Plant Bell Peppers – Add Color to Your Garden!

Bell peppers are among the most vibrant and versatile vegetables you can grow in your garden. Their glossy fruits come in a spectrum of colors—from green, red, yellow, and orange to even purple and chocolate brown—adding not only nutritional value but a splash of beautiful color to your garden beds. Whether you’re a seasoned gardener or a beginner eager to add some flavor and flair to your outdoor space, growing bell peppers can be incredibly rewarding.

This guide will walk you through everything you need to know about how to plant bell peppers successfully—from choosing the right varieties and preparing your soil to caring for your plants and harvesting colorful, crunchy peppers.


Why Grow Bell Peppers?

Before diving into the planting process, it’s worth highlighting why bell peppers are a fantastic addition to your garden:

  • Colorful appeal: Their vivid colors brighten any garden plot, container, or raised bed.
  • Nutritional powerhouse: Bell peppers are packed with vitamins A, C, and antioxidants.
  • Culinary versatility: Perfect raw in salads, cooked in stir-fries, stuffed, or grilled.
  • Relatively easy to grow: With proper care, they thrive in many climates.
  • Extended harvest: Produces fruits over a long season, providing ongoing satisfaction.

Step 1: Choose the Right Bell Pepper Varieties

Bell peppers come in many colors, shapes, and sizes. Selecting the right variety depends on your climate, garden space, and taste preferences.

Popular bell pepper varieties include:

  • California Wonder: Classic blocky green turning red; reliable and productive.
  • Purple Beauty: Stunning deep purple fruits with sweet flavor.
  • Golden California Wonder: Bright yellow, sweet, and crisp.
  • Orange Sun: Vibrant orange peppers that add a tropical pop.
  • Chocolate Beauty: Unique brownish peppers with rich flavor.

Tip: Choose a mix of colors to create a vibrant pepper patch that doubles as a colorful garden focal point.


Step 2: Start Seeds Indoors (If You’re in a Cooler Climate)

Bell peppers need warm soil and air temperatures to germinate and thrive. If you live in a cooler region, start seeds indoors about 8-10 weeks before your last expected frost date.

How to start seeds:

  • Use seed trays or small pots with a quality seed-starting mix.
  • Plant seeds about 1/4 inch deep and keep the soil moist but not soggy.
  • Maintain a warm environment (70-85°F) to encourage germination—using a heat mat helps.
  • Provide plenty of light—either natural south-facing windows or grow lights for 12-16 hours daily.
  • Transplant seedlings into larger pots once they develop 2-3 true leaves.

Step 3: Prepare Your Garden Bed or Containers

Bell peppers thrive in well-draining, nutrient-rich soil with a slightly acidic to neutral pH (6.0 to 6.8). Before planting outdoors:

  • Choose a sunny spot that receives at least 6-8 hours of direct sunlight daily. Bell peppers are sun lovers!
  • Amend the soil with plenty of organic matter like compost or well-rotted manure to boost fertility and moisture retention.
  • Loosen the soil to a depth of about 12 inches for good root development.
  • If your soil is heavy clay or sandy, add organic amendments and consider raised beds or large containers.

Tip: If planting in containers, use a pot at least 12 inches deep with drainage holes, filled with high-quality potting mix enriched with compost.


Step 4: Transplant Seedlings Outdoors

Once the danger of frost has passed and nighttime temperatures are consistently above 50°F (10°C), your seedlings are ready for transplanting.

How to transplant:

  • Harden off your seedlings by gradually exposing them to outdoor conditions for about a week.
  • Space plants 18-24 inches apart to allow good air circulation and growth.
  • Dig holes slightly larger than the root balls and plant seedlings at the same soil depth they were growing indoors.
  • Water well after planting to settle the soil around the roots.
  • Mulch around the plants with straw, shredded leaves, or bark to retain moisture and suppress weeds.

Step 5: Watering and Feeding Your Bell Peppers

Bell peppers prefer consistently moist soil but dislike soggy roots.

Watering tips:

  • Water deeply about 1-2 times per week depending on rainfall and temperature.
  • Avoid overhead watering to reduce the risk of fungal diseases; drip irrigation or watering at the base is best.
  • Mulching helps maintain moisture and prevent soil from drying out too quickly.

Feeding tips:

  • Fertilize with a balanced vegetable fertilizer (such as 10-10-10) every 3-4 weeks during the growing season.
  • Alternatively, side-dress with compost or well-rotted manure to provide slow-release nutrients.
  • Avoid excessive nitrogen, which can encourage foliage growth at the expense of fruit production.

Step 6: Support Your Plants

Some bell pepper varieties can become top-heavy as fruits develop. To prevent plants from bending or breaking:

  • Use stakes, cages, or tomato supports to keep stems upright.
  • Tie plants loosely with garden twine or soft ties.
  • Regularly check supports as the plants grow to adjust ties and prevent damage.

Step 7: Watch for Pests and Diseases

Bell peppers are generally hardy but can be vulnerable to some pests and diseases.

Common pests include:

  • Aphids
  • Spider mites
  • Pepper maggots
  • Cutworms

Control methods:

  • Introduce beneficial insects like ladybugs for aphid control.
  • Spray with insecticidal soap or neem oil if infestations occur.
  • Remove affected leaves and debris promptly.

Common diseases:

  • Blossom end rot (caused by calcium deficiency or uneven watering)
  • Bacterial spot
  • Powdery mildew

Preventive tips:

  • Maintain consistent watering and good soil nutrition.
  • Provide proper spacing and airflow to reduce humidity.
  • Rotate crops yearly to avoid soil-borne diseases.

Step 8: Encourage Flowering and Fruit Set

Bell peppers produce flowers before fruits, and good flower development is key to a bountiful harvest.

Tips for promoting flowers:

  • Ensure your plants get plenty of sunlight (at least 6-8 hours daily).
  • Avoid excessive nitrogen fertilization, which can delay flowering.
  • Maintain steady watering to prevent flower drop.
  • Hand pollinate flowers by gently shaking or tapping blossoms to mimic insect activity (especially useful in greenhouses or indoor setups).

Step 9: Harvest Your Bell Peppers

Bell peppers can be harvested when they are still green or when they reach their mature color—red, yellow, orange, purple, or brown—depending on the variety.

Harvest tips:

  • Use sharp scissors or pruners to cut peppers off the plant to avoid damage.
  • Harvest peppers when they are firm, glossy, and fully sized for the best flavor and crunch.
  • Pick regularly to encourage the plant to keep producing more fruit.
  • If you want sweeter peppers, allow them to ripen fully on the plant, but watch out for over-ripening or pest damage.

Step 10: Extend Your Growing Season

In cooler climates, you can extend your bell pepper harvest with a few smart strategies:

  • Use row covers or cloches to protect plants from chilly nights.
  • Grow peppers in containers that can be moved indoors or to sheltered spots during cold spells.
  • Start seeds indoors early or buy transplants from local nurseries.
  • In warmer regions, plant a fall crop for a second harvest.

Bonus Tips for Growing Bell Peppers Successfully

  • Rotate your crops yearly to keep soil healthy and reduce disease risks.
  • Companion plant with basil, onions, or carrots to repel pests and improve growth.
  • Avoid planting peppers near beans or fennel, which can stunt growth.
  • Keep an eye on soil pH and amend with lime if it’s too acidic.
  • Harvest regularly to prevent plants from becoming overcrowded with fruit.

Final Thoughts

Bell peppers are an excellent choice for gardeners looking to add both beauty and bounty to their gardens. Their colorful fruits make your garden pop visually, while the fresh harvest delights your kitchen with nutritious, tasty produce. By following these 10 essential steps—from seed selection to harvest—you can enjoy a flourishing bell pepper patch all season long.

So why wait? Grab some seeds, prepare your soil, and get ready to add a vibrant splash of color and flavor to your garden with bell peppers!

How to Plant Broccoli Plants – Nutritious Greens Made Easy!

How to Plant Broccoli Plants – Nutritious Greens Made Easy!

Broccoli is a nutrient-packed vegetable loved by gardeners and health enthusiasts alike. Known for its rich content of vitamins C, K, fiber, and antioxidants, broccoli is a powerhouse of nutrition that can transform your garden into a green haven. Plus, growing broccoli at home guarantees fresh, flavorful, and pesticide-free produce right at your fingertips.

If you’ve ever wondered how to plant broccoli successfully and make the process simple and rewarding, you’re in the right place. This comprehensive guide will take you through every step—from choosing the right variety to harvesting those delicious green crowns. Ready to add a splash of vibrant health to your garden? Let’s dive in!


Why Grow Broccoli?

Before we get into the planting details, let’s understand why broccoli is worth the effort:

  • Nutrient Dense: Packed with vitamin C, vitamin K, fiber, folate, and powerful antioxidants.
  • Versatile in Cooking: Can be steamed, roasted, sautéed, or eaten raw in salads and slaws.
  • Long Growing Season: Depending on your climate, broccoli can be grown in spring, fall, or even winter in milder areas.
  • Easy to Grow: With proper care, broccoli thrives in many garden settings—from raised beds to containers.
  • Pest Deterrent: Acts as a companion plant to deter some pests in vegetable gardens.

Step 1: Choose the Right Broccoli Variety

There are several broccoli types suited to different climates and tastes. Selecting the right variety is the first step toward success.

Common varieties include:

  • Calabrese: Classic large-headed broccoli with thick stalks and dark green heads.
  • Sprouting Broccoli: Produces many smaller heads and tender shoots over a longer season.
  • Purple Cauliflower: A colorful relative that can add visual interest and nutrition.
  • Romanesco: Unique fractal-shaped heads with a milder flavor.

Tip: For beginners, Calabrese varieties like ‘Green Magic’ or ‘Packman’ are reliable and productive.


Step 2: When to Plant Broccoli

Broccoli is a cool-season crop that grows best in temperatures between 65°F and 75°F (18°C to 24°C). It can tolerate light frost but struggles in hot weather.

Planting timelines:

  • Spring Planting: Start seeds indoors 6-8 weeks before the last expected frost, then transplant seedlings outdoors 2-3 weeks before the last frost date.
  • Fall Planting: Sow seeds or transplant seedlings 8-10 weeks before the first expected frost for a fall harvest.
  • Mild Winters: In warmer climates, broccoli can be grown almost year-round with appropriate timing.

Step 3: Starting Broccoli Seeds Indoors

Starting broccoli from seed indoors ensures a head start on the growing season, especially in cooler areas.

How to start seeds:

  • Use seed trays or small pots filled with a quality seed-starting mix.
  • Sow seeds ¼ to ½ inch deep.
  • Keep the soil moist and maintain a temperature around 65°F to 75°F for optimal germination.
  • Provide plenty of light—either from a sunny window or grow lights—12-16 hours per day.
  • Transplant seedlings when they develop 4-6 true leaves and are sturdy enough to handle.

Step 4: Preparing Your Garden for Broccoli

Broccoli prefers well-drained, fertile soil with a pH between 6.0 and 7.0. Preparing the soil properly boosts growth and yield.

Steps for preparation:

  • Choose a sunny location that receives at least 6 hours of direct sunlight daily.
  • Work compost or well-rotted manure into the soil to enrich it with organic matter and nutrients.
  • Loosen the soil to about 12-15 inches deep to allow room for roots.
  • Conduct a soil test if possible and amend the soil according to recommendations.

Step 5: Transplanting Seedlings Outdoors

Once seedlings are 4-6 weeks old and outdoor temperatures are suitable, it’s time to transplant.

How to transplant:

  • Harden off seedlings by gradually exposing them to outdoor conditions for 7-10 days.
  • Space plants 18-24 inches apart in rows 24-36 inches apart to provide room for growth and airflow.
  • Dig holes deep enough for roots and plant at the same depth as they grew indoors.
  • Water thoroughly after transplanting to settle the soil.
  • Mulch around plants to retain moisture and suppress weeds.

Step 6: Caring for Your Broccoli Plants

Consistent care is essential for healthy broccoli and bountiful harvests.

Watering:

  • Broccoli needs regular, deep watering—about 1-1.5 inches per week.
  • Avoid water stress, which can cause poor head development or bolting.
  • Use drip irrigation or water at the base to reduce disease risk.

Feeding:

  • Fertilize with a balanced fertilizer or side-dress with compost every 3-4 weeks.
  • Avoid excess nitrogen late in the season to prevent leafy growth at the expense of heads.

Weeding:

  • Keep the bed weed-free to reduce competition for nutrients and water.
  • Mulching helps suppress weeds naturally.

Step 7: Pest and Disease Management

Broccoli can attract pests like aphids, cabbage worms, and flea beetles, as well as diseases like clubroot and downy mildew.

Common pests & solutions:

  • Aphids: Spray with insecticidal soap or introduce beneficial insects like ladybugs.
  • Cabbage Worms: Handpick larvae or use Bt (Bacillus thuringiensis), a natural biological pesticide.
  • Flea Beetles: Use row covers early in the season to protect young plants.

Disease prevention:

  • Rotate crops yearly to reduce soil-borne diseases.
  • Avoid overhead watering to reduce fungal problems.
  • Remove and destroy affected plants promptly.

Step 8: Supporting Broccoli Growth

To maximize head development:

  • Thin seedlings if overcrowded.
  • Pinch off any early flower buds that appear before the head is formed to encourage bigger heads.
  • Provide adequate water and nutrients throughout the growing season.

Step 9: Harvesting Your Broccoli

Knowing when and how to harvest is key to enjoying your nutritious greens.

Harvest indicators:

  • Harvest when the central head is fully formed but before the flower buds start to open (before yellow flowers appear).
  • The head should be firm and tight, about 4-7 inches in diameter depending on variety.
  • Cut the main head with a sharp knife, leaving a few inches of stem.

Bonus: After harvesting the main head, many broccoli plants will produce smaller side shoots that can be harvested for weeks afterward.


Step 10: Extending Your Broccoli Harvest

To enjoy broccoli longer:

  • Plant varieties with staggered maturity dates.
  • Succession plant every 2-3 weeks during the planting window.
  • Use row covers to protect against early frost and pests.
  • Consider container gardening for flexibility in placement and season extension.

Bonus Tips for Successful Broccoli Growing

  • Companion planting: Plant broccoli near aromatic herbs like dill and rosemary to deter pests. Avoid planting near strawberries or tomatoes, which compete for nutrients.
  • Soil health: Regularly add organic matter to maintain fertility.
  • Harvest timing: Harvest broccoli early in the morning for the freshest taste.
  • Frost protection: Use garden fleece or row covers if frost threatens during early or late season plantings.

Final Thoughts

Growing broccoli is not only rewarding but also an excellent way to boost your home garden’s health and nutrition profile. With a bit of planning, care, and patience, you can enjoy vibrant green crowns packed with vitamins and antioxidants right from your backyard.

Whether you’re planting in a spacious garden bed or a large container on your patio, broccoli is surprisingly easy to grow for gardeners of all skill levels. So start your seeds, prepare your soil, and get ready to enjoy nutritious greens made easy!

8 Jade Plants That Will Bring Good Vibes to Your Room

8 Jade Plants That Will Bring Good Vibes to Your Room

If you’re looking for a plant that’s both beautiful and believed to attract prosperity, the jade plant is a classic favorite. Known for its thick, fleshy leaves and rich symbolism in Feng Shui, jade plants are said to bring good luck, wealth, and positive energy to any space. From compact varieties perfect for tabletops to striking tree-like shapes that anchor a room, there’s a jade plant for every corner. Let’s explore 8 jade plants that will brighten your room and uplift your vibes.


1. Crassula Ovata (Classic Jade Plant)

The traditional jade plant, Crassula Ovata, is a must-have for anyone looking to invite prosperity into their space. With its thick, oval-shaped leaves that shimmer in deep green, this plant symbolizes growth and renewal. It’s incredibly low-maintenance and thrives in indirect sunlight, making it perfect for indoor settings. Place it by your desk, living room, or entrance for a touch of good fortune and to purify the air around you.


2. Crassula Ovata ‘Hobbit’

A quirky and eye-catching variety, Crassula Ovata ‘Hobbit’ features tubular, finger-like leaves that curl inward. Its unique look makes it a conversation starter in any room. Ideal for small shelves or side tables, this jade plant variety loves bright, indirect sunlight. Its distinctive shape is associated with curiosity and adventure, bringing playful, uplifting energy to your home environment while still offering the same air-purifying benefits as its classic counterpart.


3. Crassula Ovata ‘Gollum’

Similar to the ‘Hobbit’ jade but with more elongated, trumpet-shaped leaves, ‘Gollum’ jade adds a sculptural element to any room. Its leaves often have a reddish tint at the tips, giving it a charming, mystical appearance. In Feng Shui, it’s believed to attract wealth and harmony, especially when placed near entryways or office desks. It’s easy to care for and thrives with minimal attention, making it perfect for beginners.


4. Crassula Ovata ‘Hummel’s Sunset’

If you love a splash of color, ‘Hummel’s Sunset’ is the jade plant for you. Its leaves transition from green to brilliant shades of yellow, orange, and red at the edges, especially under bright light. This vibrant variety symbolizes abundance and joy. It’s an ideal choice for brightening dull corners and bringing a warm, positive glow to your room decor. It pairs wonderfully with neutral or earth-toned interiors.


5. Crassula Arborescens (Silver Dollar Jade)

Known for its round, silver-blue leaves with a slightly powdery finish, Crassula Arborescens is a serene and sophisticated addition to any space. The leaves often develop a pinkish tinge in sunlight, adding subtle beauty. Associated with peace and clarity, this jade variety makes a lovely accent for bedrooms, meditation corners, or home offices. Its calm appearance helps create a tranquil, balanced atmosphere.


6. Crassula Ovata ‘Minima’

A dwarf version of the classic jade, ‘Minima’ features compact, thick leaves and grows as a small, branching shrub. Perfect for small apartments, desks, or window sills, it symbolizes steady growth and personal development. This adorable jade variety occasionally produces small pink or white star-shaped flowers, making it both decorative and symbolic. It’s great for those wanting a positive, nurturing plant without taking up much space.


7. Crassula Ovata ‘Tricolor’

For those who enjoy variegated foliage, the ‘Tricolor’ Jade Plant offers a beautiful mix of green, cream, and pink hues on its fleshy leaves. This plant represents balance and harmony, making it an ideal choice for shared spaces like living rooms or family areas. The colorful leaves not only brighten up a room but are also believed to attract loving, peaceful energy, helping to maintain a harmonious home environment.


8. Crassula Ovata ‘Red Edge’

As the name suggests, ‘Red Edge’ jade boasts green leaves with striking red margins, especially when exposed to plenty of sunlight. This fiery accent plant is said to draw in vibrant energy and good fortune. Its bold color makes it a standout on windowsills or console tables. It thrives with minimal care, requiring only occasional watering and bright, indirect light, making it a perfect low-maintenance good luck charm.


Final Thoughts

Jade plants not only enhance your room’s aesthetic but also bring symbolic positive energy, wealth, and balance. Whether you prefer the classic jade or unique, colorful varieties, these plants are wonderful additions to any indoor space. Easy to care for and rich in meaning, jade plants make perfect companions for those seeking both style and good vibes.

6 Poison Ivy Plants to Know and Avoid

6 Poison Ivy Plants to Know and Avoid

While gardens and nature walks are a source of beauty and tranquility, it’s important to know which plants can cause harm. Poison Ivy is one of the most notorious plants in North America, known for causing itchy, blistering skin reactions. It’s a master of disguise, often blending in with other foliage, and it changes appearance with the seasons. Whether you’re hiking, camping, or gardening, being able to identify different forms of poison ivy is key to staying safe. Let’s explore six types and lookalikes you should know and avoid.


1. Toxicodendron radicans (Eastern Poison Ivy)

Eastern Poison Ivy is the most common form and can be found throughout the eastern and central United States. It usually grows as a trailing vine or ground cover, though it can also climb trees and fences. Its famous “leaves of three, let it be” warning refers to its three pointed, glossy leaflets. These leaves turn reddish in spring, green in summer, and vibrant orange or red in the fall. Contact with its oily resin, urushiol, causes itchy, red rashes on the skin. It’s commonly found in wooded areas, fields, and disturbed grounds.


2. Toxicodendron rydbergii (Western Poison Ivy)

Western Poison Ivy is a close relative of its eastern counterpart but is more commonly found in the northern and western parts of North America. Unlike the climbing Eastern Poison Ivy, this variety typically grows as a small shrub, ranging from 1 to 2 feet tall. It still bears the signature three-leaflet arrangement, with leaves that can be shiny or dull, smooth-edged, or slightly toothed. It thrives in dry woods, along roadsides, and riverbanks. Like other poison ivies, it releases urushiol when bruised or broken, causing severe skin irritation.


3. Toxicodendron diversilobum (Pacific Poison Oak)

Although commonly called poison oak, Pacific Poison Oak is technically a species of poison ivy. Native to the western U.S., particularly California, it can grow as a vine or shrub. Its leaves often resemble oak leaves, with deep lobes, and they grow in groups of three. The foliage changes colors with the seasons — bright green in spring, darker in summer, and rich red-orange in fall. It thrives in coastal areas, woodlands, and chaparral. Like other members of the Toxicodendron genus, it produces urushiol that can cause allergic reactions upon contact.


4. Toxicodendron pubescens (Atlantic Poison Oak)

Found mostly in sandy soils of the southeastern U.S., Atlantic Poison Oak is another shrub-like relative of poison ivy. It has three oak-like, lobed leaflets that are hairy on both sides — a key identifying feature. The leaves can range from green to reddish depending on the season. It typically grows in open woods, fields, and along fence rows. While less common than Eastern Poison Ivy, it still contains urushiol, capable of causing intense itching, redness, and swelling when it comes in contact with the skin.


5. Poison Ivy in Winter (Bare Stems & Vines)

Winter Poison Ivy might seem harmless because it sheds its leaves, but it remains dangerous. The bare vines and stems still contain urushiol. During the colder months, poison ivy vines can be recognized by their hairy appearance as they cling to trees, fences, and walls. Even the dormant plant can trigger allergic reactions if touched. Many people make the mistake of pulling or cutting these vines in winter, thinking they’re safe — an important reason to recognize its distinctive hairy, rope-like stems year-round.


6. Poison Ivy Lookalikes (Virginia Creeper & Boxelder)

While not true poison ivy, several lookalike plants can confuse even experienced gardeners and hikers. Virginia Creeper (Parthenocissus quinquefolia), for instance, has five leaflets rather than three but grows in a similar vine-like manner. Boxelder (Acer negundo) seedlings can also mimic poison ivy with their three-leaflet pattern early in growth. While these plants don’t produce urushiol, mistaking them for poison ivy can lead to unnecessary worry. Learning the subtle differences — like the number of leaflets or vine characteristics — is essential for safe outdoor adventures.


Conclusion

Knowing how to identify poison ivy and its lookalikes can save you from uncomfortable rashes and allergic reactions. Whether it’s the classic Eastern Poison Ivy, the shrubby Atlantic Poison Oak, or a misleading Virginia Creeper, being aware of these plants helps you confidently enjoy nature and tend to your garden safely. Remember the golden rule: “Leaves of three, let it be” — and when in doubt, steer clear.