How to Propagate and Plant a Christmas Cactus: A Complete Step-by-Step Guide

How to Propagate and Plant a Christmas Cactus: A Complete Step-by-Step Guide

If you’re looking to grow a houseplant that not only brightens your home but also carries a beautiful family tradition, the Christmas Cactus is a wonderful choice. Known for its elegant, drooping stems and vibrant, tubular flowers that bloom around the holiday season, this charming succulent is easy to propagate, plant, and care for.

In this complete guide, we’ll explore everything you need to know about propagating and planting a Christmas Cactus successfully — from choosing healthy cuttings to the perfect potting mix, planting techniques, and aftercare. Whether you’re a beginner or a seasoned plant enthusiast, you’ll be able to expand your collection and keep your home blooming every festive season.


Why Grow a Christmas Cactus?

Unlike many desert cacti, the Christmas Cactus (Schlumbergera bridgesii) hails from Brazil’s tropical rainforests and grows in shaded, humid environments. It’s prized for:

  • Brilliant blooms in shades of pink, red, white, yellow, or purple
  • Low-maintenance nature — perfect for homes and offices
  • Easy propagation for gifting or expanding your indoor garden
  • Longevity — some family plants have been passed down for generations!

The Best Time to Propagate a Christmas Cactus

The ideal time to propagate is:

  • After the blooming season (typically late winter to early spring)
  • When the plant is actively growing and producing new stems
  • Avoid propagating while it’s in bloom, as this can stress the plant and reduce the chances of successful rooting.

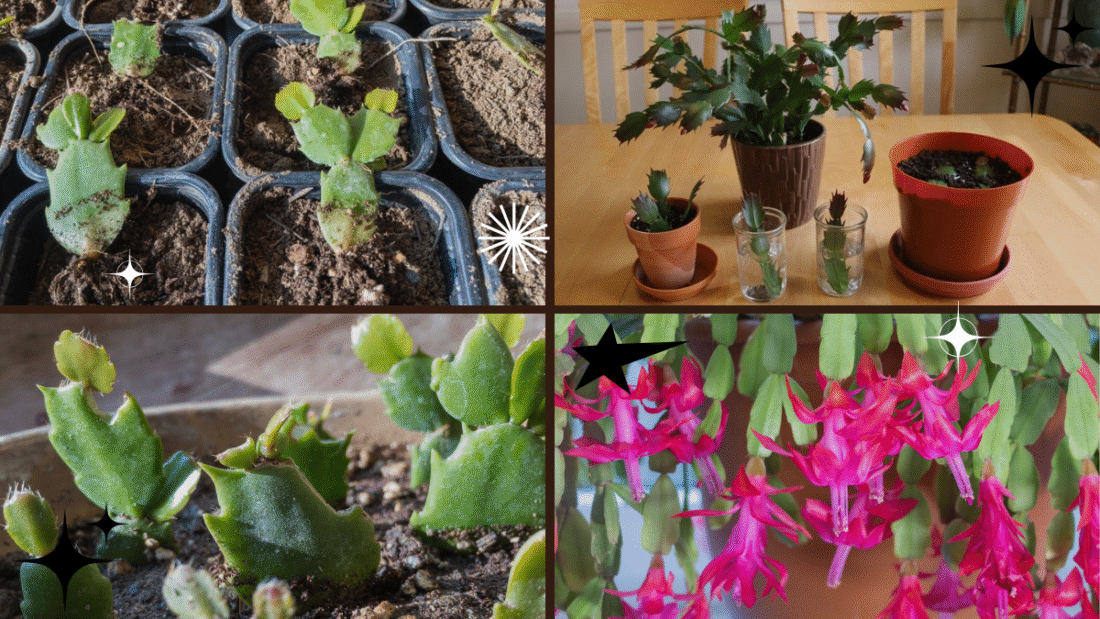
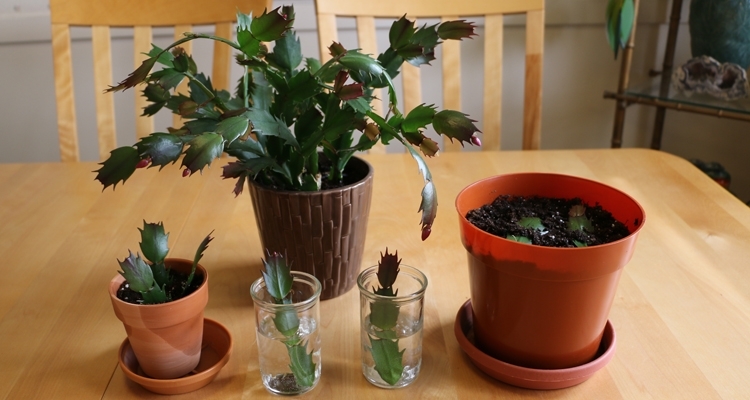
How to Propagate a Christmas Cactus

You can propagate a Christmas Cactus through stem cuttings. It’s an easy and reliable method that usually yields high success rates.

What You’ll Need:

  • A healthy, mature Christmas Cactus
  • Clean, sharp scissors or pruning shears
  • Small pots or containers
  • Well-draining potting mix
  • Rooting hormone (optional, but helpful)
  • Spray bottle for misting

Step-by-Step Propagation Guide

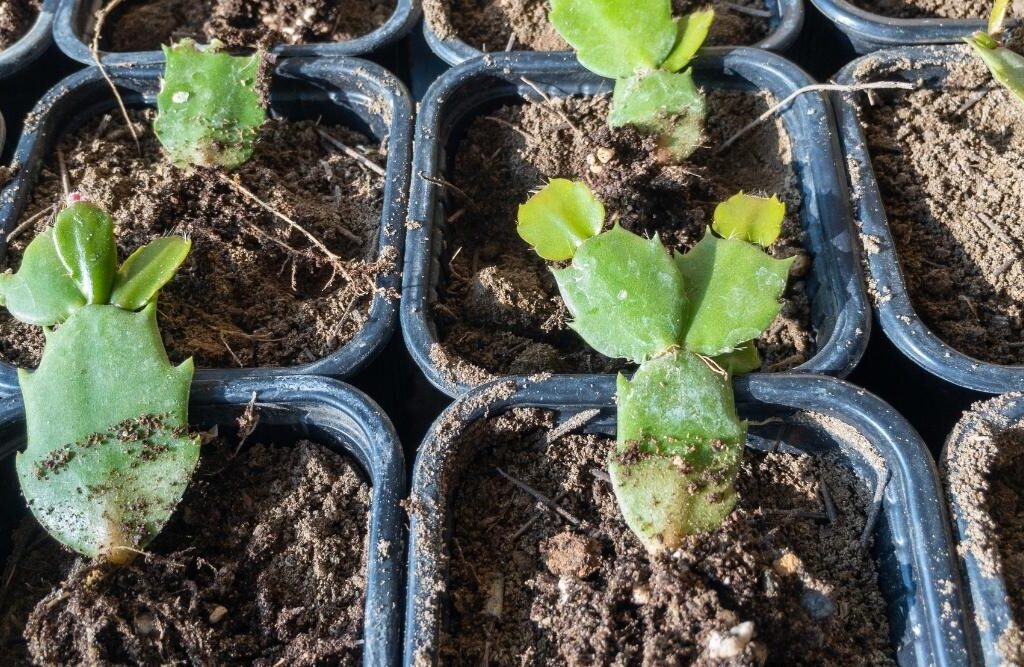
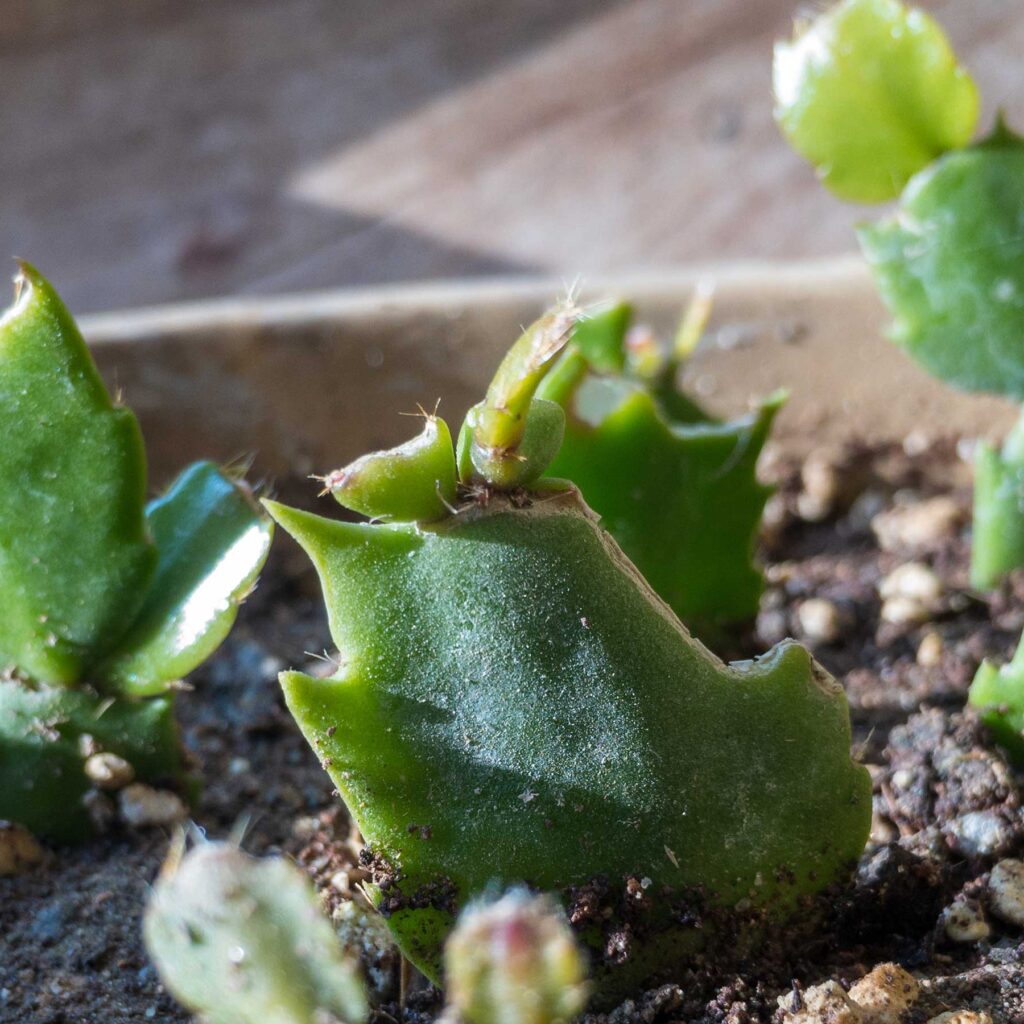
Step 1: Choose a Healthy Stem

Look for a firm, vibrant green stem with 3-5 joined segments (leaf-like pads). Avoid stems that appear wilted, shriveled, or discolored.

Step 2: Make the Cut

Using sterilized scissors or pruning shears:

  • Cut the stem cleanly between segments, ideally at a joint.
  • Take several cuttings to increase your chances of success.

Step 3: Let the Cuttings Callus

Before planting, allow your cuttings to dry and callus over at the cut end for 24-48 hours in a cool, dry place. This step prevents rot once planted.

Step 4: (Optional) Dip in Rooting Hormone

For faster root development, you can dip the cut end of each cutting into a rooting hormone powder.


How to Plant Christmas Cactus Cuttings

Once your cuttings are callused, it’s time to plant them.

Step 1: Prepare the Pot and Soil

Choose small pots with drainage holes. Christmas Cactus prefers slightly acidic, well-draining soil. You can use:

  • A mix of 2 parts cactus or succulent soil and 1 part perlite or coarse sand
  • Or make your own with regular potting soil, perlite, and peat moss

Step 2: Plant the Cuttings

  • Insert each cutting about 1-2 inches deep into the soil, with at least one segment buried.
  • Firm the soil gently around the cutting to hold it upright.
  • Space cuttings an inch apart if planting several in one pot.

Step 3: Mist and Position

  • Lightly mist the soil with a spray bottle — avoid soaking.
  • Place the pot in a bright, indirect light location (avoid direct sunlight).
  • Maintain a temperature of around 65-75°F (18-24°C) for optimal rooting.

Caring for New Christmas Cactus Cuttings

Watering:

  • Mist lightly every 2-3 days, keeping the soil barely moist.
  • Avoid overwatering — too much moisture can cause cuttings to rot.

Rooting Time:

  • New roots typically form in 2-4 weeks.
  • You’ll know your cutting has rooted when you feel slight resistance if you gently tug it.

Transplanting:

  • Once your cuttings show new growth or roots fill the pot, transplant them into slightly larger containers filled with the same potting mix.

Long-Term Care for Christmas Cactus

Once established, Christmas Cactus is low-maintenance and long-living.

Light:

  • Prefers bright, indirect light
  • Avoid harsh, direct sunlight which can scorch leaves.

Water:

  • Water when the top inch of soil feels dry.
  • Water thoroughly, allowing excess water to drain.
  • Reduce watering frequency in fall and winter.

Humidity:

  • Christmas Cactus enjoys moderate to high humidity.
  • Mist regularly or use a humidity tray indoors, especially during dry months.

Fertilizing:

  • Feed with a balanced, water-soluble fertilizer every 4-6 weeks from spring through early fall.
  • Stop feeding in late fall before the plant’s blooming period.

Pruning:

  • After flowering, prune lightly to encourage branching and a fuller shape.
  • Use clean scissors to remove leggy or damaged stems.

How to Encourage Christmas Cactus Blooms

To enjoy vibrant blooms during the holidays:

1. Provide a Rest Period

  • In fall, reduce watering and keep the plant in a cool (50-60°F/10-15°C), dark location for 6 weeks.

2. Limit Light Exposure

  • For flower buds to form, the plant needs 12-14 hours of darkness daily for several weeks.

3. Resume Regular Care

  • Once buds form, move the plant back to its bright spot and resume regular watering.

Common Issues and How to Fix Them

Wilted Leaves:

  • Cause: Overwatering or underwatering
  • Fix: Adjust watering schedule and check drainage

No Blooms:

  • Cause: Too much light or warmth during the pre-bloom rest period
  • Fix: Move to a cooler, darker spot in fall

Rotting Stems:

  • Cause: Excess water or poor drainage
  • Fix: Remove affected parts and repot in fresh, dry soil

Fun Facts About Christmas Cactus

  • Despite its name, it’s not a desert cactus but an epiphytic cactus that grows on trees in rainforests.
  • Some Christmas Cactus plants can live for over 50 years, often passed down through families.
  • Its relative, the Easter Cactus, blooms in spring and has slightly different care needs.

Final Thoughts

Propagating and planting a Christmas Cactus is a rewarding, beginner-friendly project that allows you to multiply one of the most charming houseplants around. With just a little patience and care, your home can soon be filled with bright, holiday blooms and lush, trailing green stems.

Whether you’re propagating to gift to loved ones or expanding your indoor plant family, following these simple, detailed steps will help you grow healthy, happy Christmas Cactus plants that brighten your space year after year.

How to Plant and Grow Orchid Plants at Home

How to Plant and Grow Orchid Plants at Home

Orchids are one of the most beautiful and exotic houseplants you can grow at home. With their stunning blooms, intricate patterns, and long-lasting flowers, orchids can instantly add elegance and tranquility to any indoor space. While many people assume that orchids are delicate and difficult to care for, the truth is — with the right approach, growing orchids at home is surprisingly manageable and rewarding.

In this detailed guide, we’ll explore how to plant and grow orchid plants at home — from choosing the right type and planting it correctly to ongoing care and troubleshooting common issues.


Why Grow Orchids at Home?

Before we get into the how-to, let’s look at why orchids make such wonderful houseplants:

  • Visually stunning: Their unique shapes and vibrant colors brighten up any room.
  • Air-purifying: Like many houseplants, orchids improve indoor air quality by absorbing toxins.
  • Compact and space-saving: Perfect for small apartments, bedrooms, and office desks.
  • Long-lasting blooms: Many orchid varieties bloom for several weeks or even months.
  • Symbolic beauty: Orchids symbolize love, luxury, and strength.

Popular Orchid Varieties for Home Growing

Not all orchids are created equal — some are easier for beginners, while others need a bit more expertise. Here are a few beginner-friendly options to consider:

Phalaenopsis (Moth Orchid)

  • Most popular houseplant orchid.
  • Long-lasting blooms in a variety of colors.
  • Prefers indirect light and consistent humidity.

Dendrobium

  • Compact plants with abundant flowers.
  • Tolerates a range of conditions.
  • Blooms usually last up to six weeks.

Cattleya

  • Known for large, fragrant flowers.
  • Prefers bright, indirect light.
  • Requires a bit more attention to humidity and temperature.

Oncidium (Dancing Lady Orchid)

  • Distinctive flowers resembling dancing figures.
  • Loves bright, filtered light and regular watering.

Ideal Growing Conditions for Orchids

To successfully grow orchids at home, you need to replicate their natural tropical habitat as closely as possible.

Light:
Bright, indirect sunlight is best. Avoid placing orchids in direct sunlight, which can scorch the leaves. A north or east-facing window is ideal.

Temperature:

  • Day: 65–80°F (18–27°C)
  • Night: 55–65°F (13–18°C)

Humidity:
Orchids thrive in 50–70% humidity. Use a humidity tray, room humidifier, or regular misting to maintain these levels indoors.

Air Circulation:
Good airflow is essential to prevent disease. Place your orchid where it can receive fresh air without being exposed to cold drafts.


What You’ll Need to Grow Orchids at Home

  • Healthy orchid plant or seedling
  • Orchid pot (with drainage holes)
  • Orchid-specific growing medium (bark chips, sphagnum moss, or perlite mix)
  • Humidity tray (optional)
  • Watering can or spray bottle
  • Balanced orchid fertilizer (20-20-20 or similar)

How to Plant Orchids at Home: Step-by-Step Guide


Step 1: Choose the Right Pot and Growing Medium

Orchid pots typically have extra drainage holes to prevent root rot. Choose a pot that’s only slightly larger than the root ball.

Orchid growing medium is different from regular soil. It’s typically made of bark chips, sphagnum moss, coconut husk, or a mixture — providing good drainage and aeration.


Step 2: Prepare the Orchid Plant

If you’re transplanting an orchid:

  • Gently remove it from its existing pot.
  • Trim away any dead, mushy, or dry roots with sterilized scissors.
  • Rinse the healthy roots under lukewarm water.

Step 3: Plant the Orchid

  • Add a small layer of the orchid medium at the bottom of the pot.
  • Place the orchid inside, spreading its roots gently.
  • Fill around the roots with the medium, ensuring the plant is stable but not buried too deeply.
  • The base of the plant (called the crown) should sit just above the medium’s surface.

Step 4: Water the Orchid

After planting, water thoroughly until the medium is evenly moist. Let excess water drain out completely.


Step 5: Position in the Right Spot

Place your orchid near an east-facing window or in a bright, shaded spot. Avoid direct afternoon sun, which can damage the leaves.


How to Care for Orchids at Home

Growing orchids is mostly about consistency and observation. Here’s how to keep them healthy and blooming:

Watering:

  • Water once a week in winter, twice in summer.
  • Always check if the medium is dry before watering.
  • Use room-temperature, filtered water if possible.
  • Avoid letting water sit at the base, which can cause root rot.

Humidity:

  • Maintain 50–70% humidity using a tray filled with pebbles and water beneath the pot.
  • Mist the leaves lightly in the morning.

Fertilizing:

  • Use a balanced orchid fertilizer every 2–3 weeks during the growing season (spring and summer).
  • Reduce feeding in fall and winter.

Repotting:

  • Orchids need repotting every 1–2 years, preferably after flowering.
  • Use fresh medium to replace the old, decomposed one.

Common Orchid Growing Problems (and How to Fix Them)

ProblemCauseSolution
Yellowing leavesOverwatering, poor drainageReduce watering, improve drainage
Wrinkled leavesUnderwatering or root rotCheck roots and adjust watering
No bloomsInsufficient light or nutrientsMove to a brighter spot, fertilize
Moldy roots or mediumExcess moisture, poor airflowRemove affected parts, repot
Drooping flowersSudden temperature changeMaintain steady indoor temperatures

Tips for Encouraging More Blooms

  • Ensure enough bright, indirect light.
  • Keep night temperatures 10°F cooler than daytime.
  • Use a bloom booster fertilizer when buds start to form.
  • Cut the flower spike back to a node after blooms drop to encourage a second bloom cycle (for some types like Phalaenopsis).

Benefits of Having Orchids at Home

Beyond their beauty, orchids offer several lifestyle perks:

  • Improve indoor air quality.
  • Add color and vibrancy to any room.
  • Reduce stress and promote calmness.
  • Serve as a rewarding, low-maintenance hobby.
  • Make perfect, thoughtful gifts for special occasions.

Frequently Asked Questions

Q: How long do orchid flowers last?
A: Most orchid blooms last 6–10 weeks, depending on the variety and care.

Q: Do orchids like to be root-bound?
A: Yes — orchids prefer snug pots. Only repot when absolutely necessary.

Q: Can orchids grow in regular potting soil?
A: No — regular soil holds too much moisture and suffocates orchid roots. Always use a specialized orchid medium.

Q: How often should I water my orchid?
A: Typically once a week, but adjust based on temperature, humidity, and medium dryness.


Final Thoughts

Orchids may have a reputation for being finicky, but with the right setup and a little care, they’re one of the most rewarding houseplants to grow. By choosing beginner-friendly varieties, providing bright but indirect light, maintaining humidity, and sticking to a consistent watering schedule, you’ll enjoy vibrant, exotic blooms right in your living room.

Ready to add a touch of tropical elegance to your home? Start planting orchids today — and discover why these timeless beauties have enchanted plant lovers for centuries.

How to Plant Mushrooms at Home Easily

How to Plant Mushrooms at Home Easily

If you’ve ever marveled at the rich, earthy flavor of fresh mushrooms in your meals and thought about growing your own, you’re not alone. More and more home gardeners and food lovers are discovering the joy of cultivating mushrooms at home. Unlike typical plants, mushrooms are fungi — and they grow differently, in dark, damp, and nutrient-rich environments. The good news? With a few simple tools and a little patience, growing mushrooms at home is easier than you might think.

In this guide, we’ll walk you through how to plant mushrooms at home easily, covering everything from choosing your mushroom variety to harvesting your first batch.


Why Grow Mushrooms at Home?

Before diving into the how-to, let’s take a look at why growing mushrooms at home is such a rewarding activity:

  • Freshness and flavor: Homegrown mushrooms have richer flavor and texture than store-bought varieties.
  • Health benefits: Mushrooms are packed with vitamins, antioxidants, and immune-boosting properties.
  • Space-saving: They don’t require a garden — you can grow them indoors in a basement, kitchen, or closet.
  • Eco-friendly: Growing your own mushrooms reduces your carbon footprint and food waste.

Best Mushroom Varieties for Home Growing

Start with beginner-friendly varieties that thrive in controlled environments:

White Button Mushrooms (Agaricus bisporus)

  • Mild flavor
  • Ideal for beginners
  • Grows well in composted manure

Oyster Mushrooms (Pleurotus ostreatus)

  • Fast-growing and low-maintenance
  • Can be grown on straw, coffee grounds, or sawdust

Shiitake Mushrooms (Lentinula edodes)

  • Rich, earthy flavor
  • Best grown on hardwood logs or sawdust blocks

What You’ll Need to Grow Mushrooms at Home

Supplies:

  • Mushroom spores or spawn (available from garden centers or online)
  • Growing medium (straw, compost, sawdust, or coffee grounds, depending on variety)
  • Containers (trays, buckets, or grow bags)
  • Spray bottle or mister
  • Thermometer (optional but helpful)
  • Plastic sheeting or lids to maintain humidity

Best Growing Conditions for Mushrooms

Mushrooms prefer:

  • Low light or darkness
  • High humidity (80–95%)
  • Cool to moderate temperatures (55°F–70°F / 13°C–21°C depending on species)
  • Fresh, moist growing medium

A basement, dark closet, or shaded room corner works well for indoor mushroom growing.


Step-by-Step Guide to Plant Mushrooms at Home

Let’s get practical — here’s exactly how to do it:


Step 1: Choose Your Mushroom and Growing Medium

Decide which mushroom type suits your taste and growing setup:

  • White button mushrooms: Composted manure
  • Oyster mushrooms: Straw, coffee grounds, or sawdust
  • Shiitake mushrooms: Hardwood logs or sawdust blocks

Purchase spores or spawn matched to your chosen variety.


Step 2: Prepare the Growing Medium

For straw or sawdust:

  • Cut straw into small pieces.
  • Soak it in hot water (160°F / 71°C) for 1 hour to sterilize.
  • Drain and cool to room temperature.

For composted manure:

  • Moisten the compost until it feels like a damp sponge.

For logs:

  • Drill holes and soak the log in water for 24 hours.

Step 3: Inoculate the Medium with Mushroom Spawn

Mix the mushroom spawn into your prepared growing medium.

  • For containers: Spread a 2–3 inch (5–8 cm) layer of medium, sprinkle spawn evenly, and cover with more medium.
  • For logs: Insert spawn plugs into drilled holes and seal with wax.

Step 4: Create a Humid, Dark Environment

Cover containers loosely with plastic sheeting or lids to maintain humidity and darkness.

  • Mist the surface regularly to keep it damp but not waterlogged.
  • Maintain the ideal temperature based on your mushroom variety.

Step 5: Incubation Period

Allow the spawn to colonize the medium:

  • White button mushrooms: 2–3 weeks
  • Oyster mushrooms: 10–14 days
  • Shiitake mushrooms: 6–12 months on logs

During this time, keep the area dark and humid. You’ll notice white, thread-like growth called mycelium spreading through the medium.


Step 6: Trigger Fruiting (Mushroom Growth)

Once the medium is fully colonized:

  • Expose it to indirect light for a few hours daily.
  • Lower the temperature slightly.
  • Increase fresh air circulation.
  • Keep misting the surface to maintain humidity.

Small mushroom pins will appear within days to weeks.


Step 7: Harvest Your Mushrooms

When mushrooms reach mature size:

  • Gently twist and pull them from the medium.
  • Avoid cutting, as this may leave stubs that could rot.

Timing varies:

  • Oyster mushrooms: Ready in 5–7 days after pinning
  • White button mushrooms: 7–10 days
  • Shiitake mushrooms: A few weeks to months

How to Care for Growing Mushrooms

  • Mist regularly: Keep medium consistently damp but not soggy.
  • Control temperature: Maintain the optimal range for your species.
  • Limit light exposure: Most mushrooms prefer darkness for colonization and dim light for fruiting.
  • Watch for mold: Remove any green or black moldy patches promptly.

Common Mushroom Growing Problems and Solutions

ProblemCauseSolution
Medium too dryInsufficient mistingMist daily, cover with plastic sheet
Mold growthExcessive moisture, poor airflowRemove affected areas, improve air flow
No mushroom growthWrong temperature or spawn diedCheck environment, replace if needed
Mushrooms too smallLow humidity or nutrientsIncrease misting, refresh medium

Benefits of Growing Mushrooms at Home

  • Fresh, organic produce without chemicals
  • Sustainable recycling of kitchen scraps (like coffee grounds)
  • Saves money compared to grocery store prices
  • Year-round harvest in controlled conditions
  • Fun, educational hobby for families and kids

Frequently Asked Questions

Q: Can I grow mushrooms in my kitchen?
Yes — as long as you can maintain high humidity and avoid direct sunlight, a kitchen corner works well.

Q: How long does it take to grow mushrooms?
From inoculation to harvest, it takes about 3–4 weeks for oyster or button mushrooms and several months for shiitake.

Q: Are homegrown mushrooms safe to eat?
Absolutely — as long as you’re using spores from reliable suppliers and following clean growing practices.

Q: Can mushrooms grow in sunlight?
No — mushrooms thrive in low light or dark, humid environments.

Q: How many times can I harvest from one batch?
Most growing mediums produce 2–3 flushes (harvest cycles) before needing replacement.


Final Thoughts

Growing mushrooms at home is surprisingly easy, fun, and highly rewarding. Whether you’re a seasoned gardener or a curious beginner, mushrooms offer a unique way to produce fresh, healthy food in small spaces, all year round.

By selecting beginner-friendly varieties like oyster or white button mushrooms and following simple steps for moisture, temperature, and cleanliness, you’ll soon be enjoying your own homegrown fungi. It’s a fantastic hobby that nourishes both your kitchen and your connection to nature.

How to Plant and Maintain Moss in Your Garden

How to Plant and Maintain Moss in Your Garden

When you think of tranquil, enchanting gardens, one plant quietly working its magic is moss. Soft, velvety, and vibrantly green, moss transforms ordinary spaces into serene retreats. Whether you want to create a peaceful shade garden, a carpet-like ground cover, or a Japanese-inspired landscape, moss adds texture and a timeless natural beauty to any outdoor space.

Best of all — moss is hardy, low-maintenance, and eco-friendly. If you’ve been curious about incorporating moss into your garden, this guide will show you exactly how to plant and maintain moss for a lush, inviting landscape.


Why Choose Moss for Your Garden?

Moss offers both aesthetic and practical advantages:

  • Evergreen year-round: Stays green through all seasons.
  • Low maintenance: Requires no mowing, fertilizing, or chemical treatments.
  • Thrives in shade: Perfect for areas where grass struggles.
  • Prevents soil erosion: Ideal for slopes and damp areas.
  • Creates tranquil spaces: Common in Zen gardens and shaded retreats.

Moss is perfect for modern, rustic, or classic garden designs — from stepping stone pathways to shady nooks and decorative rock gardens.


Types of Moss for Gardens

There are several varieties to consider, depending on your landscape and climate:

Sheet Moss (Hypnum)

  • Forms soft, carpet-like layers.
  • Great for ground cover and shady areas.

Cushion Moss (Leucobryum glaucum)

  • Grows in mounded, pillow-like shapes.
  • Beautiful for rock gardens and accents.

Haircap Moss (Polytrichum)

  • Upright, spiky texture.
  • Ideal for woodland gardens and moist areas.

Fern Moss (Thuidium)

  • Feathery, fern-like appearance.
  • Spreads quickly and thrives in shade.

Where and When to Plant Moss

Moss thrives in moist, shaded areas, although some varieties tolerate sun if humidity remains high.

Best Time to Plant

  • Spring and fall are ideal, when temperatures are moderate and moisture is more consistent.
  • Avoid planting in the heat of summer or during droughts.

Ideal Planting Conditions

  • Shade or partial shade: Under trees, near walls, or alongside paths.
  • Moist, acidic soil: pH between 5.0 and 5.5 is best.
  • Compact soil: Moss prefers firm, clay-like or compacted soil without loose texture.

How to Plant Moss: Step-by-Step Guide

Whether you’re transplanting live moss or growing it from a slurry, these steps will ensure successful establishment.


Materials You’ll Need:

  • Moss sheets or clumps (purchased or foraged ethically)
  • Garden rake or hoe
  • Spray bottle or hose with mist setting
  • Water
  • Optional: Buttermilk or yogurt (for slurry method)

Planting Moss Sheets or Clumps

1. Prepare the Area

  • Remove leaves, weeds, grass, and debris.
  • Lightly rake or tamp down the soil for a firm, even surface.

2. Test Soil pH

  • Use a pH testing kit.
  • If necessary, acidify the soil using sulfur or organic compost.

3. Place the Moss

  • Press moss sheets or clumps firmly onto the soil.
  • For clumps, arrange pieces tightly together for even coverage.

4. Water Immediately

  • Mist the moss thoroughly, ensuring it makes good contact with the soil.

5. Keep Moist

  • Mist daily for the first 2-3 weeks until moss establishes and roots into the soil.

Planting Moss with a Slurry Method

Ideal for vertical surfaces, rocks, or difficult spots.

1. Blend Moss Fragments

  • Combine 2 cups of moss pieces with 2 cups of buttermilk (or yogurt) and a cup of water in a blender.
  • Blend into a paint-like slurry.

2. Apply the Slurry

  • Paint or pour the mixture onto soil, rocks, or wood surfaces.
  • Keep the area moist, misting daily until moss starts growing.

How to Maintain Moss in Your Garden

Once established, moss requires very little attention. Here’s how to keep it lush and healthy:

Watering

  • Keep moss consistently moist, especially in dry periods.
  • Use a mist setting or spray bottle to avoid dislodging moss.
  • In shady, humid environments, natural rainfall may suffice.

Clearing Debris

  • Gently remove fallen leaves, twigs, and debris regularly.
  • Use a soft broom or hand to avoid disturbing the moss.

Trimming

  • Trim overgrown or uneven patches with garden scissors.
  • This promotes a uniform, dense appearance.

Sunlight Management

  • If moss starts browning due to excess sunlight, create shade using nearby plants, garden screens, or shade cloth.

Common Moss Problems and Solutions

IssueCauseSolution
Yellowing or browning patchesToo much sun, lack of moistureIncrease watering, provide partial shade
Loose or lifting patchesInadequate contact with soilPress firmly and mist frequently until rooted
Invasion by weeds or grassCompetition for space/nutrientsRegularly clear weeds, maintain acidic soil
Mold or algae on mossPoor air circulation, excess moistureThin out dense patches, improve drainage

Benefits of Moss in Garden Landscapes

Still wondering why you should choose moss over grass or other ground covers? Here’s what makes moss a standout:

  • Eco-friendly: No fertilizers, pesticides, or mowing required.
  • Supports biodiversity: Provides habitat for insects and small wildlife.
  • Retains moisture: Keeps soil cool and reduces water evaporation.
  • Reduces erosion: Ideal for shady, sloped, or wet areas.
  • Aesthetic appeal: Adds ancient, mystical charm to any setting.

Frequently Asked Questions

Q: Can moss grow in sunny areas?
Some varieties, like Haircap Moss, tolerate dappled sunlight if kept moist. However, most moss thrives in shade.

Q: Does moss need soil to grow?
No — moss can grow on soil, wood, rocks, and even concrete if moisture and shade are adequate.

Q: How fast does moss spread?
Moss grows slowly at first but accelerates once established. Regular misting and care can speed up growth.

Q: Is moss safe for pets and children?
Yes — moss is non-toxic and safe for pets and kids to walk or play on.

Q: Can I transplant moss from the wild?
It’s best to purchase nursery-grown moss or forage responsibly (with permission) to protect wild habitats.


Final Thoughts

Planting and maintaining moss in your garden is a rewarding, low-maintenance way to create a serene, naturally beautiful outdoor space. Whether you’re covering a shady patch of ground, adding texture between stepping stones, or designing a Zen retreat, moss brings softness, color, and tranquility to your landscape.

By choosing the right variety, ensuring proper planting conditions, and maintaining consistent moisture, you’ll enjoy a vibrant, evergreen moss garden that transforms your space into a soothing, green sanctuary.

How to Plant Lavender for a Relaxing Aroma

How to Plant Lavender for a Relaxing Aroma

Few plants are as beloved as lavender, with its silvery foliage, elegant purple flower spikes, and famously soothing scent. A staple of Mediterranean landscapes, cottage gardens, and modern patios alike, lavender not only adds beauty to your garden but also fills the air with a calming, fresh fragrance that relaxes the mind and lifts the spirit.

Whether you dream of a sun-drenched lavender border, a scented patio container, or a cutting garden for dried lavender sachets, this comprehensive guide will show you exactly how to plant, grow, and care for lavender to enjoy its relaxing aroma right at home.


Why You Should Plant Lavender in Your Garden

Lavender isn’t just beautiful — it’s one of the most useful and rewarding plants you can grow. Here’s why gardeners and aromatherapy lovers adore it:

  • Naturally fragrant: Fills your garden with a soothing scent.
  • Attracts pollinators: Bees and butterflies love it.
  • Drought-tolerant: Thrives in dry, sunny spots.
  • Low maintenance: Needs minimal care once established.
  • Versatile uses: Great for cut flowers, dried arrangements, sachets, culinary uses, and essential oils.

Choosing the Right Lavender Variety

Before you start planting, choose the variety that best suits your climate, garden space, and aesthetic:

English Lavender (Lavandula angustifolia)

  • Most fragrant
  • Cold hardy (zones 5-9)
  • Ideal for culinary uses

French Lavender (Lavandula dentata)

  • Delicate, frilly flowers
  • Mild fragrance
  • Less cold-hardy (zones 8-11)

Spanish Lavender (Lavandula stoechas)

  • Distinctive “rabbit ear” bracts
  • Good for warm climates (zones 7-10)

Lavandin (Lavandula x intermedia)

  • Hybrid of English and Portuguese lavender
  • Larger plants, intense aroma
  • Great for drying and oil extraction

When and Where to Plant Lavender

Timing and location play a huge role in lavender’s success.

Best Time to Plant

  • Spring or early summer is ideal, after the danger of frost has passed.
  • In hot climates, fall planting is also possible.

Choosing the Perfect Spot

Lavender loves Mediterranean conditions:

  • Full sun: At least 6-8 hours of direct sunlight daily.
  • Well-drained soil: Prefers sandy or gravelly soil.
  • Good air circulation: Prevents fungal diseases.

If your soil is heavy or clay-like, amend it with sand, gravel, and organic matter to improve drainage.


How to Plant Lavender: Step-by-Step Guide

Whether you’re planting from nursery-grown plants, cuttings, or seeds, follow these steps for healthy, aromatic lavender.

Materials You’ll Need:

  • Lavender plants or seeds
  • Gardening gloves
  • Compost or aged manure
  • Garden trowel
  • Mulch (optional)

Planting Lavender from Plants (Recommended)

1. Prepare the Soil
Loosen soil to a depth of 12 inches. Mix in coarse sand or small gravel for drainage. Optionally, add a handful of lime to slightly raise soil pH to the preferred 6.5-7.5 range.

2. Dig the Hole
Dig a hole twice the width of the plant’s root ball and about the same depth.

3. Position the Plant
Gently remove the plant from its container. Tease out the roots if tightly bound. Place it in the hole so the crown (where stems meet roots) is level with the soil surface.

4. Backfill and Water
Fill in around the plant with amended soil, pressing down gently. Water deeply to settle the soil.

5. Spacing
Allow 2-3 feet of space between plants to ensure good airflow and room for growth.


Planting Lavender from Seeds

Lavender seeds can be tricky but rewarding with patience.

1. Start Indoors:
Sow seeds 6-12 weeks before the last frost in a seed tray with light, sandy soil.

2. Light & Warmth:
Place trays in a warm, sunny window or under grow lights. Maintain soil temperature around 70°F (21°C).

3. Transplanting:
Once seedlings have several true leaves and all frost risk has passed, harden them off outdoors for a week, then plant following the steps above.


Essential Lavender Care Tips

Once planted, lavender is delightfully low maintenance — but a little attention goes a long way.

Watering

  • Water young plants deeply once a week.
  • Once established, water sparingly. Allow soil to dry out between waterings.

Tip: Overwatering is the most common way to kill lavender.

Pruning

  • Lightly prune after the first bloom to encourage a second flush.
  • In early spring, cut back woody stems by one-third to maintain shape and vigor.

Fertilizing

  • Lavender thrives in lean soil. Avoid rich fertilizers.
  • A light top dressing of compost in spring is enough.

Mulching

Use light-colored gravel or coarse sand as mulch. It reflects sunlight and keeps the soil dry — perfect for lavender.


How to Harvest and Use Lavender

Lavender’s uses are endless, from aromatherapy to culinary delights.

When to Harvest:

  • Cut flower stems just as buds open for the strongest fragrance.

How to Dry Lavender:

  • Tie stems in small bundles.
  • Hang upside down in a dry, shaded, well-ventilated spot.
  • Store dried lavender in airtight containers for sachets, teas, or crafts.

Popular Uses:

  • Homemade lavender sachets
  • Dried flower arrangements
  • Lavender-infused oils
  • Baking and herbal teas
  • Natural insect repellent

Common Lavender Growing Problems and Solutions

ProblemCauseSolution
Yellowing leavesOverwatering, poor drainageWater less, improve soil drainage
Woody, sparse growthLack of pruningPrune annually in spring
No bloomsToo much shade, rich soilMove to a sunnier spot, avoid fertilizing
Root rotWaterlogged soilEnsure well-drained soil, use gravel mulch
Aphids or spittlebugsInsect pestsSpray with a mild soapy water solution

Frequently Asked Questions

Q: Can I grow lavender in pots?
Absolutely! Use a terracotta or clay pot with excellent drainage holes and a gritty soil mix. Place in full sun and water sparingly.

Q: How long does it take for lavender to bloom?
Lavender planted from nursery plants blooms the same year. Seed-grown plants typically flower in their second year.

Q: Is lavender deer and rabbit resistant?
Yes — the fragrant oils deter most garden pests and wildlife.

Q: Does lavender survive winter?
English lavender is hardy to zone 5. In colder areas, grow in pots and overwinter indoors or heavily mulch outdoor plants.


Final Thoughts

There’s nothing quite like the gentle, relaxing aroma of lavender swaying in the summer breeze. With its elegant appearance, easy-care nature, and versatile uses, lavender is one of the most rewarding plants you can grow. By choosing the right variety, planting in the proper location, and following a few simple care tips, you’ll enjoy a garden filled with beauty and calming fragrance year after year.

So go ahead — roll up your sleeves, grab some lavender plants, and transform your garden into a serene, aromatic haven!

How to Plant Iris Bulbs for Beautiful Flowers

How to Plant Iris Bulbs for Beautiful Flowers

If you’re dreaming of a garden filled with elegant, colorful, and hardy blooms, irises are the perfect flowers to consider. Known for their distinctive sword-like foliage and striking, intricate flowers, irises are a classic favorite in home gardens. They’re relatively easy to plant and maintain, rewarding gardeners with breathtaking flowers in shades ranging from deep purples and blues to yellows, whites, and even multicolored varieties.

In this comprehensive guide, we’ll show you exactly how to plant iris bulbs (actually rhizomes, in most cases), when to plant them, where to plant them, and how to care for them to ensure a vibrant display year after year.


Why Choose Irises for Your Garden?

Irises aren’t just beautiful — they’re also remarkably versatile and hardy. Here’s why gardeners love them:

  • Wide range of colors and varieties
  • Attract pollinators like bees and butterflies
  • Deer and rabbit resistant
  • Low maintenance once established
  • Adaptable to different garden styles: cottage, formal, wildflower meadows, or water gardens

Types of Iris Bulbs You Can Plant

Before you start planting, it’s important to know that not all irises grow from traditional bulbs. The term “iris bulbs” is commonly used to describe rhizomes (horizontal underground stems) for bearded irises and true bulbs for species like Dutch or reticulated irises. Here’s a quick breakdown:

1. Rhizomatous Irises

  • Bearded Irises: The most popular garden iris, with a fuzzy ‘beard’ on their petals.
  • Beardless Irises: Including Siberian and Japanese irises, which lack the fuzzy beard but are equally stunning.

2. Bulbous Irises

  • Dutch Irises: Typically grown from true bulbs, known for their delicate blooms and suitability for cutting gardens.
  • Reticulated Irises: Small, early-blooming species perfect for rock gardens and borders.

This guide will focus mainly on bearded irises and Dutch irises, as these are the most common for home gardeners.


When to Plant Iris Bulbs

The right planting time is crucial for healthy growth and beautiful blooms:

  • Bearded Irises (Rhizomes): Plant in late summer to early fall (July to September).
  • Dutch Irises (Bulbs): Plant in fall (September to November), before the ground freezes.

Planting at the right time allows irises to establish roots before winter and bloom beautifully in spring or early summer.


How to Choose the Perfect Planting Location

Irises thrive best in certain conditions:

  • Full Sun: Aim for at least 6 hours of direct sunlight daily. Less sun leads to fewer blooms.
  • Well-Drained Soil: Irises dislike “wet feet.” Choose a spot with good drainage to avoid rot.
  • Air Circulation: Good airflow around plants reduces the risk of fungal diseases.

If your soil is heavy clay, amend it with compost, sand, or fine gravel to improve drainage.


Step-by-Step Guide: How to Plant Iris Bulbs

Whether you’re planting rhizomes or bulbs, follow these steps for a healthy start.


How to Plant Bearded Iris Rhizomes

Materials Needed:

  • Iris rhizomes
  • Garden spade or fork
  • Compost or organic matter

Steps:

  1. Prepare the Soil
    Loosen the soil about 12 inches deep. Mix in some compost to improve fertility and drainage.
  2. Dig Shallow Holes
    Create a shallow hole or trench about 4 inches deep and 10-12 inches apart for each rhizome.
  3. Position the Rhizome
    Place the rhizome horizontally in the hole with its roots fanned out beneath it. Keep the top of the rhizome slightly exposed or just barely covered with soil.
  4. Backfill and Water
    Lightly cover the roots and firm the soil around the rhizome. Water gently to settle the soil, but avoid soaking.
  5. Spacing
    Space plants 10-24 inches apart to allow good air circulation and room for growth.

How to Plant Dutch Iris Bulbs

Materials Needed:

  • Dutch iris bulbs
  • Garden trowel
  • Compost or bulb fertilizer

Steps:

  1. Prepare the Bed
    Loosen soil to about 8 inches deep and mix in compost or a balanced bulb fertilizer.
  2. Dig Planting Holes
    Plant bulbs 4 inches deep and 3-4 inches apart, with the pointed end facing upwards.
  3. Cover and Water
    Backfill the hole and water gently. Keep the soil moist but not waterlogged through fall until the ground freezes.

How to Care for Iris Plants After Planting

Proper aftercare ensures your irises establish well and bloom abundantly.

Watering

  • Newly planted irises: Water lightly after planting and keep soil slightly moist until established.
  • Established irises: Water during dry spells, especially in the growing season, but avoid overwatering.

Fertilizing

  • Apply a low-nitrogen fertilizer (like 5-10-10) in early spring and just after flowering.
  • Avoid high-nitrogen feeds as they promote leaf growth over blooms.

Mulching

  • Apply a light mulch after planting Dutch iris bulbs in fall to protect them from hard frosts.
  • Avoid mulching directly over rhizomes to prevent rot.

Dividing

Bearded irises need dividing every 3-5 years to prevent overcrowding and maintain flower production.

How to divide:

  • Dig up clumps after flowering, in late summer.
  • Discard old, woody rhizomes and replant healthy sections.

Common Problems and Solutions

ProblemCauseSolution
Rhizome rotOverwatering, poor drainageImprove soil drainage, avoid mulching rhizomes
No flowersToo much shade, overcrowdingMove to a sunnier spot, divide clumps
Leaf spot (fungal)Poor air circulationSpace plants well, remove affected leaves
Aphids or thripsInsect pestsUse insecticidal soap or neem oil

Frequently Asked Questions

Q: Can I plant irises in containers?
Yes — especially Dutch irises and dwarf bearded irises. Ensure containers have good drainage and place them in a sunny spot.

Q: How long do iris flowers last?
Individual blooms last 1-2 days, but each stem holds multiple buds, offering color for 1-2 weeks per plant.

Q: Should I deadhead irises after blooming?
Yes — remove spent flowers to tidy plants and prevent seed formation, which diverts energy from rhizome development.


Final Thoughts

Planting iris bulbs is a rewarding, simple garden project that offers lasting beauty with minimal effort. Whether you choose bearded irises for their show-stopping elegance or Dutch irises for their graceful charm, following the right planting techniques and aftercare tips will fill your garden with stunning blooms season after season.

So, grab your garden gloves, pick your favorite iris varieties, and start planting — your future self will thank you for those breathtaking, colorful flowers swaying in the breeze!

How to Plant Grass Seed on an Existing Lawn: A Complete, Easy-to-Follow Guide

How to Plant Grass Seed on an Existing Lawn: A Complete, Easy-to-Follow Guide

A lush, green lawn is one of the most beautiful and inviting features of any yard. But over time, even the healthiest lawns can develop bare patches, thinning grass, or areas where weeds have taken over. The good news? You don’t need to rip everything out and start from scratch. Planting grass seed on an existing lawn — a process called overseeding — is an effective, affordable, and eco-friendly way to rejuvenate your lawn and restore it to its former glory.

In this detailed guide, we’ll walk you through everything you need to know about how to successfully plant grass seed on an existing lawn — from when to do it, what tools and supplies you’ll need, how to prepare your lawn, and the best aftercare tips to guarantee thick, healthy, beautiful grass.


Why Should You Overseed Your Lawn?

Before we get into the how, let’s talk about why overseeding is worth your time:

  • Fills in bare patches and thinning areas
  • Crowds out weeds naturally
  • Improves the lawn’s color, density, and resilience
  • Helps your lawn recover from drought, disease, or insect damage
  • Allows you to introduce better, more modern grass seed varieties

Whether you want to touch up a few problem spots or give your entire yard a refresh, overseeding is one of the most cost-effective ways to improve your landscape.


When Is the Best Time to Plant Grass Seed on an Existing Lawn?

Timing is key when it comes to overseeding. You want to give the new grass seeds the best possible conditions to germinate and establish.

  • Cool-Season Grasses (like Kentucky Bluegrass, Fescue, and Ryegrass):
    Best overseeded in early fall (late August to early October) or early spring (March to April) when temperatures are between 60°F and 75°F.
  • Warm-Season Grasses (like Bermuda, Zoysia, and St. Augustine):
    Best overseeded in late spring to early summer (April to June) when soil temperatures are consistently warm.

Pro tip: Fall is generally considered the ideal time for overseeding because the cooler temperatures, increased rainfall, and reduced weed competition create optimal conditions for seed germination.


What You’ll Need

Before getting started, gather these supplies:

Tools:

  • Lawn mower
  • Metal rake or dethatcher
  • Garden hose or sprinkler
  • Seed spreader (broadcast or drop type)

Materials:

  • High-quality grass seed (suited to your region and lawn type)
  • Lawn starter fertilizer (optional but recommended)
  • Topsoil or compost (optional for topdressing)

Step-by-Step: How to Plant Grass Seed on an Existing Lawn

1. Choose the Right Grass Seed

Select a high-quality seed blend suited to your climate, lawn conditions (sun vs. shade), and your existing grass type. Look for disease-resistant, drought-tolerant, and fast-germinating varieties for best results.

Examples:

  • Shady areas: Fine Fescue blends
  • Sunny lawns: Perennial Ryegrass or Kentucky Bluegrass
  • Southern lawns: Bermuda or Zoysia

Check seed packaging for information about coverage rates.


2. Mow the Lawn Short

Cut your existing grass to a height of about 1.5 to 2 inches. This reduces competition for light, improves soil contact for new seeds, and makes it easier to see bare spots. Collect and remove all grass clippings.


3. Rake or Dethatch the Lawn

Use a metal rake or dethatching tool to remove dead grass, leaves, and debris. This step also roughens the soil surface, creating better contact points for seeds to settle into.

For heavily compacted soil, consider aerating your lawn with a core aerator to allow water, air, and nutrients to reach the roots more easily.


4. Apply Grass Seed Evenly

Using a broadcast spreader or drop spreader, evenly distribute the grass seed over the entire lawn, focusing extra seed on bare or thin areas.

Coverage tip: Follow the seed package’s recommended overseeding rate, usually listed in pounds per 1,000 square feet.

For small patchy areas: You can scatter seed by hand.


5. Lightly Rake the Seeds Into the Soil

After spreading the seed, gently rake the area to help mix the seeds into the top 1/8 inch of soil. This improves seed-to-soil contact — a crucial factor for germination.


6. (Optional) Topdress with a Thin Layer of Soil or Compost

For improved germination rates, sprinkle a very light layer (no more than 1/4 inch) of screened topsoil or compost over the seeded area. This helps retain moisture, protects seeds from birds, and adds nutrients.


7. Water the Lawn Consistently

Watering is critical for successful overseeding. Newly planted seeds need to stay moist until they germinate.

Watering schedule:

  • Water lightly 2–3 times per day for the first 7–14 days to keep the topsoil consistently damp.
  • As seeds germinate (usually 5–21 days depending on the grass type), gradually reduce watering frequency but increase the depth of watering to encourage deep root growth.

8. Apply Starter Fertilizer (Optional)

A high-phosphorus lawn starter fertilizer can help new grass establish faster. Apply it at seeding time according to the manufacturer’s instructions. Be cautious not to overfertilize, which can harm delicate seedlings.


How to Care for Your Overseeded Lawn

Once your new grass starts growing, proper care ensures it blends seamlessly with your existing lawn.

  • Mow for the first time when the new grass reaches about 3 inches tall. Set your mower to its highest setting to avoid scalping the young grass.
  • Avoid heavy foot traffic on newly seeded areas for at least 3–4 weeks.
  • Keep watering regularly until the new grass is established (about 6–8 weeks).
  • After about 4–6 weeks, apply a balanced lawn fertilizer to promote healthy, sustained growth.

Common Mistakes to Avoid

  1. Planting seed too deeply: Grass seed needs light and soil contact to germinate.
  2. Letting the soil dry out: New seeds must stay consistently moist.
  3. Overseeding at the wrong time: Poor timing reduces germination success.
  4. Using the wrong grass seed type: Match your seed to your region and lawn conditions.
  5. Neglecting to prep the lawn properly: Skipping dethatching or mowing short reduces overseeding effectiveness.

Benefits of Overseeding Regularly

Regular overseeding (once every 1–2 years) offers multiple benefits:

  • Keeps your lawn looking fresh and healthy
  • Naturally suppresses weeds by crowding them out
  • Enhances lawn color and texture
  • Helps lawn recover from seasonal stress or pest damage

Final Thoughts

Planting grass seed on an existing lawn is one of the easiest and most effective ways to restore and rejuvenate your outdoor space. With a little effort and attention to detail — from choosing the right seed to preparing your lawn and maintaining proper watering — you can achieve a dense, vibrant, and weed-resistant lawn that’ll make your neighbors green with envy.

So grab your spreader, pick out your favorite grass seed blend, and give your lawn the fresh start it deserves!

How to Plant Flowers for a Vibrant Garden: A Complete Guide for Beginners

How to Plant Flowers for a Vibrant Garden: A Complete Guide for Beginners

There’s something truly magical about stepping into a garden brimming with colorful, fragrant flowers. Whether you’re hoping to brighten up your backyard, create a charming border, or add some life to your balcony, planting flowers is one of the most satisfying and rewarding hobbies you can take up.

But where should you begin? How do you ensure your flowers not only survive but thrive and bloom beautifully through the seasons? In this comprehensive guide, we’ll walk you through everything you need to know about planting flowers for a vibrant garden — from choosing the right flowers to planting, caring, and maintaining them.


Why Plant a Flower Garden?

Before we dive into the details, let’s take a moment to appreciate why planting flowers is such a beloved pastime:

  • Beautifies your outdoor space
  • Boosts your mood and mental well-being
  • Attracts pollinators like bees, butterflies, and hummingbirds
  • Provides fresh flowers for arrangements and gifts
  • Encourages a connection with nature and seasonal rhythms

With a bit of planning and care, anyone — even beginners — can create a colorful, blooming garden.


When Is the Best Time to Plant Flowers?

The ideal planting time depends on your region and the type of flowers you choose:

  • Spring: Most annuals and perennials can be planted once the risk of frost has passed.
  • Fall: Great for planting spring-blooming bulbs and hardy perennials.
  • Summer: Suitable for adding heat-loving annuals to beds or containers.

Tip: Always check your local hardiness zone and frost dates for precise timing.


Types of Flowers You Can Plant

When planning your garden, it’s important to know the basic categories of flowering plants:

Annuals

  • Complete their life cycle in one season.
  • Known for vibrant, continuous blooms.
  • Examples: Petunias, Marigolds, Zinnias, Impatiens

Perennials

  • Return year after year, usually blooming for a specific season.
  • Require patience but offer long-term beauty.
  • Examples: Daylilies, Coneflowers, Hostas, Black-eyed Susans

Bulbs

  • Planted in fall or spring, depending on the variety.
  • Produce stunning seasonal blooms.
  • Examples: Tulips, Daffodils, Crocuses, Irises

Pro tip: Combining all three types ensures a dynamic, season-long display.


How to Choose the Right Flowers for Your Garden

Success in flower gardening starts with selecting plants suited to your environment:

Factors to consider:

  • Sun exposure: Full sun (6+ hours), partial shade, or full shade
  • Soil type: Sandy, clay, loamy, or rocky
  • Climate and hardiness zone: Choose flowers adapted to your area
  • Color palette: Harmonize colors for a balanced aesthetic or go wild with a rainbow effect
  • Height and spread: Plan taller plants in the back and shorter ones in front

Idea: Mix textures, shapes, and bloom times for a layered, lush garden look.


How to Prepare the Soil for Planting

Healthy soil is the foundation of a thriving flower garden.

Steps for soil preparation:

  1. Clear the area: Remove weeds, rocks, and debris.
  2. Loosen the soil: Use a shovel or garden fork to loosen soil to a depth of 8–12 inches.
  3. Amend the soil: Add compost, well-rotted manure, or organic matter to improve texture and fertility.
  4. Test and adjust pH: Most flowers prefer a slightly acidic to neutral pH (6.0–7.0).

Pro tip: Well-draining soil is essential. If your soil holds water, consider raised beds or amend it with sand and compost.


How to Plant Flowers (Step-by-Step)

Now, the fun part — planting your flowers!

Planting Seeds

  • Follow package instructions for spacing, depth, and sun exposure.
  • Sow directly in the ground after the last frost or start indoors earlier.
  • Keep soil moist during germination.

Planting Seedlings or Potted Flowers

  1. Dig a hole twice as wide and just as deep as the plant’s root ball.
  2. Gently remove the plant from its container, teasing out roots if they’re compacted.
  3. Place the plant in the hole at the same depth it was growing in its pot.
  4. Fill the hole with soil, gently firming around the base.
  5. Water thoroughly to settle the soil.

How to Care for Your Flower Garden

Flowers need ongoing care to stay healthy and vibrant. Here’s how to keep them thriving:

Watering

  • Water newly planted flowers daily until established.
  • Once established, water deeply but less frequently.
  • Early morning or evening watering is best to reduce evaporation.

Mulching

  • Apply a 2–3 inch layer of organic mulch around plants.
  • Retains moisture, suppresses weeds, and keeps soil cool.

Deadheading

  • Remove spent blooms to encourage continuous flowering.
  • Prevents plants from going to seed and keeps your garden tidy.

Fertilizing

  • Use a balanced, slow-release fertilizer at planting time.
  • Supplement with liquid fertilizer during peak blooming periods.

Attracting Pollinators to Your Garden

A vibrant flower garden isn’t just beautiful — it’s a haven for helpful insects.
To attract pollinators:

  • Choose nectar-rich flowers like Lavender, Bee Balm, Echinacea, and Zinnias
  • Avoid chemical pesticides
  • Provide a shallow water source for butterflies and bees

Dealing with Common Flower Garden Problems

Even the healthiest gardens can face challenges. Here’s how to tackle a few common issues:

  • Aphids: Spray plants with a mix of water and mild soap.
  • Powdery mildew: Improve air circulation and avoid overhead watering.
  • Snails/slugs: Hand-pick or use safe barriers like crushed eggshells.

Pro tip: Inspect your plants regularly to catch problems early.


Container Flower Gardening

No backyard? No problem! Flowers thrive in pots, too.

Tips for container flower gardens:

  • Use quality potting mix, not garden soil.
  • Ensure pots have drainage holes.
  • Group plants with similar light and water needs.
  • Fertilize more often, as nutrients leach out of containers faster.

Great container flowers: Petunias, Begonias, Geraniums, Lobelias


Seasonal Flower Garden Ideas

Keep your garden lively all year by planning for the seasons:

  • Spring: Daffodils, Tulips, Pansies
  • Summer: Zinnias, Marigolds, Sunflowers
  • Fall: Mums, Asters, Sedum
  • Winter (mild climates): Violas, Ornamental kale, Snapdragons

Final Thoughts

Creating a vibrant flower garden is one of the simplest joys in life. With a bit of care, the right plant choices, and attention to your local climate, you’ll be rewarded with a colorful, fragrant, and lively outdoor space.

Whether you’re planting a sprawling backyard bed, a cozy balcony display, or a mix of pots by the front door — flowers will brighten your home and your mood. So grab those gardening gloves, pick out your favorite blooms, and start planting your dream flower garden today!

How to Plant Dill in Your Herb Garden: A Complete, Easy-to-Follow Guide

How to Plant Dill in Your Herb Garden: A Complete, Easy-to-Follow Guide

Fresh, fragrant, and wonderfully versatile — dill is one of those herbs every home gardener should grow. Whether you’re using it to flavor pickles, fish dishes, or summer salads, there’s nothing quite like the taste of freshly picked dill from your own garden.

The best part? Dill is easy to grow, thrives in most gardens, and practically takes care of itself once it gets started. If you’ve ever wondered how to successfully plant and care for dill, this guide has you covered from seed to harvest.


Why Grow Dill in Your Herb Garden?

Dill (Anethum graveolens) is an annual herb known for its feathery green leaves and aromatic seeds. It’s loved for both culinary and ornamental purposes — and it attracts beneficial pollinators like butterflies and bees.

Reasons to plant dill:

  • Quick-growing and beginner-friendly
  • Enhances dishes with a fresh, grassy flavor
  • Produces seeds and leaves for dual-purpose use
  • Attracts pollinators and beneficial insects
  • Acts as a companion plant, repelling certain pests

When to Plant Dill

Dill thrives in warm weather and grows best when direct-seeded into the garden after the danger of frost has passed.

  • Plant outdoors: Once soil temperatures reach 60–70°F (16–21°C)
  • In most regions, this means spring through early summer
  • Successive sowing every 2–3 weeks ensures a continuous harvest

Pro tip: Dill doesn’t transplant well due to its long taproot, so it’s best sown directly into its final growing spot.


Choosing the Right Spot

Dill is fairly adaptable but prefers certain conditions to flourish.

Ideal growing conditions:

  • Full sun — at least 6–8 hours daily
  • Well-draining soil with a slightly acidic to neutral pH (6.0–7.5)
  • Sheltered location if your garden is windy, as dill’s tall stems can topple over

Companion planting:
Dill pairs well with cabbage, onions, cucumbers, lettuce, and asparagus, but keep it away from carrots as it can stunt their growth.


How to Prepare the Soil

Like most herbs, dill appreciates fertile but well-drained soil.

Soil preparation steps:

  1. Loosen the soil to a depth of 8–12 inches
  2. Remove rocks, debris, and weeds
  3. Work in compost or aged manure to enrich the soil
  4. Mix in a balanced, all-purpose organic fertilizer if needed

Pro tip: Avoid overly rich soil or excessive fertilizer, as it can lead to lush foliage but weaker flavor.


How to Plant Dill Seeds

Dill is one of the simplest herbs to start from seed.

Planting steps:

  1. Sow seeds ¼ inch deep directly in the soil
  2. Space seeds about 12 inches apart (or thin later)
  3. Cover lightly with soil and gently water

Watering:
Keep soil evenly moist during germination, which usually takes 7–14 days

Succession planting:
To ensure a steady supply of fresh leaves, sow new seeds every 2–3 weeks until midsummer.


Caring for Your Dill Plants

Once your dill seedlings have emerged, they require minimal care.

Watering

  • Water regularly to keep the soil lightly moist but not waterlogged
  • Avoid letting the soil dry out completely during hot weather
  • Water at the base to prevent mildew on foliage

Thinning

When plants are about 3–4 inches tall, thin them to 12–18 inches apart to allow good air circulation and strong growth.

Mulching

Apply a thin layer of organic mulch like straw or shredded leaves to:

  • Retain soil moisture
  • Suppress weeds
  • Keep roots cool

Fertilizing

If soil is moderately fertile, dill won’t need extra feeding. In poor soil, use a diluted balanced liquid fertilizer once or twice during the growing season.


Attracting Pollinators

Dill’s small, umbrella-shaped yellow flowers attract beneficial insects:

  • Bees
  • Ladybugs
  • Lacewings
  • Swallowtail butterflies (they often lay their eggs on dill)

This makes dill a valuable addition to pollinator-friendly herb gardens.


Harvesting Dill

You can harvest both the leaves (dill weed) and seeds from the same plant.

Harvesting Leaves

  • Begin harvesting leaves when plants reach 6–8 inches tall
  • Snip leaves in the morning when oils are most concentrated
  • Use fresh for the best flavor or dry/freeze for later

Pro tip: Regular harvesting encourages bushier growth.

Harvesting Dill Seeds

  • Allow plants to flower and form seed heads
  • When seed heads turn brown and dry, cut them off
  • Place seed heads in a paper bag, hang upside down, and let seeds fall as they dry
  • Store in an airtight container for pickling or seasoning

How to Keep Dill From Bolting

In hot weather, dill quickly flowers (bolts) and turns bitter.

To prevent premature bolting:

  • Keep soil consistently moist
  • Provide light afternoon shade in hot climates
  • Use succession planting to ensure fresh, tender growth all season

Companion Planting Benefits

Dill is an excellent companion herb for several vegetables:

  • Cabbage family plants: Repels cabbage worms
  • Cucumbers: Attracts pollinators and improves growth
  • Lettuce: Deters aphids and improves flavor
  • Asparagus: Attracts beneficial insects

Avoid planting near carrots and tomatoes, as dill can inhibit their growth or seed too readily among them.


Common Pests and Problems

Dill is relatively pest-free, but here’s what to watch out for:

  • Aphids: Can cluster on tender leaves; treat with insecticidal soap
  • Caterpillars (Swallowtail butterfly larvae): Harmless and beneficial, but if you want to keep foliage for yourself, gently relocate them
  • Powdery mildew: Avoid overhead watering and ensure good air circulation

Using Fresh Dill in the Kitchen

Freshly picked dill enhances countless recipes:

  • Chopped over grilled fish or salmon
  • Mixed into yogurt or sour cream dips
  • Tossed with new potatoes and butter
  • Added to pickles, salads, and dressings
  • Baked into breads and herb butters

Final Thoughts

Growing dill in your herb garden is one of the easiest and most rewarding choices you can make. It’s fast-growing, flavorful, beautiful, and beneficial to the garden ecosystem. With just a bit of sunshine, regular watering, and occasional harvesting, you’ll enjoy a continuous supply of this fragrant herb all season long.

Whether you’re a culinary enthusiast, a beginner gardener, or someone looking to attract more pollinators, dill is a must-have addition to your garden beds or containers.

How to Plant Daffodil Bulbs for Spring Blooms: A Complete Guide

How to Plant Daffodil Bulbs for Spring Blooms: A Complete Guide

Is there anything more uplifting than the sight of bright yellow daffodils signaling the arrival of spring? These cheerful, trumpet-shaped flowers are among the earliest bloomers, offering a burst of color when gardens need it most. The good news is — daffodils are easy to plant, incredibly resilient, and require minimal care once established.

In this detailed guide, you’ll learn how to plant daffodil bulbs for glorious spring blooms, including choosing the best bulbs, ideal planting times, soil preparation, planting techniques, and expert care tips.


Why Plant Daffodils?

Daffodils (Narcissus spp.) are beloved for their bright, sunny appearance and are one of the most dependable spring perennials. Here’s why you should include them in your garden:

  • Easy to grow and low maintenance
  • Deer and rodent resistant
  • Naturalizes well (multiplies and returns year after year)
  • Available in a variety of colors — classic yellow, white, peach, and even pink
  • Perfect for borders, flower beds, containers, and naturalized meadows

When to Plant Daffodil Bulbs

Timing is crucial for successful blooms.
Daffodil bulbs need a chilling period to develop roots and flower properly in spring.

  • Best time to plant: Fall, about 2–4 weeks before the ground freezes
  • In most regions, this means September to November
  • In warmer climates (zones 8–10), refrigerate bulbs for 6–8 weeks before planting

Pro tip: The soil temperature should be around 60°F (15°C) or lower at planting time.


Choosing the Best Daffodil Bulbs

Healthy bulbs = healthy blooms.
When shopping for daffodil bulbs:

  • Choose firm, plump bulbs without soft spots, mold, or signs of disease.
  • Bigger bulbs generally produce stronger flowers.
  • Pick varieties based on bloom time (early, mid, or late spring) and color preference.

Popular daffodil varieties:

  • King Alfred — classic large yellow
  • Tête-à-Tête — charming dwarf variety
  • Ice Follies — white petals with a soft yellow cup
  • Thalia — elegant white blooms
  • Pink Charm — blush-pink centers with white petals

Where to Plant Daffodils

Daffodils are versatile and can thrive in a variety of garden settings.
For best results:

  • Choose a spot with full to partial sun (at least 6 hours daily)
  • Ensure well-draining soil — daffodils don’t like wet feet
  • Ideal for:
    • Flower beds
    • Borders
    • Under deciduous trees (they bloom before trees leaf out)
    • Along fences and walkways
    • Containers and window boxes

How to Prepare the Soil

Well-prepared soil sets the foundation for strong roots and healthy blooms.

Soil preparation steps:

  1. Loosen the soil to a depth of 12 inches
  2. Remove rocks, weeds, and debris
  3. Mix in compost, well-rotted manure, or peat moss to improve drainage and fertility
  4. Add a balanced bulb fertilizer or bone meal at planting time

Soil pH:
Daffodils prefer slightly acidic to neutral soil (pH 6.0–7.0)


How to Plant Daffodil Bulbs

Spacing and Depth

  • Plant bulbs 6 inches deep (about 2–3 times the bulb’s height)
  • Space bulbs 3–6 inches apart for a natural, clustered look or denser displays

Planting Tips:

  • Plant with the pointy end facing up and the flat, root end down.
  • If unsure, plant bulbs sideways — they’ll find their way up.
  • Water thoroughly after planting to settle the soil.

Pro tip: Plant in odd numbers (3, 5, 7) for a natural, informal look.


Watering and Mulching

  • After planting, water thoroughly
  • Keep soil lightly moist (not soggy) through fall and winter if rainfall is scarce
  • Once established, daffodils are fairly drought tolerant

Mulching:

  • Apply a 2–3 inch layer of mulch (straw, leaves, or shredded bark) after planting to:
    • Conserve soil moisture
    • Regulate soil temperature
    • Protect bulbs from extreme winter cold

Daffodil Care After Planting

Once your daffodils sprout and bloom in spring:

  • Water during dry spells while the foliage is green
  • Deadhead spent flowers to direct energy back to the bulb
  • Allow the foliage to die back naturally — this is essential for storing energy for next year’s bloom
  • Don’t cut or tie leaves until they turn yellow and wither

Fertilizing:

  • Apply a low-nitrogen, high-potassium bulb fertilizer in early spring when shoots appear
  • Repeat after blooming to encourage strong bulbs for next year

Common Pests and Problems

Daffodils are naturally resistant to most pests and diseases, but here’s what to watch for:

  • Bulb rot — caused by poor drainage; always plant in well-drained soil
  • Narcissus fly — larvae feed on bulbs; dig up and discard affected bulbs
  • Aphids — can transmit viruses; treat with insecticidal soap if needed

Lifting and Dividing Daffodil Bulbs

After several years, daffodil clumps may become overcrowded and produce fewer flowers.

When to lift and divide:

  • Wait until 6–8 weeks after flowering when the foliage has died down
  • Gently lift bulbs with a garden fork
  • Separate offsets (baby bulbs) and replant them at the recommended depth and spacing

Pro tip: It may take a season or two for offsets to reach flowering size.


Creative Ways to Use Daffodils in the Garden

Daffodils aren’t just for flower beds!
Here are a few charming ideas:

  • Plant around mailboxes, tree bases, or garden statues
  • Create a drift of daffodils in a naturalized lawn setting
  • Pair with tulips, hyacinths, and crocuses for a layered spring display
  • Use in window boxes or containers for balconies and patios
  • Mix different varieties for a continuous bloom succession

Final Thoughts

Learning how to plant daffodil bulbs for spring blooms is one of the simplest yet most rewarding gardening projects you can undertake. Their cheerful faces signal the end of winter and the promise of warmer, brighter days ahead.

With the right planting time, location, and care, you’ll enjoy a gorgeous display of daffodils that not only light up your garden but also return year after year with little effort.

So this fall, grab your favorite daffodil varieties, dig in, and look forward to a spectacular splash of color come springtime!